为 TeamCity 配置 VCS Post-Commit 钩子
TeamCity 定期轮询每个活动的 VCS root 所指向的远程库,以检测新的更改。 如果您的安装有数百个 VCS 根,这种连续的轮询可能会对服务器造成很大的负载。
您可以设置 post-commit 钩子以减轻这种负担并加快检测新的更改。 在这种情况下,每当有新的提交推送到远程仓库时,VCS 提供商会立即向 TeamCity 发送请求,检查最近的更改。
概述
常见的提交挂钩信息
提交挂钩利用 TeamCity REST API 向 TeamCity 服务器发布命令。 推荐的后提交钩子方法是发出命令来检查是否有新的提交被推送到远程仓库。 为了实现这一点,webhook 应该向 /app/rest/vcs-root-instances 端点发送 POST 请求:
TeamCityServerURL是您的 TeamCity 服务器的 URL。vcsRootInstancesLocator是 定位器 ,指向由此构建配置使用的特定 VCS 根实例。
发送至 /app/rest/vcs-root-instances/commitHookNotification?locator 端点的请求并不会自动触发构建;它们只会强制 TeamCity 检查新的更改。 您可以配置 VCS 触发器 ,以便在检测到这些更改时启动构建。
如果您想要显式地排列新的构建,而不是检查更改并让 TeamCity 触发器初始化构建,那么请将请求直接发送到 /app/rest/buildQueue 端点。 参阅此文档文章以获取请求示例: Start and Cancel Builds。
实例定位器
vcsRootInstancesLocator 是一个过滤表达式,它找到所有需要检查版本库更改的构建配置的 VCS 根实例。 这个表达式应该定义一组特定的标准,以定位所需的根实例,并过滤掉所有其他的。 否则,如果您的定位器返回许多无关的实例,TeamCity将会发布过多的更改检查,增加服务器负载(在某些情况下,超出初始轮询负载)。
您可以通过其名称、唯一ID、父VCS根的名称、项目或构建配置等其他字段来查找所需的VCS根实例。 请参阅此文章,以获取您可以在此定位器中指定的完整尺寸列表: VcsRootInstanceLocator。
最可靠的定位器是使用仓库 URL 的定位器(因为它通常永远不会改变)。 VCS 根实例定位器不包含 URL 作为可用维度。 相反,您需要使用嵌套定位器来检查实例属性。 请注意,URL 的冒号和斜杠应该被转义。
要查看所有 VCS 根实例属性及其值,请使用路径定位器(使用 endpoint / value 而不是 endpoint?locator=value )和默认的 "ID" 维度请求一个实例。
这个请求将返回一个与以下类似的有效负载:
要获取内部实例 ID:
转到您的构建配置并打开 设置 选项卡。
复制 ID 属性值。
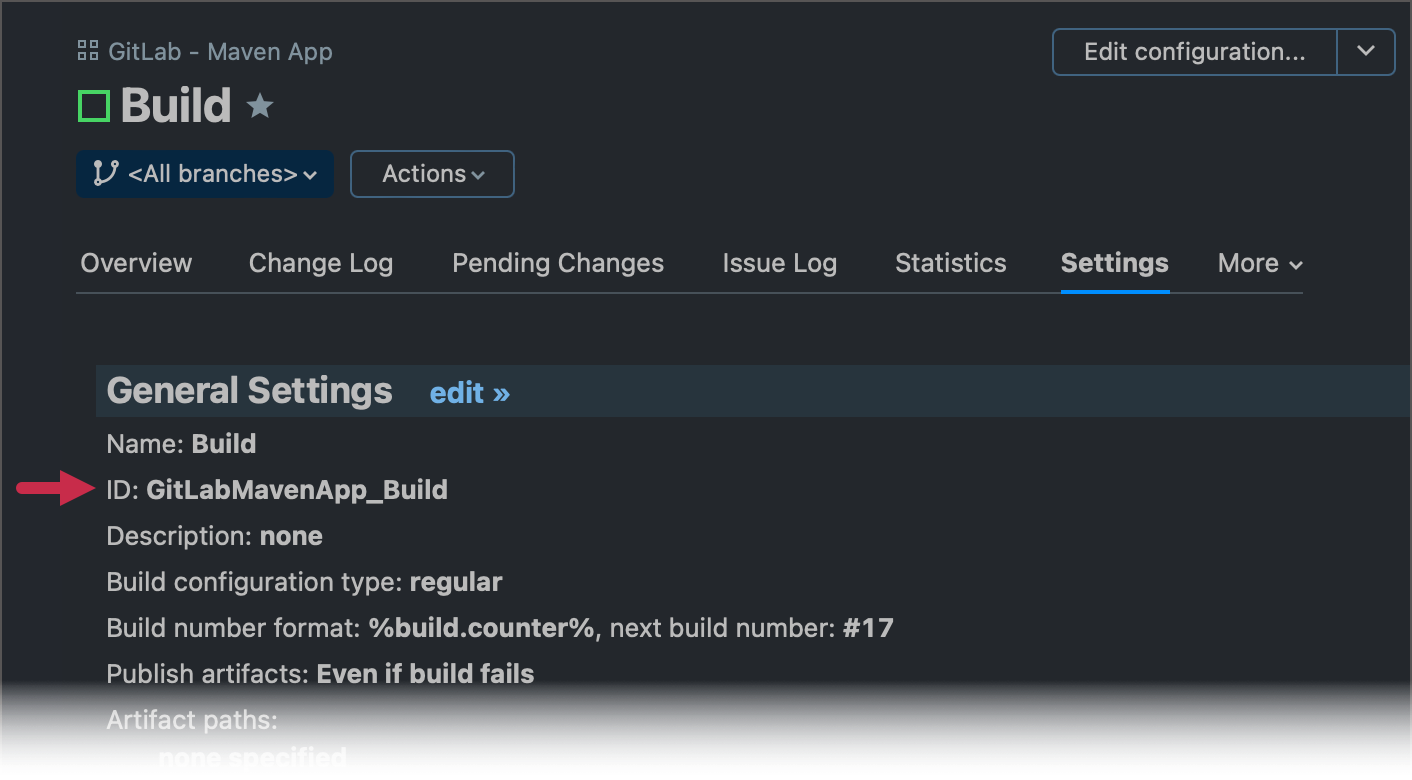
使用任何 REST API 测试工具,例如 Postman,发送以下请求。
/app/rest/vcs-root-instances?locator=buildType:<copied_value>您应该收到类似以下的回应:
<?xml version="1.0" encoding="UTF-8" standalone="yes"?> <vcs-root-instances count="1" href="/app/rest/vcs-root-instances?locator=buildType:GitLabMavenApp_Build"> <vcs-root-instance id="87" vcs-root-id="GitLabMavenApp_HttpsGitlabComUsernameReponameGitRefsHeadsMain" name="https://gitlab.com/username/reponame.git#refs/heads/main" href="/app/rest/vcs-root-instances/id:87"/> </vcs-root-instances>{ "count": 1, "href": "/app/rest/vcs-root-instances?locator=buildType:GitLabMavenApp_Build", "vcs-root-instance": [ { "id": "87", "vcs-root-id": "GitLabMavenApp_HttpsGitlabComUsernameReponameGitRefsHeadsMain", "name": "https://gitlab.com/username/reponame.git#refs/heads/main", "href": "/app/rest/vcs-root-instances/id:87" } ] }在上述示例响应中,构建配置使用的 VCS 根实例的唯一 ID 是 "87"。
定位器可以包含多个维度,这允许您指定多个过滤条件。 例如:
此定位器找到特定VCS根的所有实例。 count 维度将返回实例的最大数量提高到给定值(默认限制是 100 个条目)。
对于没有 *-引用 参数的 VCS 根,您可以使用以下选项以获得更好的性能:
身份验证
出于安全原因,TeamCity 要求所有 REST API 调用进行身份验证。 某些 VCS 提供商并未提供高级 webhook 设置以指定所需的认证方法(基本认证、令牌认证等等),只允许您输入请求目标 URL。 在这种情况下,请按照以下格式之一在URL中添加用户凭据:
username:password — 您用于登录 TeamCity 的常规凭据的组合。 需要在 管理 | 身份验证 中启用 "Basic HTTP" 模块。
username:PAT — 常规用户名和 个人访问令牌的组合。 需要在 管理 | 身份验证 中启用 "Token-Based Authentication" 模块。
请求应使用具有“查看项目和所有父项目”及“查看构建配置设置”权限的用户的凭据,适用于定义了 VCS root 的所有项目。
如果出现身份验证问题,请导航到 管理 | 诊断 并在 故障排查 部分选择"debug-auth"预设。 您可以随后查看 TeamCity_Folder / logs / teamcity-auth.log 文件,以查看详细的问题信息。
使用配置的钩子进行仓库轮询
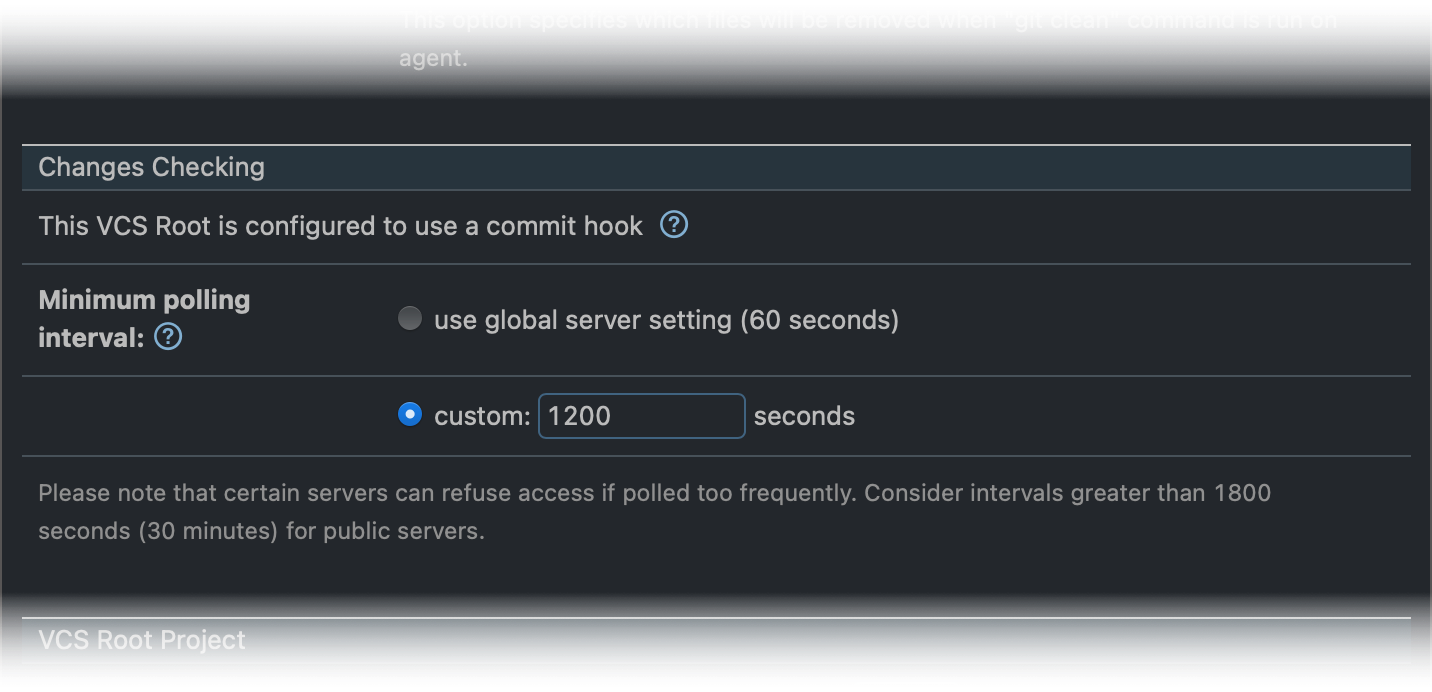
已配置提交钩子的项目仍会轮询其远程存储库,作为钩子停止工作时的备份机制。 然而,每次成功的 hook 通信,轮询间隔会自动翻倍。 TeamCity 将此间隔增加到的最大值是 4 小时,而最小间隔是 15 分钟。 如果定时轮询揭示了没有触发提交钩子的更改,TeamCity 将会将轮询间隔重置为默认值。
要检查当前轮询间隔和提交钩子状态,请导航到 管理 | <Your_Project> | <Your_Build_Configuration> | 版本控制设置。
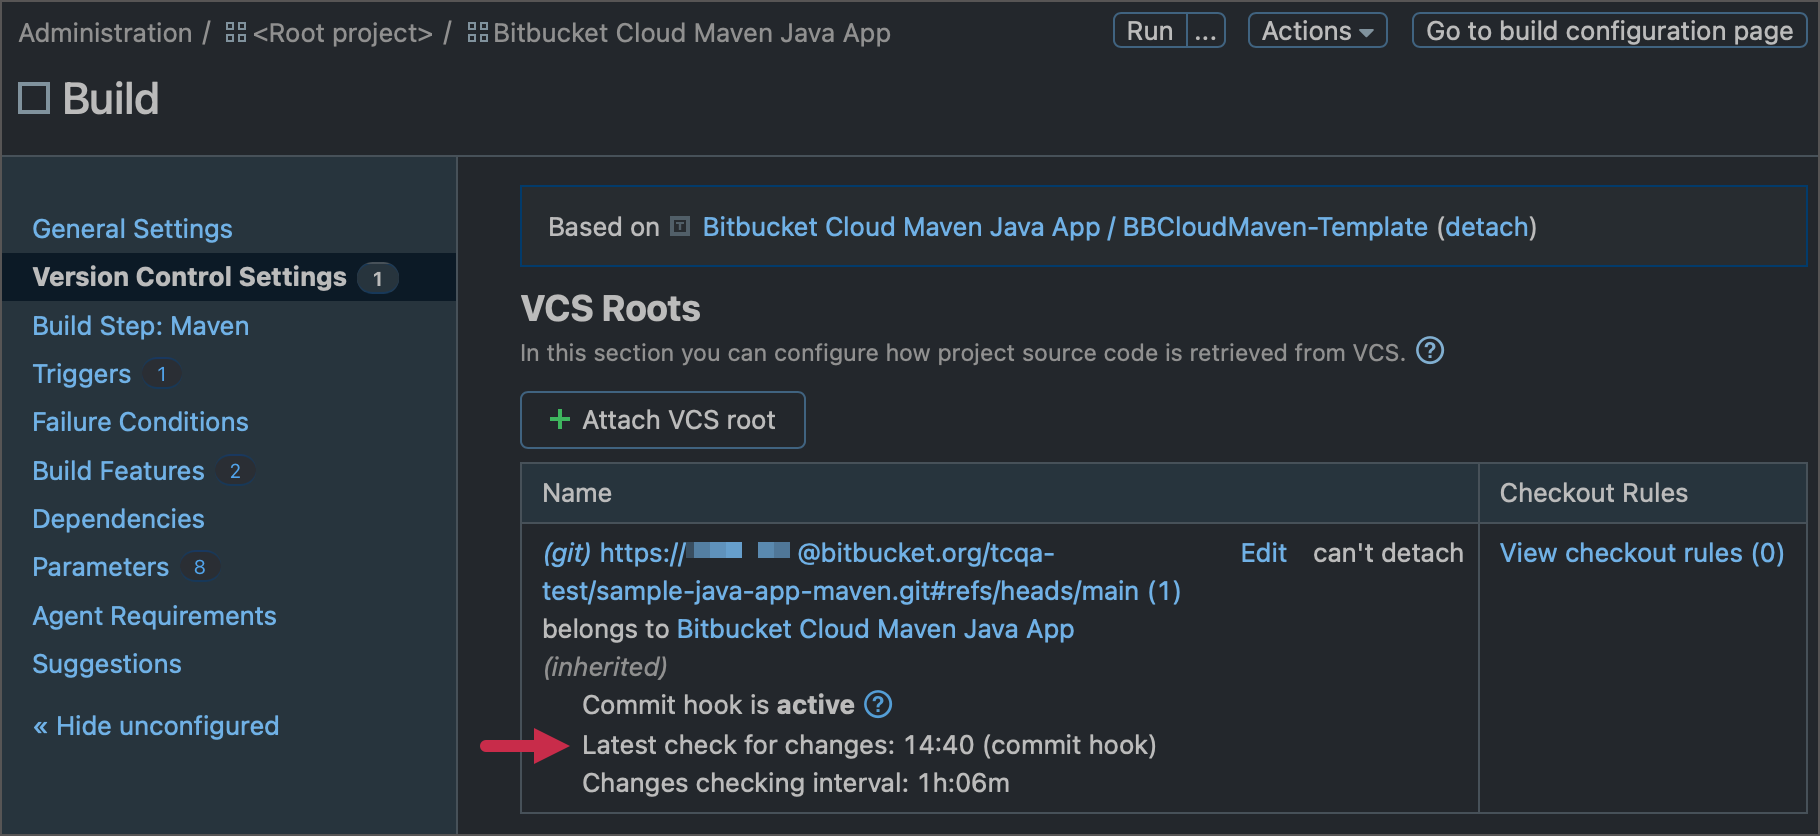
要为 最小轮询间隔设置自定义值,请导航到 VCS 根设置并向下滚动到 更改检查 部分。
设置 Post-Commit 钩子
本节解释如何为允许无缝webhook实现并且不需要编写您自己的 post-commit 脚本的 VCS 提供商设置钩子。
GitHub 和 GitHub Enterprise
如果您通过 GitHub Apps 配置了与 GitHub 或 GitHub Enterprise 的连接,您可以直接在连接属性中设置 post-commit 钩子。
在配置 GitHub App 连接时,请根据 TeamCity 的指示,使用给定的 URL 创建一个 GitHub App webhook。
在 GitHub App 配置页面上设置一个 webhook 密钥,并将相同的值粘贴到 TeamCity 连接设置对话框中。
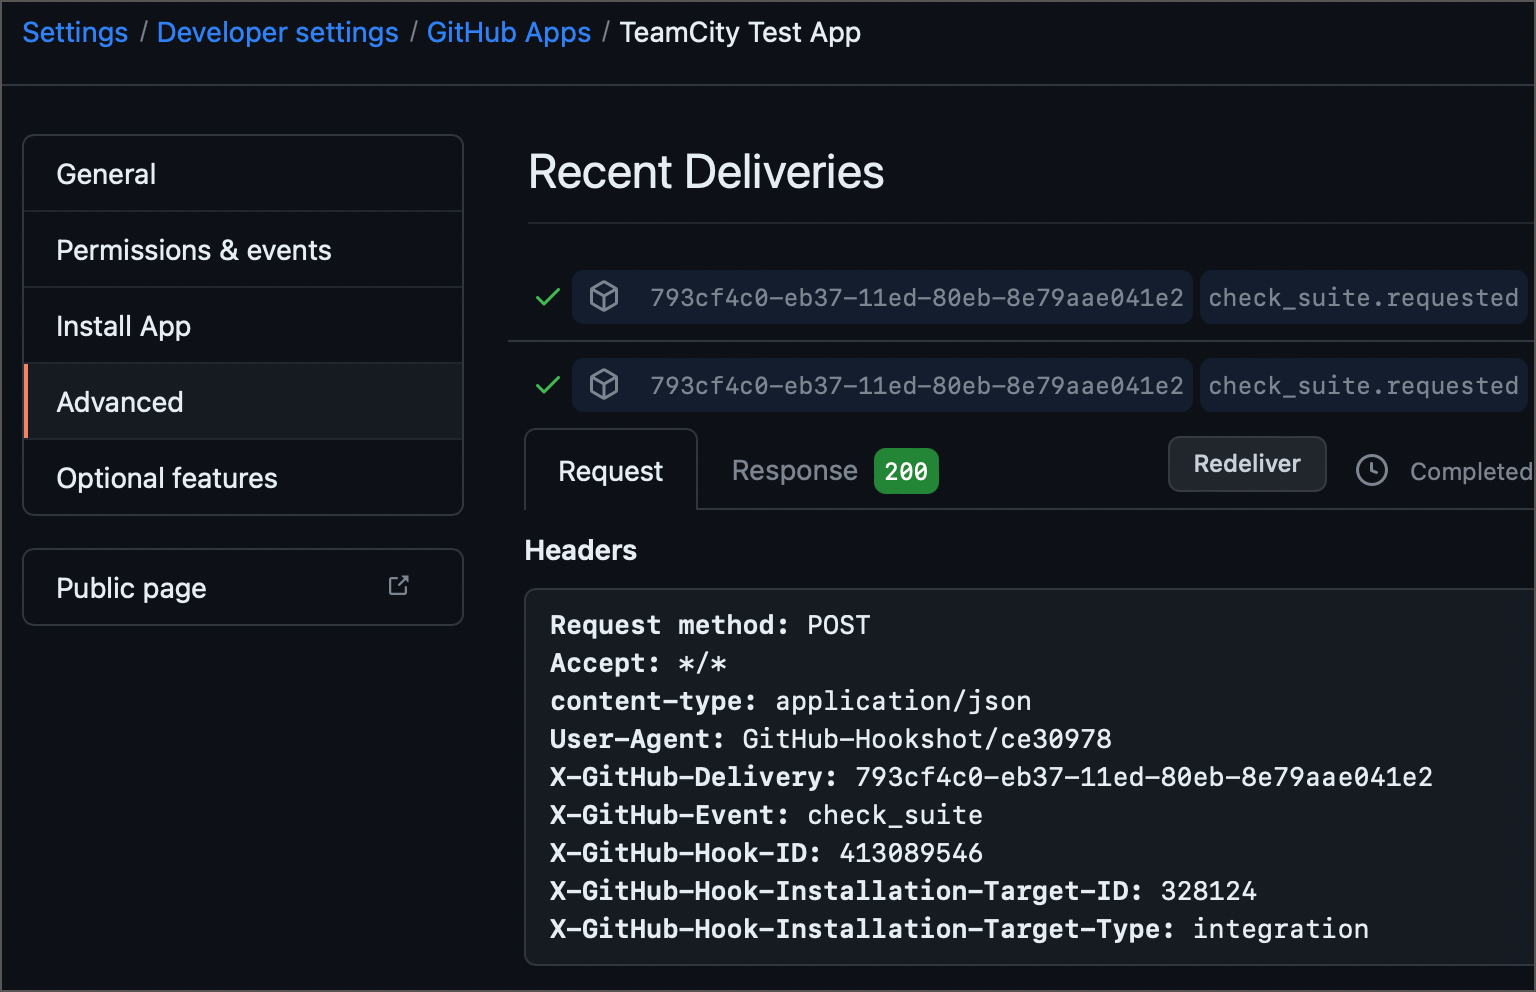
将测试提交推送到 GitHub 仓库,以检查 TeamCity 是否收到更新通知。 您可以在 "GitHub App | 设置 | 高级" 页面上查看已发送的更新通知和 TeamCity 的回应。
另一种方法是利用 GitHub Checks Webhook 触发器 ,该触发器利用 GitHub check run API在每次提交时触发新的 TeamCity 构建。 此触发器还可替代 Commit Status Publisher 构建功能。
GitLab
在您的 GitLab 服务器上导航至所需的远程存储库。
点击 GitLab 侧边栏中的 设置 | Webhooks。
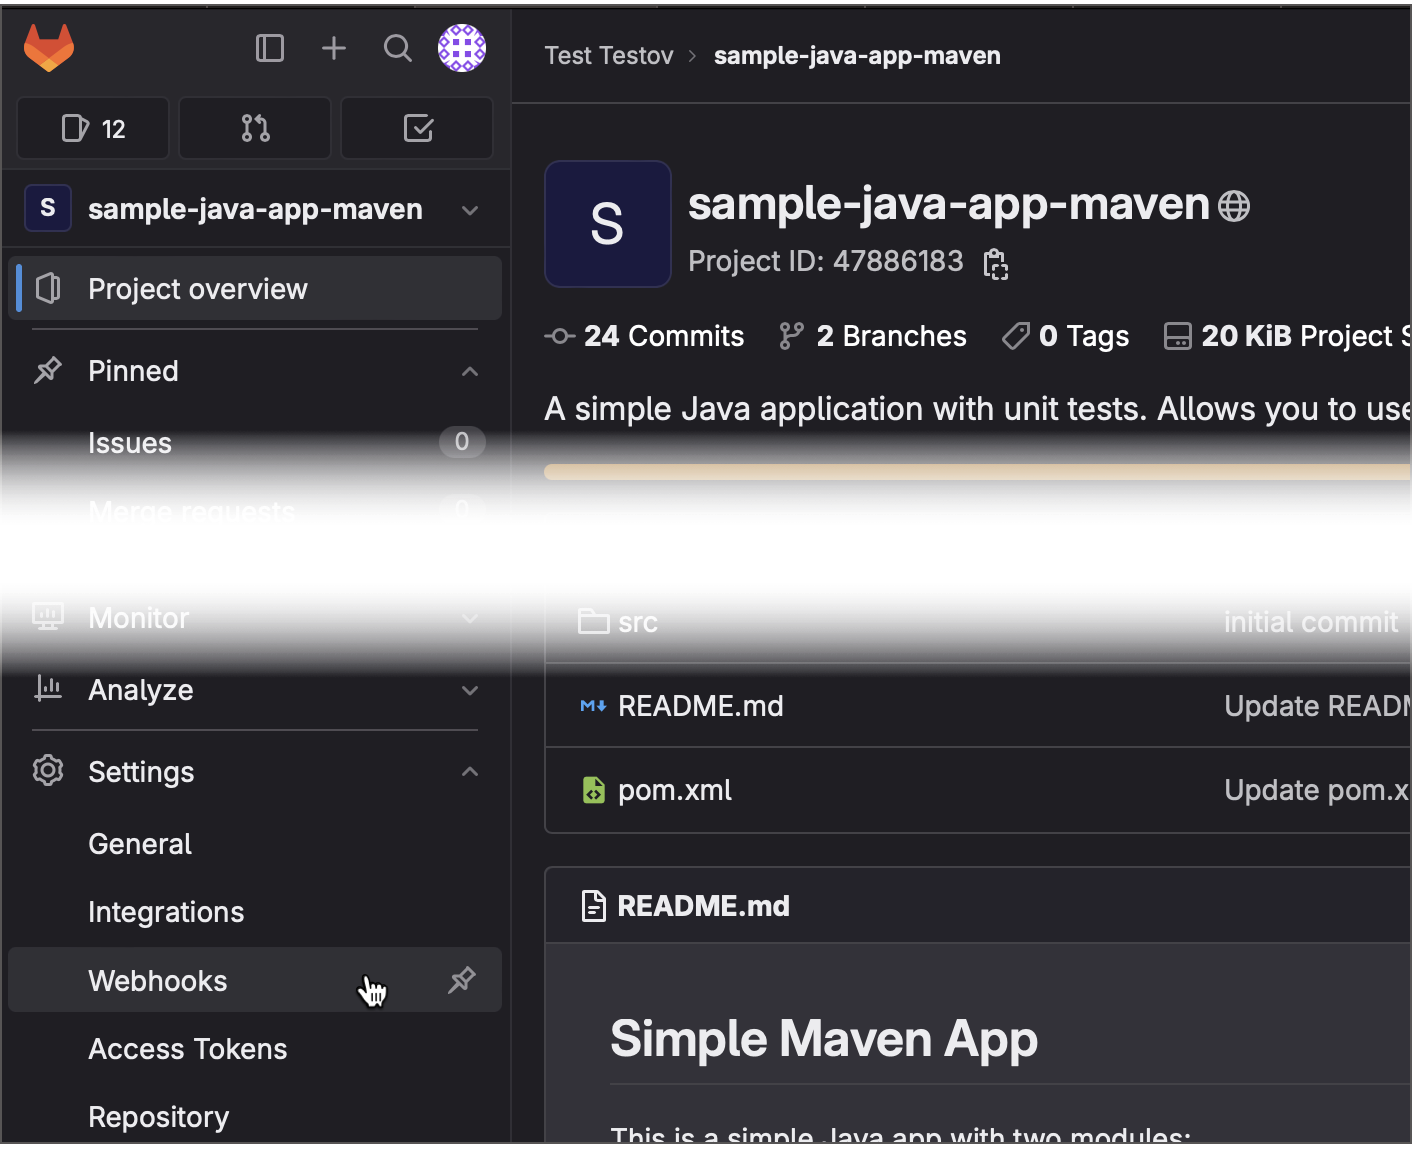
点击 添加新 webhook。
指定 webhook 应向其发送
POST请求的 URL。 按照 身份验证 部分所描述的,包括用户名和密码 / PAT。 例如:http://valravn:querty@myteamcityfarm.build.gg/app/rest/vcs-root-instances/commitHookNotification?locator=87在"触发器"部分下勾选 推送事件。
点击 添加 webhook 以保存您的新 webhook。
推送一个新的提交以测试钩子。 您应该能够在 TeamCity 构建配置的 待处理的更改 选项卡中看到您的提交。
GitLab 还允许您在 存储库设置 | 集成 页面上设置与 JetBrains TeamCity 的集成。 这个集成将请求发送到 /app/rest/buildQueue 端点,所以,它不是发出"检查更改"的请求,而是在推送新的提交或创建新的合并请求时,明确地将新的 TeamCity 构建排入队列。
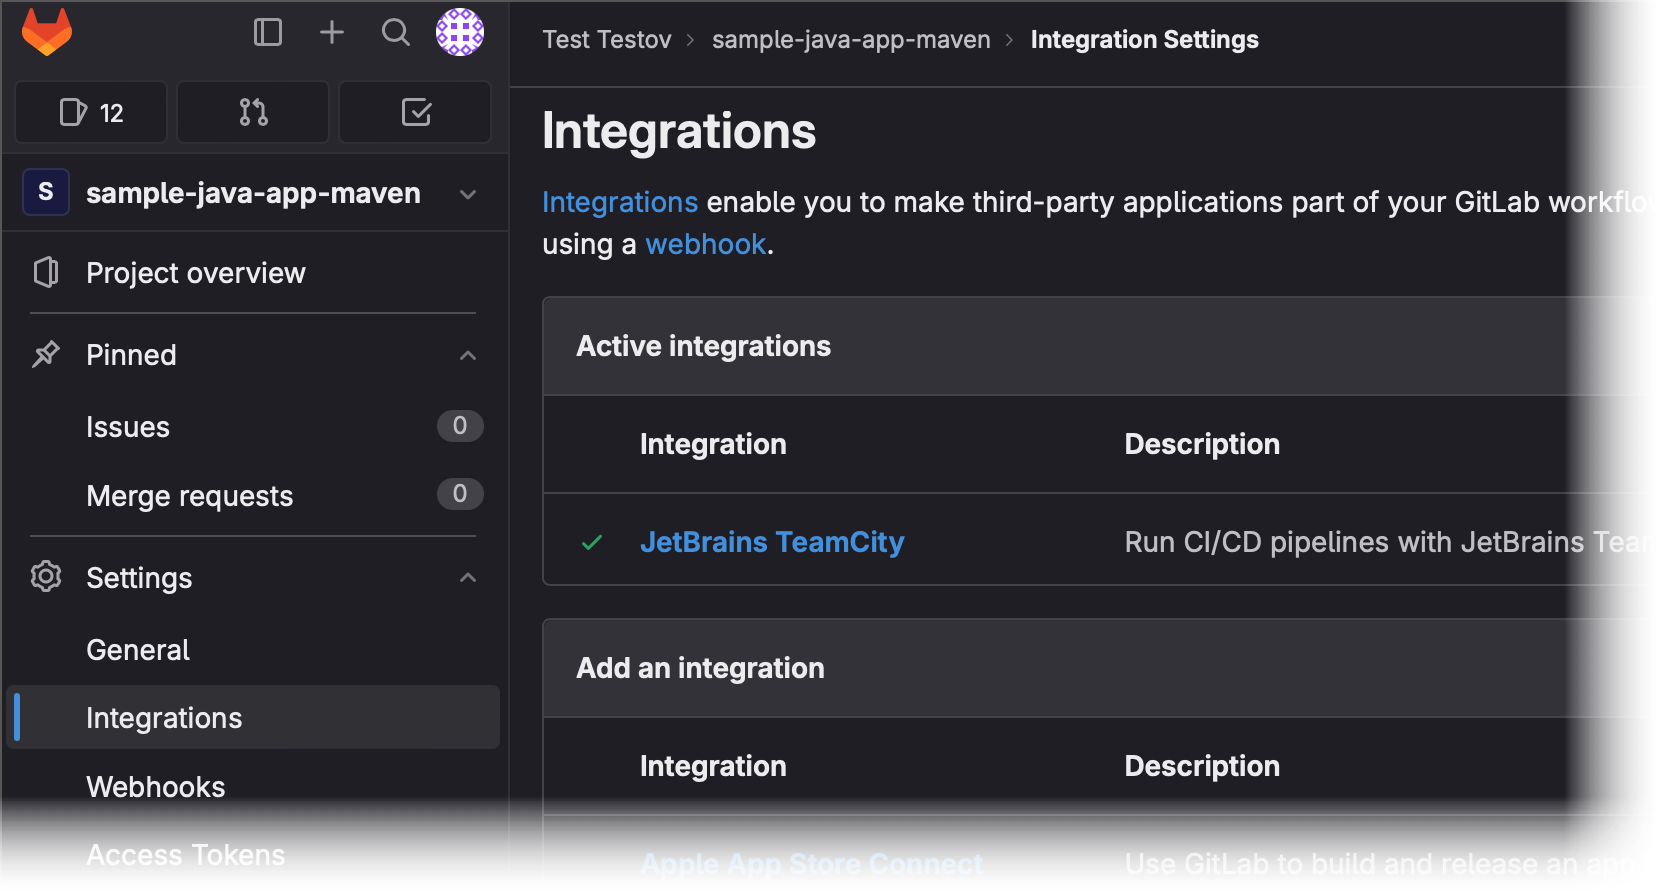
为了设置这个集成,您需要指定 TeamCity URL(去掉 /app/rest/... 后缀),构建配置 ID,以及 TeamCity 用户凭证。
Bitbucket
您可以在 Bitbucket Cloud 、 Bitbucket Server 和 Bitbucket Data Center 中利用此方法。
前往应该发送更新通知的远程仓库。
导航到 Webhook 页面。
在侧边栏菜单中,点击 存储库设置 | Webhooks。
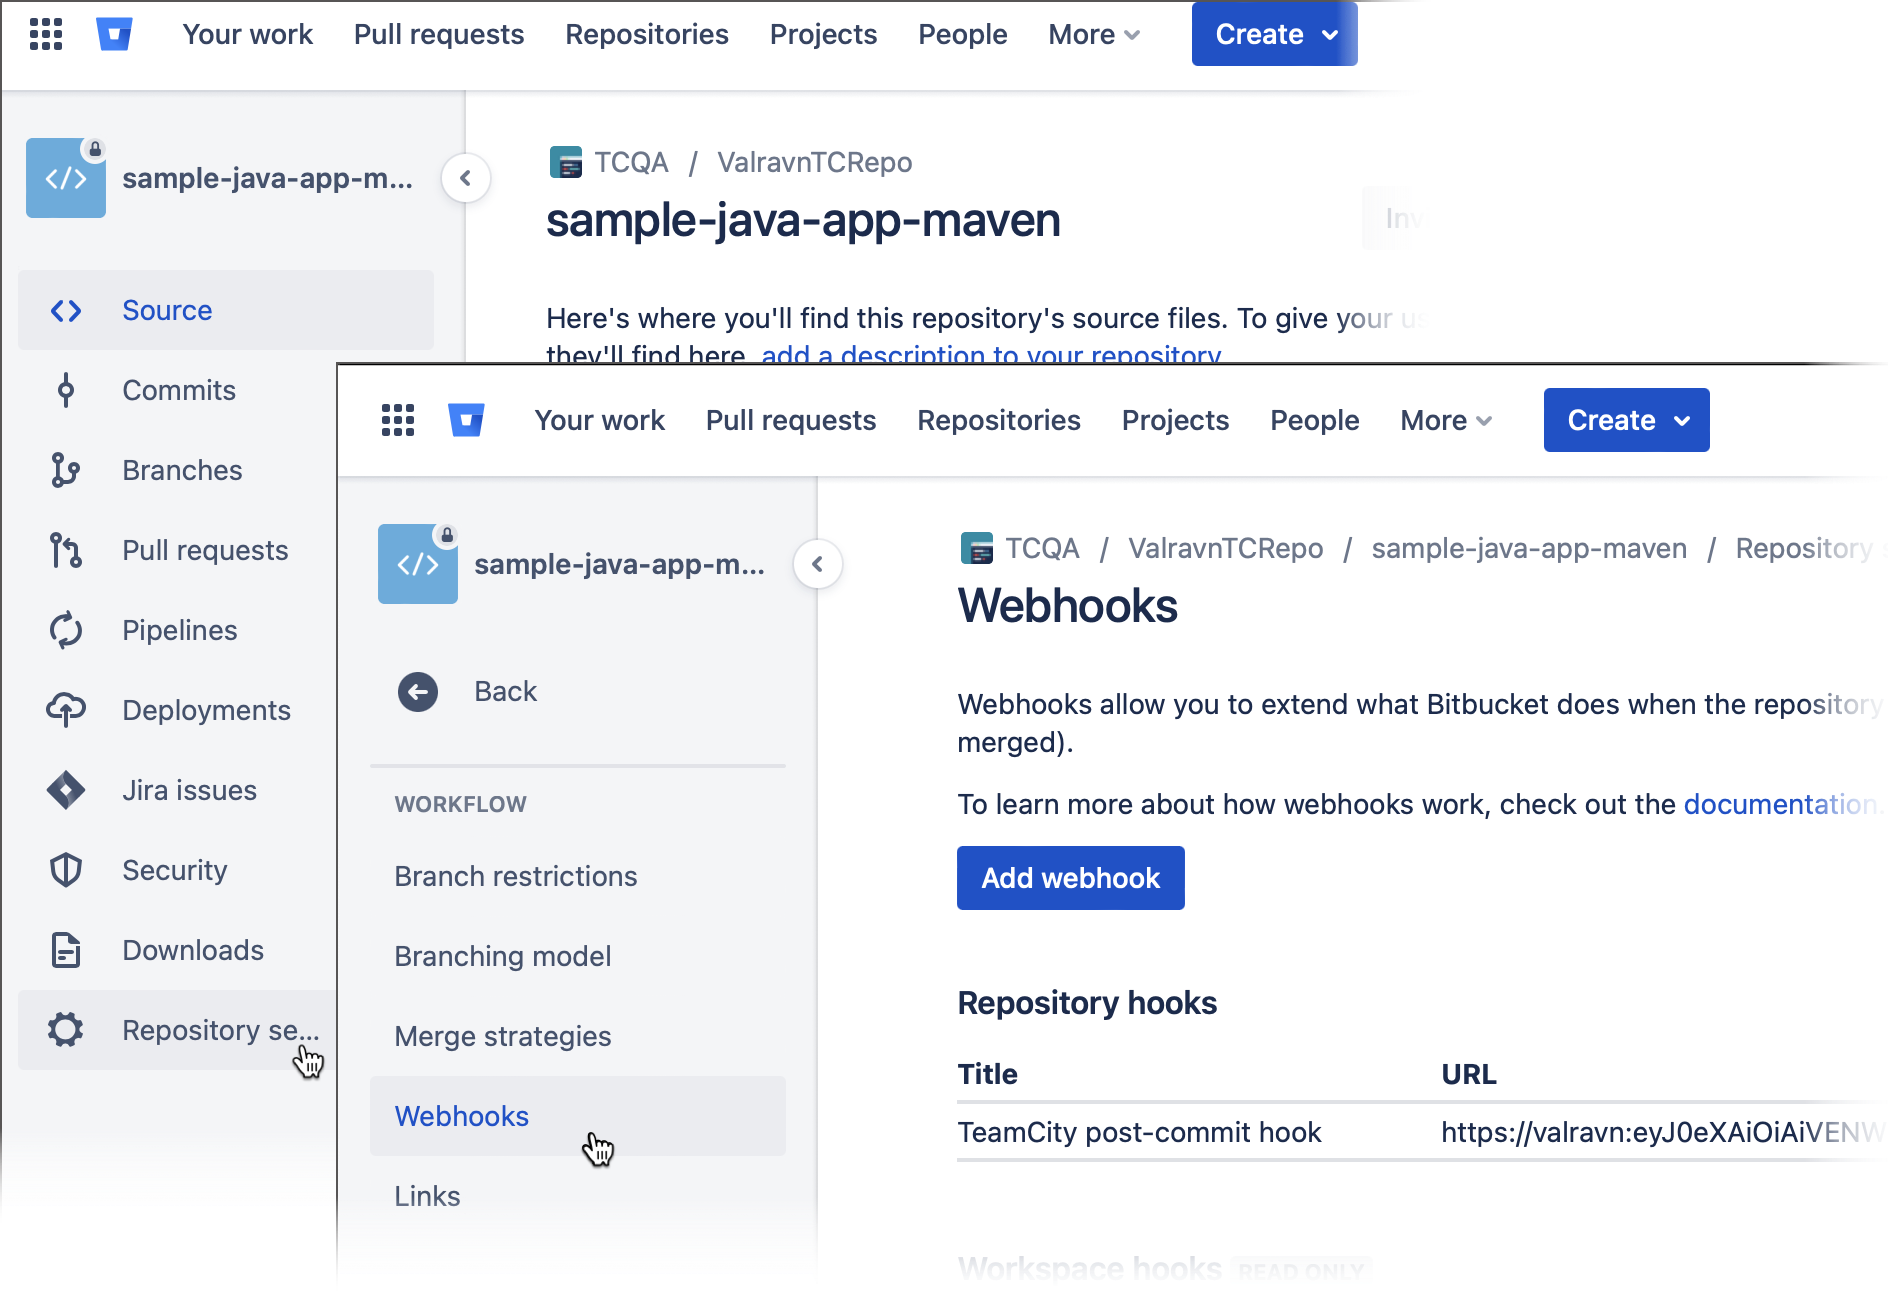
在侧边栏菜单中,点击齿轮图标并选择 Webhook。
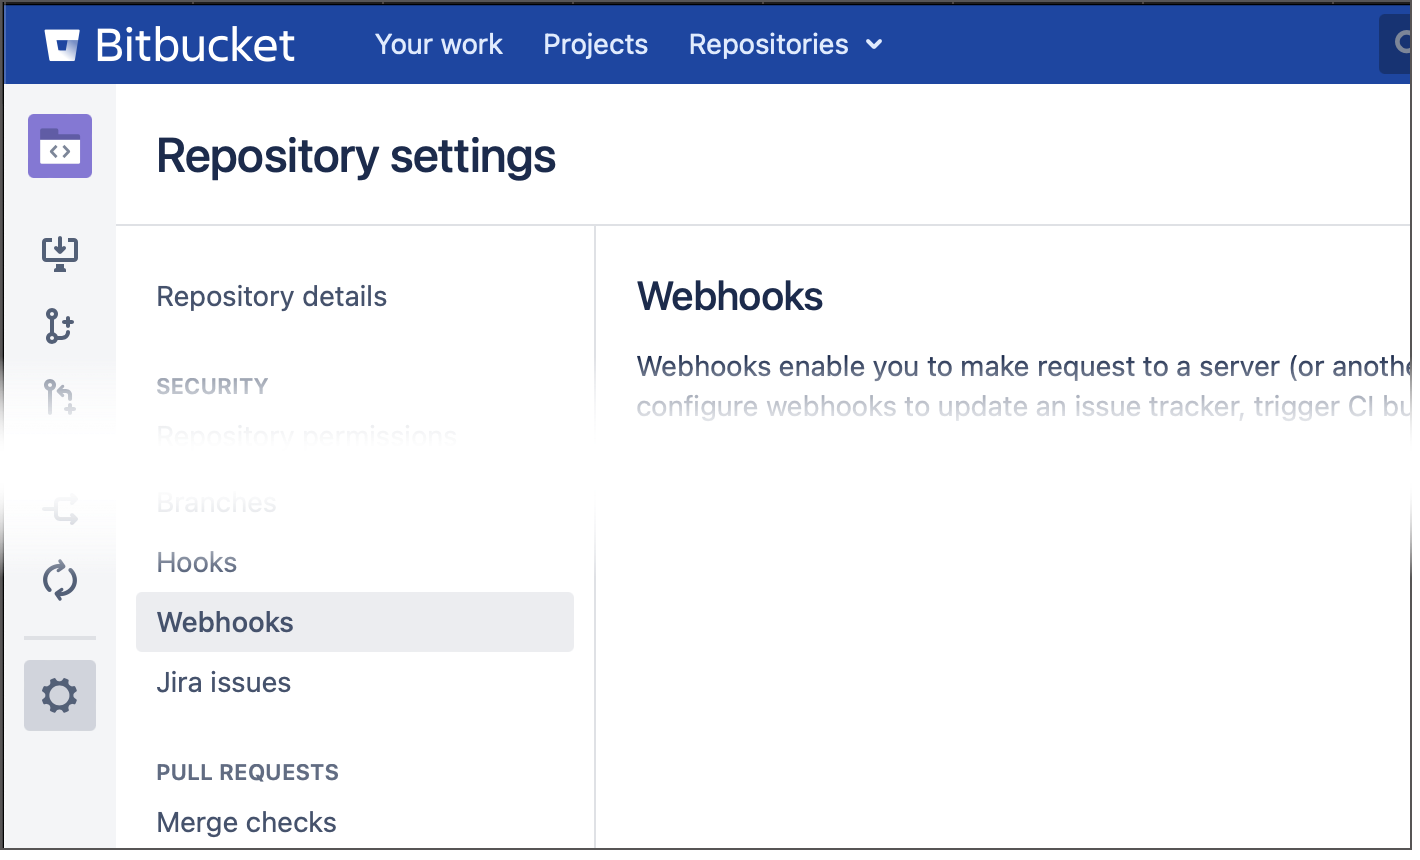
点击 创建/添加 Webhook。
指定 webhook 名称,并在"触发器"或"事件"部分下勾选 推送。
指定 Bitbucket 应将
POST请求发送到的 URL 以触发 TeamCity 更新检查。 按照 身份验证 部分所述,在 URL 中包含用户凭证。 例如:https://valravn:querty@mybuildfarm.gg/app/rest/vcs-root-instances/commitHookNotification?locator=id:34点击 保存 或 创建 以保存您的新 webhook。
推送一个样本提交以验证您的 webhook 是否成功发送请求。
Azure DevOps Server
最新的 Azure DevOps Server(前身为 Team Foundation Server)和 Azure DevOps Services 为代码提交事件提供了服务挂钩。 要创建一个钩子,请执行以下步骤:
在网页访问中打开团队项目的管理员页面。
通过运行向导来创建一个订阅。
选择 "Web Hooks" 服务进行集成。
选择 "Code checked in" 事件并指定一个过滤器。
在格式中填写 TeamCity 用户名、密码和服务器 URL:
"$SERVER/app/rest/vcs-root-instances/commitHookNotification?locator=$LOCATOR"$LOCATOR值取决于 TFS 仓库类型。vcsRoot:(type:tfs,count:99999),property:(name:tfs-url,value:<TFS server url>,matchType:equals,ignoreCase:true),property:(name:tfs-root,value:<TFS project>,matchType:contains,ignoreCase:true),count:99999在这里,
<TFS server url>必须替换为在 Azure DevOps VCS root URL 和 path 属性中指定的值。 例如:http://teamcity/app/rest/vcs-root-instances/commitHookNotification?locator=vcsRoot:(type:tfs,count:99999),property:(name:tfs-url,value:http%3A%2F%2Ftfs%3Aport%2Ftfs%2Fcollection,matchType:equals,ignoreCase:true),property:(name:tfs-root,value:Project,matchType:contains,ignoreCase:true),count:99999vcsRoot:(type:jetbrains.git,count:99999),property:(name:url,value:<VCS root repository URL>,matchType:equals,ignoreCase:true),count:99999在这里,
<VCS root repository URL>必须被替换成在相应的 TeamCity VCS 根中指定的仓库 URL,值应该是 URL-转码的。 示例:http://teamcity/app/rest/vcs-root-instances/commitHookNotification?locator=vcsRoot:(type:jetbrains.git,count:99999),property:(name:url,value:https%3A%2F%2Faccount.visualstudio.com%2FDefaultCollection%2FProject%2F_git%2FRepository,matchType:equals,ignoreCase:true),count:99999点击 完成 以创建服务钩子。
手动设置
如果一个仓库托管在一个没有提供现成的 webhook 设置工具的环境中,您可能需要手动实施它们。 该过程通常涉及以下步骤:
创建一个 script ,用于向所需的 TeamCity 端点发送 REST API 请求。
将此脚本保存在您的 VCS 服务器上。
编辑 VCS 服务器设置,以在每次推送新变更时执行此脚本。
通用 Post-Commit 钩子
将下方的脚本保存在 VCS 服务器上为 teamcity-trigger.sh (您将需要个人的 access token):
对于 Perforce,您可以使用这个 专用脚本。
根据您的 TeamCity 服务器设定变量。 用户必须具有在定义了 VCS 根的项目中的 " 查看构建配置设置 " 权限。 这个权限默认包含在项目开发者角色中。
Git 服务器
在目标 VCS 服务器上找到 Git 仓库的根目录。 它应该包含一些模板的
.git/hooks目录。创建带有一行的
.git/hooks/post-receive文件:/path/to/teamcity-trigger.sh 'vcsRoot:(type:jetbrains.git,count:99999),property:(name:url,value:<VCS root repository URL>,matchType:equals,ignoreCase:true),count:99999'在这里,
<VCS root repository URL>必须被替换成在相应的 TeamCity VCS 根中指定的仓库 URL,值应该是 URL-转码的。确保 Git 用户可以读取并执行
teamcity-trigger.sh和hooks/post-receive脚本。 您可能需要执行以下命令:chmod 755 /path/to/teamcity-trigger.sh /path/to/git_root/.git/hooks/post-receive
Mercurial 服务器
在目标 VCS 服务器上找到 Mercurial 仓库的根目录。
创建或编辑
.hg / hgrc 配置,并添加以下代码片段:[hooks] changegroup = /path/to/teamcity-trigger.sh 'vcsRoot:(type:mercurial,count:99999),property:(name:repositoryPath,value:<VCS root repository url>,matchType:equals,ignoreCase:true),count:99999'在这里,
<VCS root repository URL>必须被替换成在相应的 TeamCity VCS 根中指定的仓库 URL,值应该是 URL-转码的。确保
teamcity-trigger.sh是可执行的。 您可能需要执行以下命令:chmod 755 /path/to/teamcity-trigger.sh
Subversion 服务器
定位包含
db、钩子、锁定和其他目录的 Subversion 仓库根目录。 我们需要钩子目录。创建带有一行的
hooks/post-commit文件:/path/to/teamcity-trigger.sh 'vcsRoot:(type:svn,count:99999),property:(name:url,value:<VCS root repository url>,matchType:equals,ignoreCase:true),count:99999'在这里,
<VCS root repository URL>必须被替换成在相应的 TeamCity VCS 根中指定的仓库 URL,值应该是 URL-转码的。确保 Subversion 服务器的进程可以读取并执行
teamcity-trigger.sh和hooks/post-commit脚本。 您可能需要执行以下命令:chmod 755 /path/to/teamcity-trigger.sh /path/to/svn_repository_root/hooks/post-commit
Perforce Server
这一部分说明了如何设置专用的 Perforce 脚本。 请注意,使用 generic script 也是可以的,但这已经是一种过时且不再推荐的方法。
在您的 Perforce 服务器上安装的专用 post-commit 脚本会自动检测 TeamCity 中的 Perforce VCS 根,并触发相应的构建。 要使用该脚本,您首先需要生成一个 access token。 被分配此令牌的 TeamCity 用户必须拥有在定义了 Perforce VCS 根的项目中的“Run build”权限。 这个权限默认包含在项目开发者角色中。
也建议在项目设置中配置 Perforce Administrator Access 连接。 TeamCity 将使用它来确保在 Perforce 更改列表中收集所有已更改的文件。 如果没有明确配置此类连接,TeamCity 将尝试使用项目的其中一个 VCS 根的设置来连接到 Perforce。
将此脚本保存在您的 Perforce 服务器上,名为
teamcity-hook.sh:#!/bin/sh # How to use this script: # 1. Save the script on the Perforce server under the name /path/teamcity-hook.sh. # 2. Run chmod +x /path/teamcity-hook.sh. # 3. Set up a change-commit trigger by adding the following line when editing the specification with the `p4 triggers` command: # check-for-changes-teamcity change-commit //depot/... "/path/teamcity-hook.sh %\change%" # 4. Update the variables below. # # Update the following variables: # TeamCity server root URL: TEAMCITY_SERVER=http://localhost:8111/bs # Access token of a user on TeamCity server which can run builds in all relevant configurations (Developer role) TC_ACCESS_TOKEN="<token_value>" # This P4PORT value will be used to find relevant VCS roots, it should be equal to the P4Port setting in the VCS root: P4PORT="localhost:1666" CHANGE=$1 # The following is one line: (sleep 10; curl -H "Authorization: Bearer $TC_ACCESS_TOKEN" -d "p4port=$P4PORT&changelistId=$CHANGE" "$TEAMCITY_SERVER/app/perforce/commitHook" -o /dev/null) >/dev/null 2>&1 <&1 & exit 0运行
chmod +x /path/teamcity-hook.sh。编辑 Perforce 规格 ,使用
p4 触发器命令并通过添加以下行设置更改提交触发器:check-for-changes-teamcity change-commit //depot/... "/path/teamcity-hook.sh %\change%"其中
//depot/...是在 TeamCity 构建中使用的仓库。 如果有多个仓库,您可以用//...替换此路径。将脚本中的变量更新为您的 TeamCity 设置。
使用通用脚本编辑 Perforce 规范
设置一个 更改提交 触发器,当 编辑规范 时添加一行或几行。 以下文本必须按照每个触发器一行的方式摆放。
在以下情况中, <VCS Root locator> 可以是其中之一:
对于基于流的 VCS 根:
vcsRoot:(type:perforce,count:99999),property:(name:stream,value://streamdepot/streamname,matchType:equals,ignoreCase:true),count:99999针对基于客户端的 VCS 根目录:
vcsRoot:(type:perforce,count:99999),property:(name:client,value:<client name>,matchType:equals,ignoreCase:true),count:99999对于 Client-mapping VCS 根:
vcsRoot:(type:perforce,count:99999),property:(name:client-mapping,value:<unique client mapping>,matchType:equals,ignoreCase:true),count:99999在此,
<unique client mapping>应该在所有参数解析后与 TeamCity VCS 根中的 Perforce 仓库路径相匹配。 对于规则检查更改 - TeamCity 更改提交 //depot/project1/...,它将是//depot/project1/。每一条
check-for-changes-teamcity规则行描述了提交路径(//depot/project1)与应该检查更改的一组 VCS 根的关联。
故障排查
建议在配置实际钩子之前,尝试从命令行执行以下命令:
如果提交钩子与服务器上的 VCS 根正确匹配,您应该会看到类似于此的输出:
如果提交挂钩没有找到任何 VCS 根,它将报告一个错误:
可能的输出原因:
指定的定位器错误,它与服务器上的任何 VCS 根目录都不匹配
指定的用户至少在一个匹配的 VCS 根目录中没有足够的权限。
要检查实际匹配的是哪些根,使用此请求(另见 详情):