Merge, rebase, or cherry-pick to apply changes
In Git, there are several ways to integrate changes from one branch into another:
Merge branches
Suppose you have created a feature branch to work on a specific task, and want to integrate the results of your work (F1, F2, F3) into the main code base after you have completed and tested your feature:
Merging your branch into main is the most common way to do this.
It is very common that while you are working in your feature branch, your teammates continue to commit their work (C4, C5) to main:
When you merge your feature branch into main, the changes from your feature branch are integrated into the HEAD of the target branch:
Git creates a new commit that is referred to as a merge commit that results from combining the changes from your feature branch and main from the point where the two branches diverged.
The major benefit of merging is full traceability, as commits merged into the main code base preserve their original hash and author, and all commits that are part of one feature can be grouped together.
This workflow is good for projects where committing changes to the main code base involves pull or merge requests, or a hierarchical approval procedure, as existing branches are not changed in any way.
The main drawback of this approach is that extraneous merge commits are created each time you need to incorporate changes, which intensely pollutes project history and makes it difficult to read.
Merge branches
In the Branches popup (main menu ) or in the Branches pane of the Git tool window, select the target branch that you want to integrate the changes to, and choose Checkout from the context menu to switch to that branch.
Do one of the following:
If you do not need to specify options for the merge, select the branch that you want to merge into the current branch and choose Merge <branch_name> into <target_branch> from the submenu.
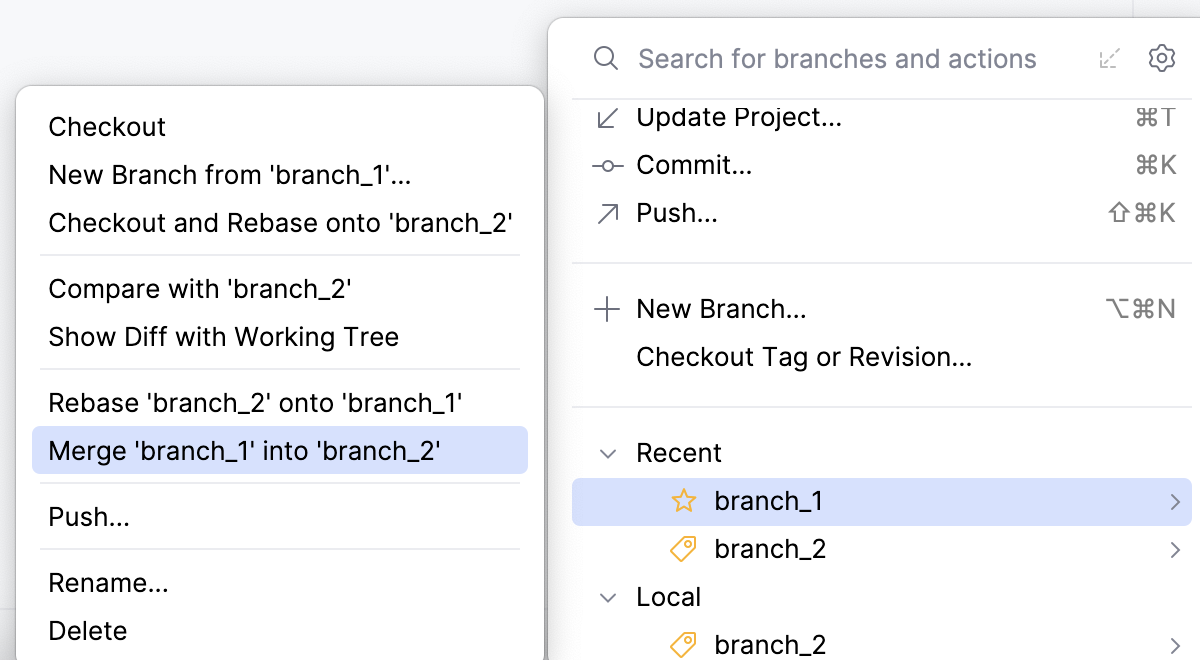
If you need to specify merge options, from the main menu choose to open the Merge dialog:

Select the branch that you want to merge into the current branch, click Modify options and choose from the following:
--no-ff: a merge commit will be created in all cases, even if the merge could be resolved as a fast-forward.--ff-only: the merge will be resolved only if it is possible to fast-forward.--squash: a single commit with all pulled changes will be created on top of the current branch.-m: you will be able to edit the message for the merge commit.--no-commit: a merge will be performed, but a merge commit will not be created so that you can inspect the result of the merge before committing.--no-verify: performs the merge while bypassing the pre-merge and commit-message hooks that normally run by default.--allow-unrelated-histories: performs a merge, overriding the safety rule that refuses to merge histories without a common ancestor.
Click Merge.
If your working tree is clean (which means you have no uncommitted changes), and no conflicts occur between your feature branch and the target branch, Git will merge the two branches, and the merge commit will appear in the Log tab of the Git tool window Alt+9:

If conflicts occur between your branch and the target branch, you will be prompted to resolve them (refer to Resolve conflicts). If there are unresolved conflicts left after a merge, the Merge Conflicts node will appear in the corresponding changelist in the Commit tool window Alt+0 with a link to resolve them.
If you have local changes that will be overwritten by merge, WebStorm will suggest performing Smart merge. If you select this option, WebStorm will stash uncommitted changes, perform merge, and then unstash the changes.
Rebase branches (git-rebase)
When you rebase a branch onto another branch, you apply the commits from the first branch on top of the HEAD commit in the second branch.
Suppose you have created a feature branch to work on a specific task and make several commits to that branch (F1, F2, F3):
While you develop in your branch, your teammates continue to commit their work (C4, C5) to main:
To integrate the changes made by your teammates (C4, C5) to your feature branch, you can rebase your branch onto main. By doing this, you will apply your commits on top of the current HEAD commit in main:
The major benefit of rebasing is that you get a clean project history that is easy for others to read and understand. Your log does not contain unnecessary merge commits produced by the merge operation, and you get linear history that is easy to navigate and search through.
When deciding to adopt this workflow, you should keep in mind, however, that rebase rewrites project history as it creates new commits for each commit in the original feature branch (F1' instead of F1), so they will have different hashes, which obstructs traceability.
Rebase a branch on top of another branch
From the main menu select
From the list, select the target branch onto which you want to rebase the current branch:

If you need to rebase the source branch starting from a particular commit instead of rebasing the entire branch, click Modify options and choose --onto.
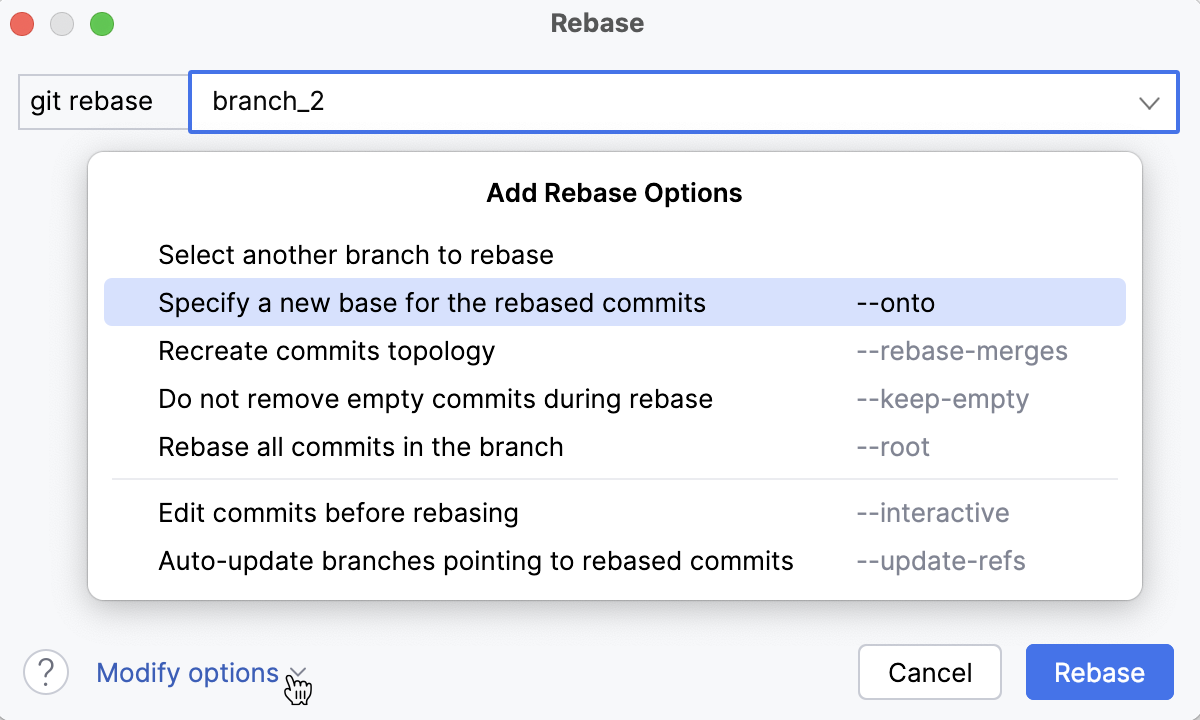
In the source branch field, enter the hash of the commit starting from which you want to apply the current branch to the new base:

If the branch you want to rebase is not currently checked out, click Modify options, click Select another branch to rebase, and choose a branch from the list that appears:
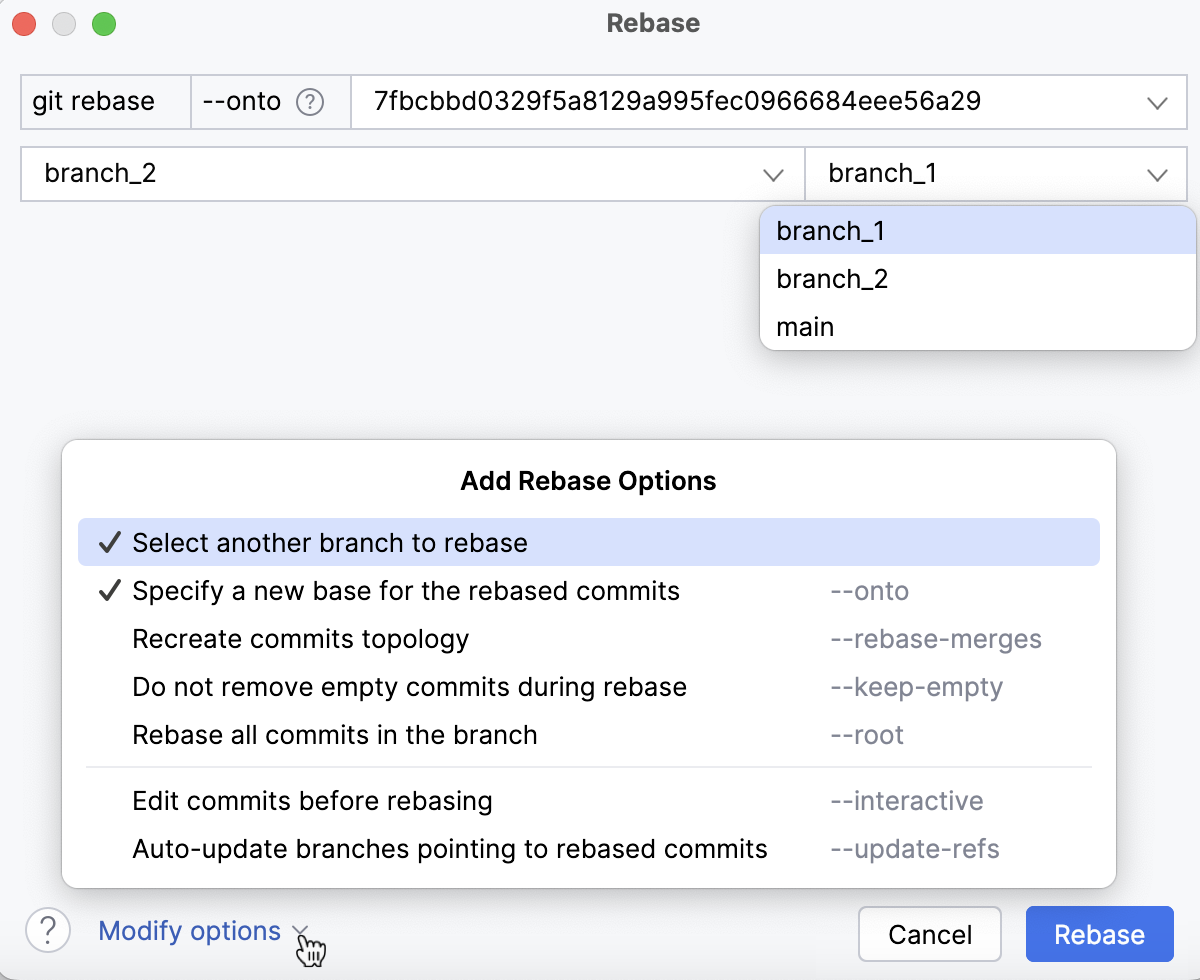
WebStorm will check out this branch before starting the rebase operation.
Depending on your particular case, choose other options from the Modify options list:
--rebase-merges: preserve the branching structure within the commits that are to be rebased.Note that any resolved merge conflicts or manual amendments in these merge commits will have to be resolved or reapplied manually.
--keep-empty: keep empty commits, which are commits that do not change anything from their parent.--root: rebase all commits reachable in the branch.--update-refs: automatically force-update any branches that point to commits that are being rebased.--autosquash: automatically squash commits marked for fixup or squash.
Click Rebase.
If you do not need to specify options for the rebase, you can initiate a rebase without invoking the rebase dialog. In the Branches popup or in the Branches pane of the Git tool window select a branch and choose one of the following actions:
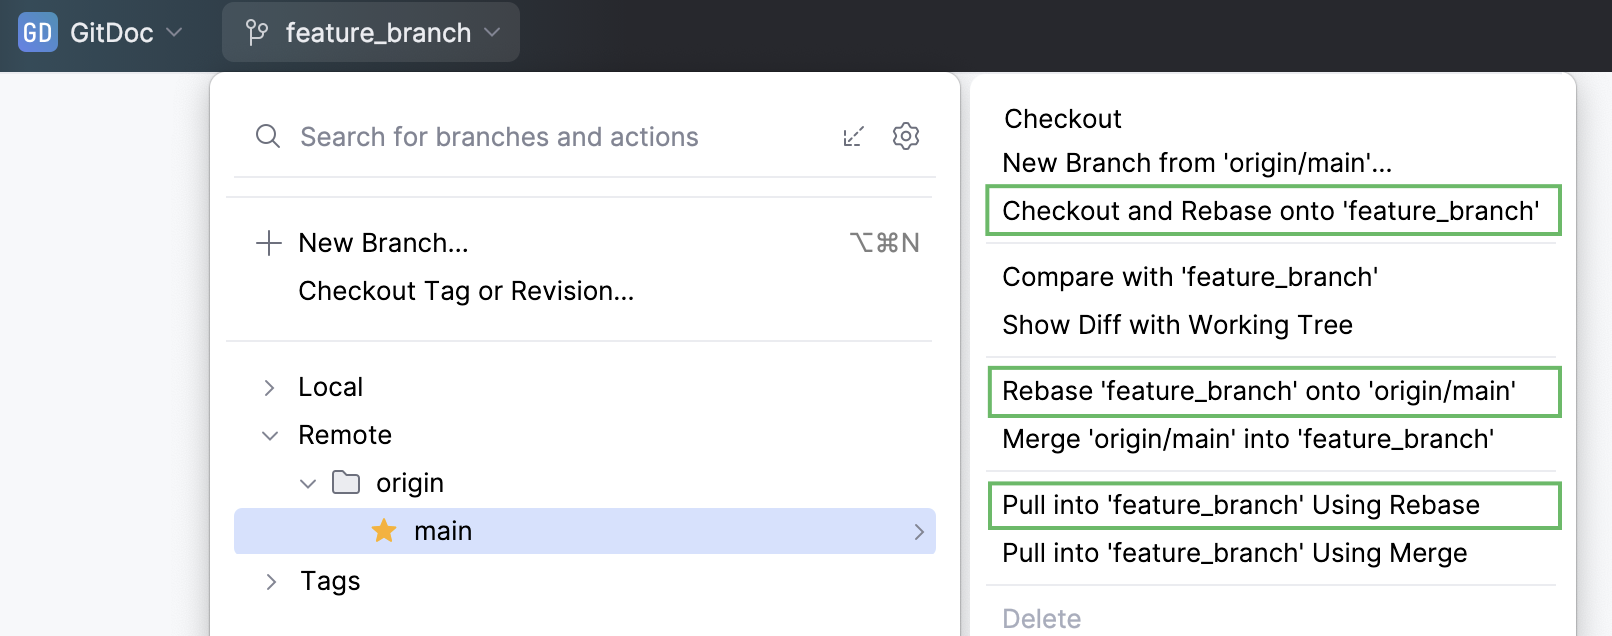
Checkout and Rebase onto <current_branch_name> (for both remote and local branches) to check out the selected branch and rebase it on top of the branch that is currently checked out. If the remote branch doesn't exist locally, WebStorm will silently create a tracked local branch, checkout into it and rebase.
Rebase <current_branch_name> onto <selected_branch_name> (for both remote and local branches) to rebase the branch that is currently checked out on top of the selected.
Pull into <current_branch_name> Using Rebase (for remote branches) to fetch changes from the selected branch and rebase the current branch on top of these changes.
Watch this video to get a better view on how rebase operation can be performed:
Edit Git history by performing interactive rebase
With Git integration in WebStorm, you can edit history for the sake of making it linear and meaningful by performing interactive rebase. This allows you to clean up the history of commits by altering individual commits, changing their order, squashing commits into one, skipping commits that contain extraneous changes, and so on before you integrate changes from your feature branch to another branch.
Edit the history of the current branch
WebStorm allows you to edit the commits history in the current branch before you apply the changes to a different branch.
Open the Git tool window Alt+9 and switch to the Log tab.
Filter the log so that it only displays commits from the current branch:

Select the oldest commit in the series of commits that you want to edit, right-click it and choose Interactively Rebase from Here.
The Interactive Rebase dialog will be displayed containing the list of all commits in the current branch that were made after the selected commit:
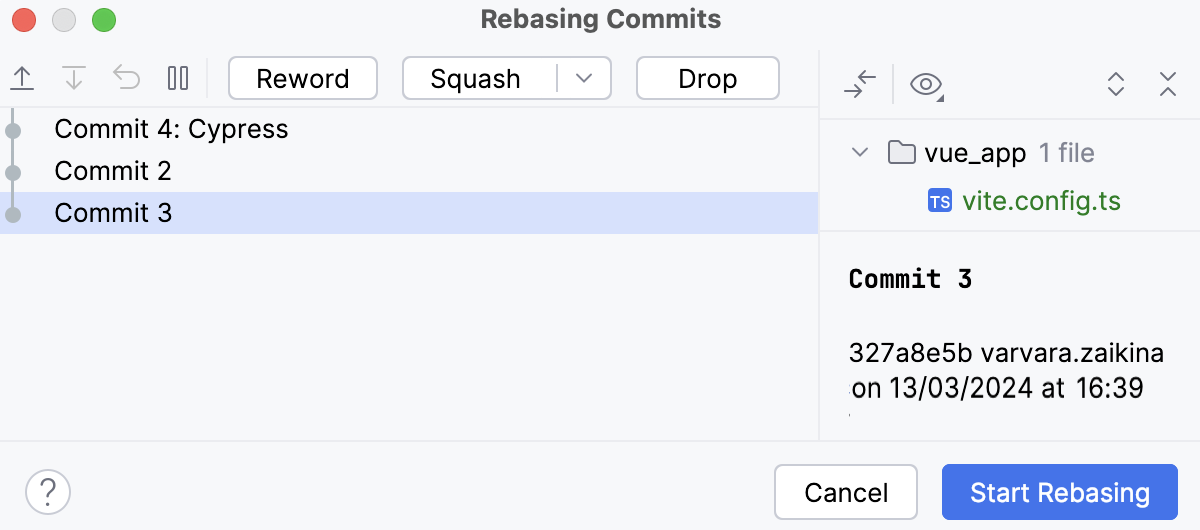
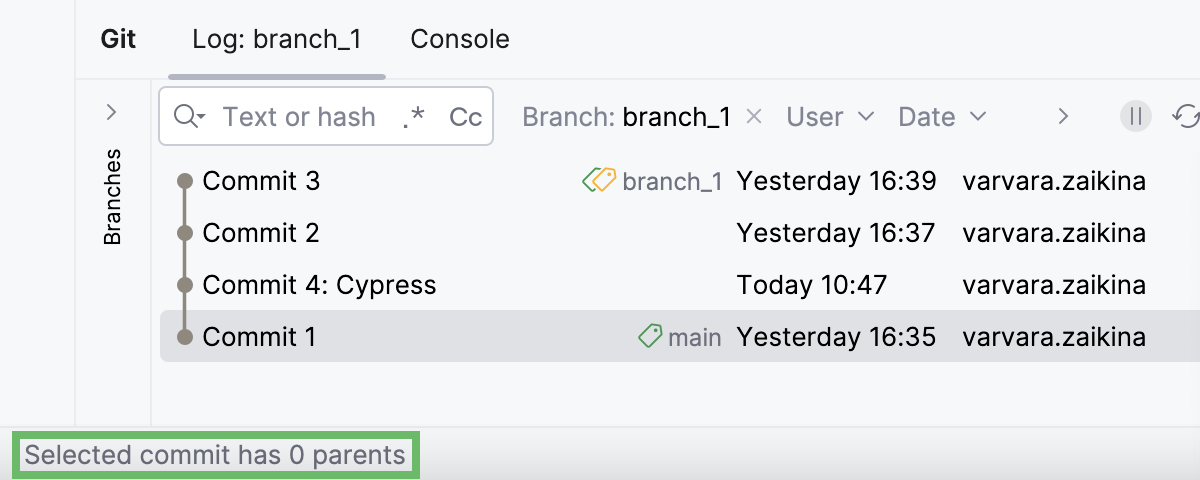
If the Interactively Rebase from Here option is disabled, this may be due to one of the following reasons:
the selected commit has several parents
the selected commit is not in the current branch
the selected commit is pushed to a protected branch
To identify the reason, hover over the action in the context menu and look for the message in the status bar:
You can perform the following changes to the branch history:
Change the order in which commits should be applied: use the
and
buttons to move commits up and down the list.
Pick a commit: this is the default state for all commits. If you need to undo an action you've already taken on a commit, click Pick
so that this commit is applied as is.
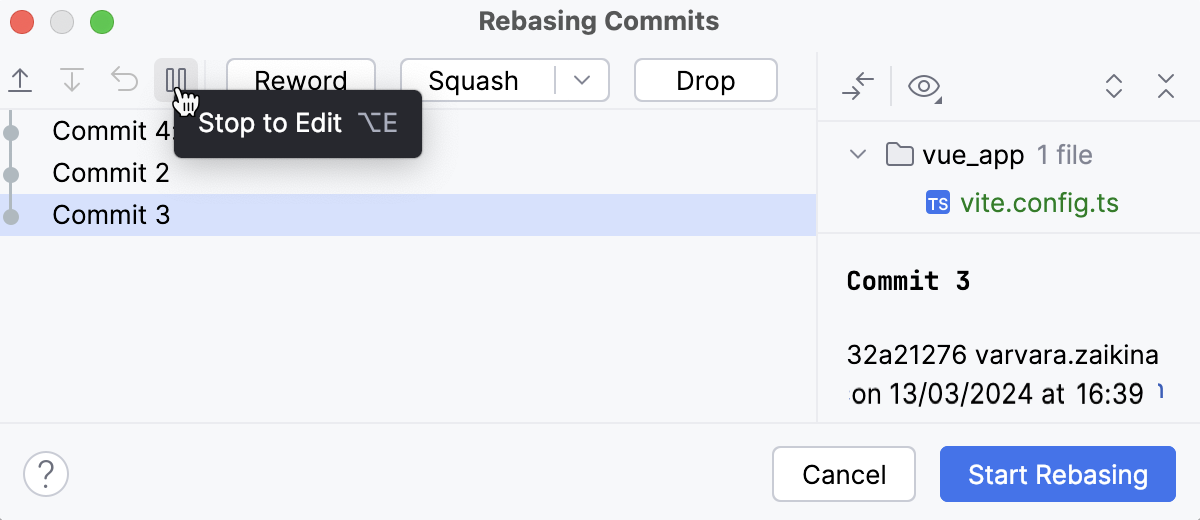
Edit: click Stop to Edit
so that when you start the rebase, you stop at this commit to be able to edit it.
When rebase is stopped at a commit, a notification pops up in the bottom-right corner of the WebStorm window letting you continue or abort the rebase:
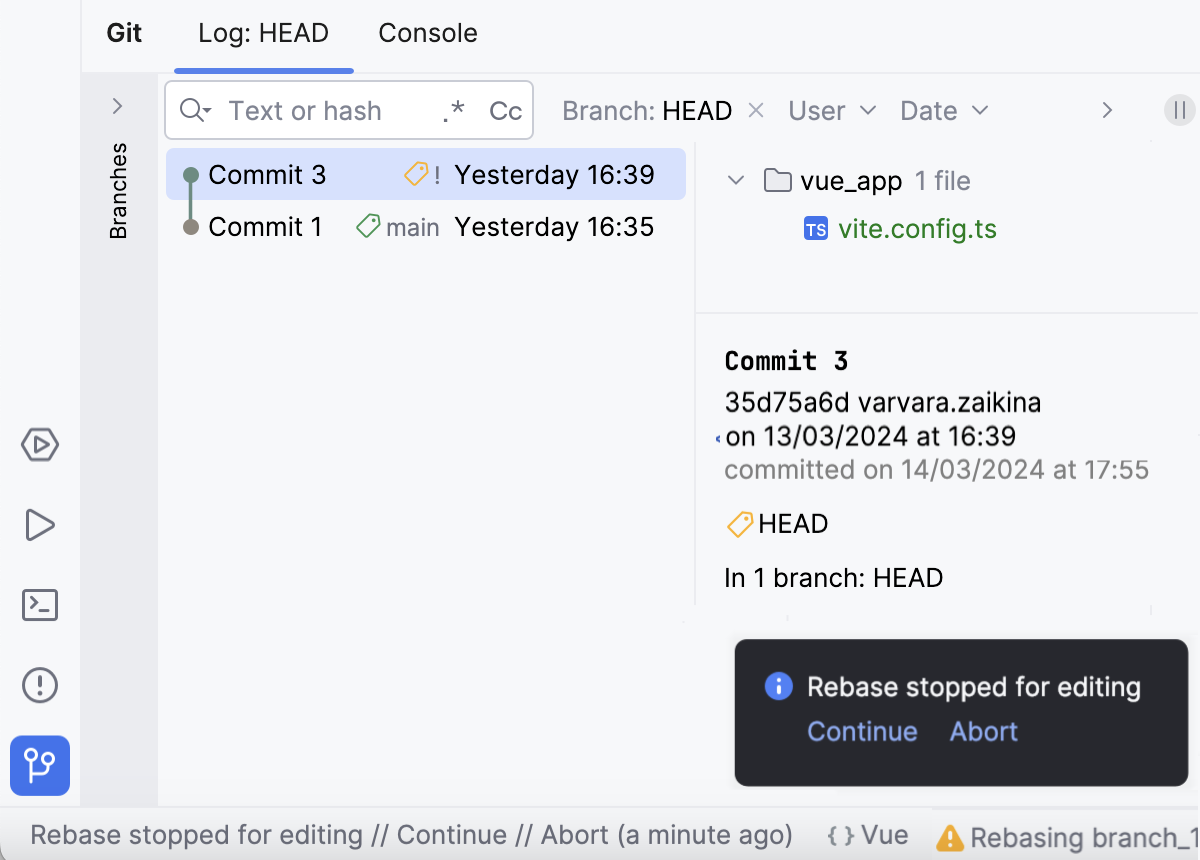
You can modify this commit using the context actions (such as Revert, Undo, Amend, and so on before continuing the rebase. If you do not perform any actions, this commit will be applied as is.
If you've closed the notification, from the main menu choose Git | Continue rebase to resume it.
Reword the commit message: click Reword or double-click a commit and edit the text in the mini-editor that opens.
Combine two commits into one: select the commit you want to meld into the previous one and click Squash or the arrow next to the Squash button and then Fixup.
If you click Squash, by default the messages from the two commits will be combined, so if you do not modify the resulting commit message, this action will be reflected in the branch history.
If you click Fixup, the commit message of the fixup commit will be discarded, so this change will be invisible in the branch history.
In both cases, you will be able to edit the commit message in the mini editor that opens when you apply one of these actions.
Ignore a commit: click Drop so that the changes from the selected commit are not applied.
Undo all changes: click Reset to discard all actions you've applied to the commits.
As a result, the Rebasing Commits dialog shows a graph illustrating all actions you've applied to commits in your branch so that you can review them before starting the rebase:
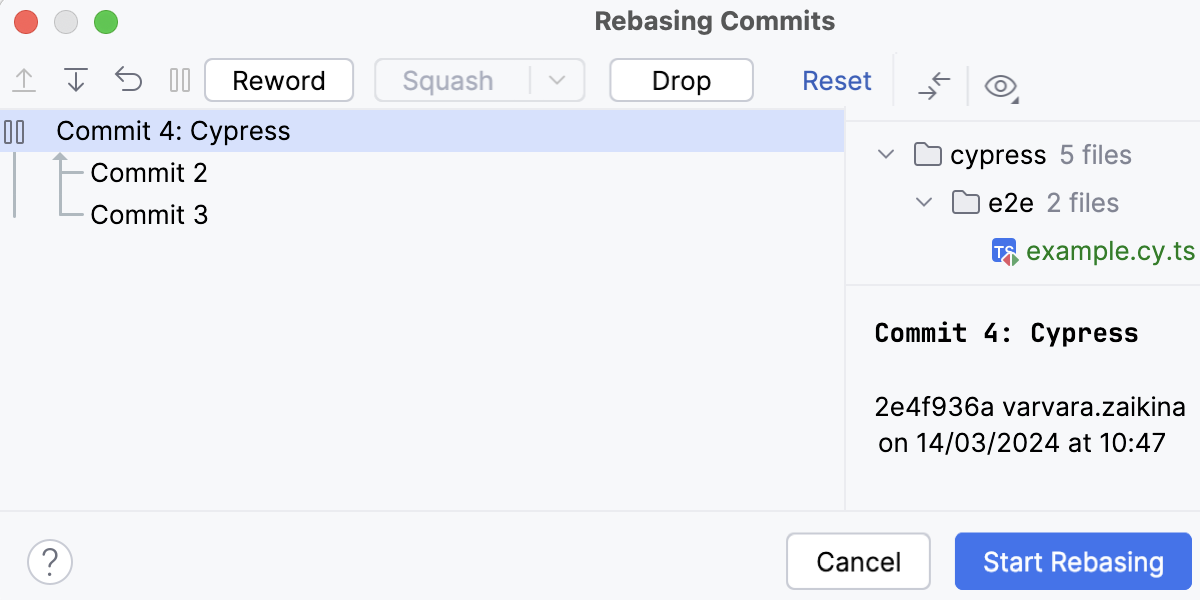
Click Start Rebasing.
Edit a branch history and integrate it into another branch
WebStorm allows you to rebase a branch on top of another branch and edit the source branch history before you apply the changes.
From the main menu select
Click Modify options and choose --interactive.
From the list, select the target branch onto which you want to rebase the current branch:
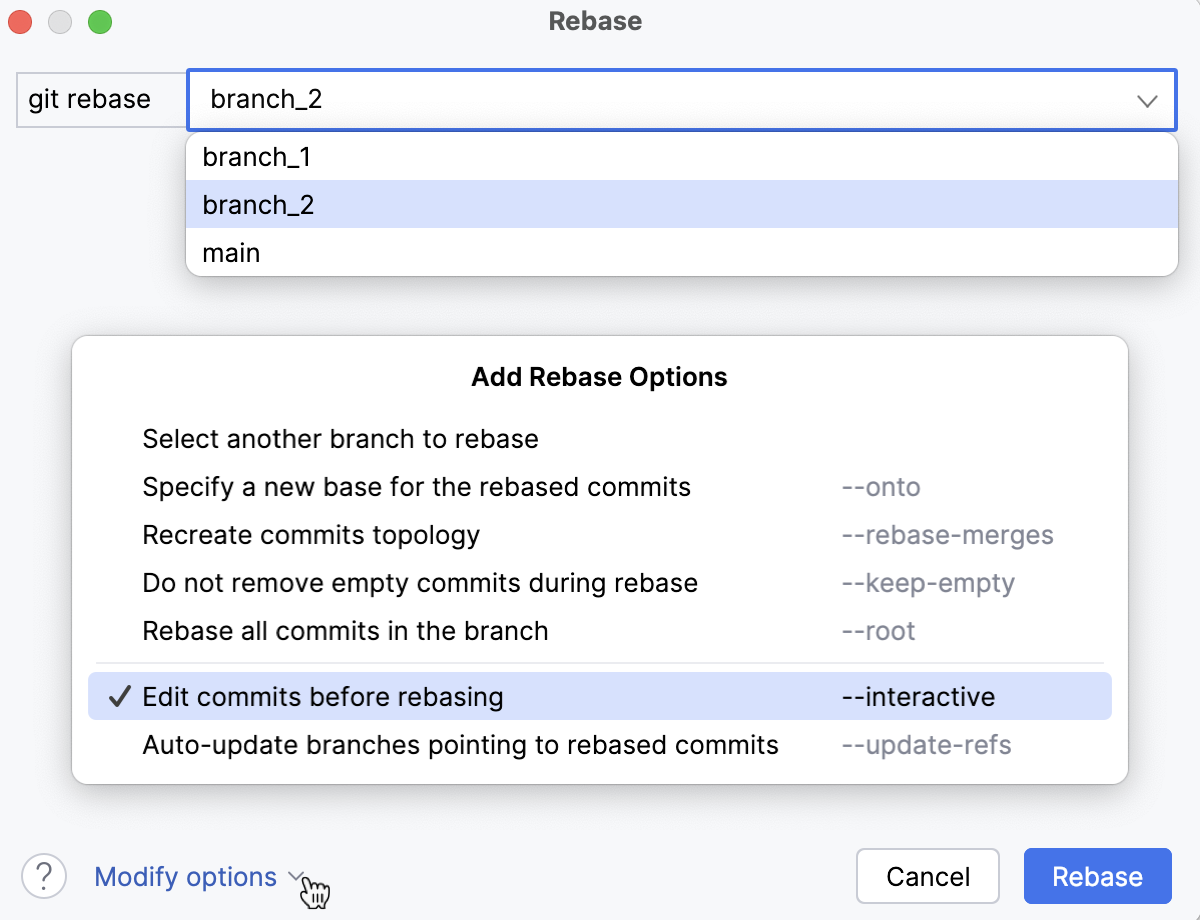
If you need to rebase the source branch starting from a particular commit instead of rebasing the entire branch, click Modify options and choose --onto.
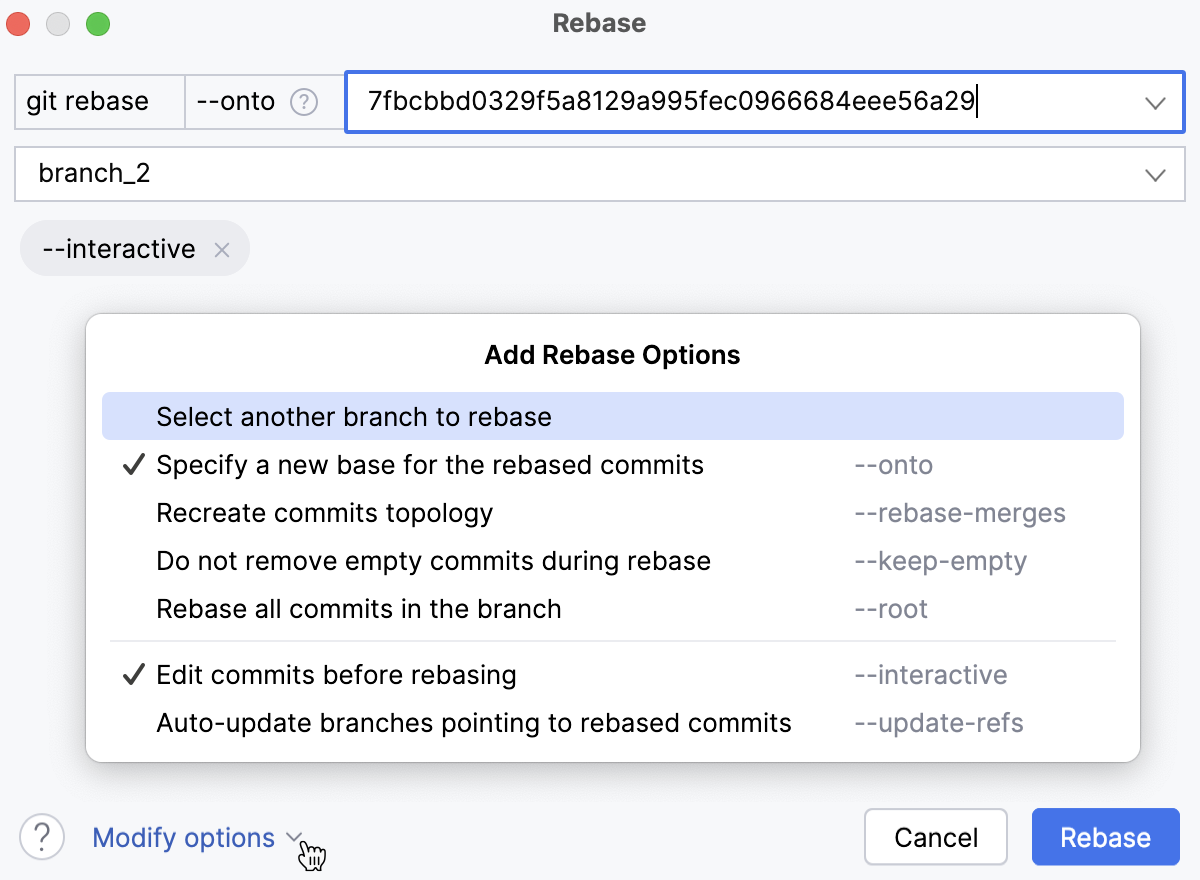
In the source branch field, enter the hash of the commit starting from which you want to apply the current branch to the new base:

If the branch you want to rebase is not currently checked out, click Modify options, click Select another branch to rebase, and choose a branch from the list that appears:
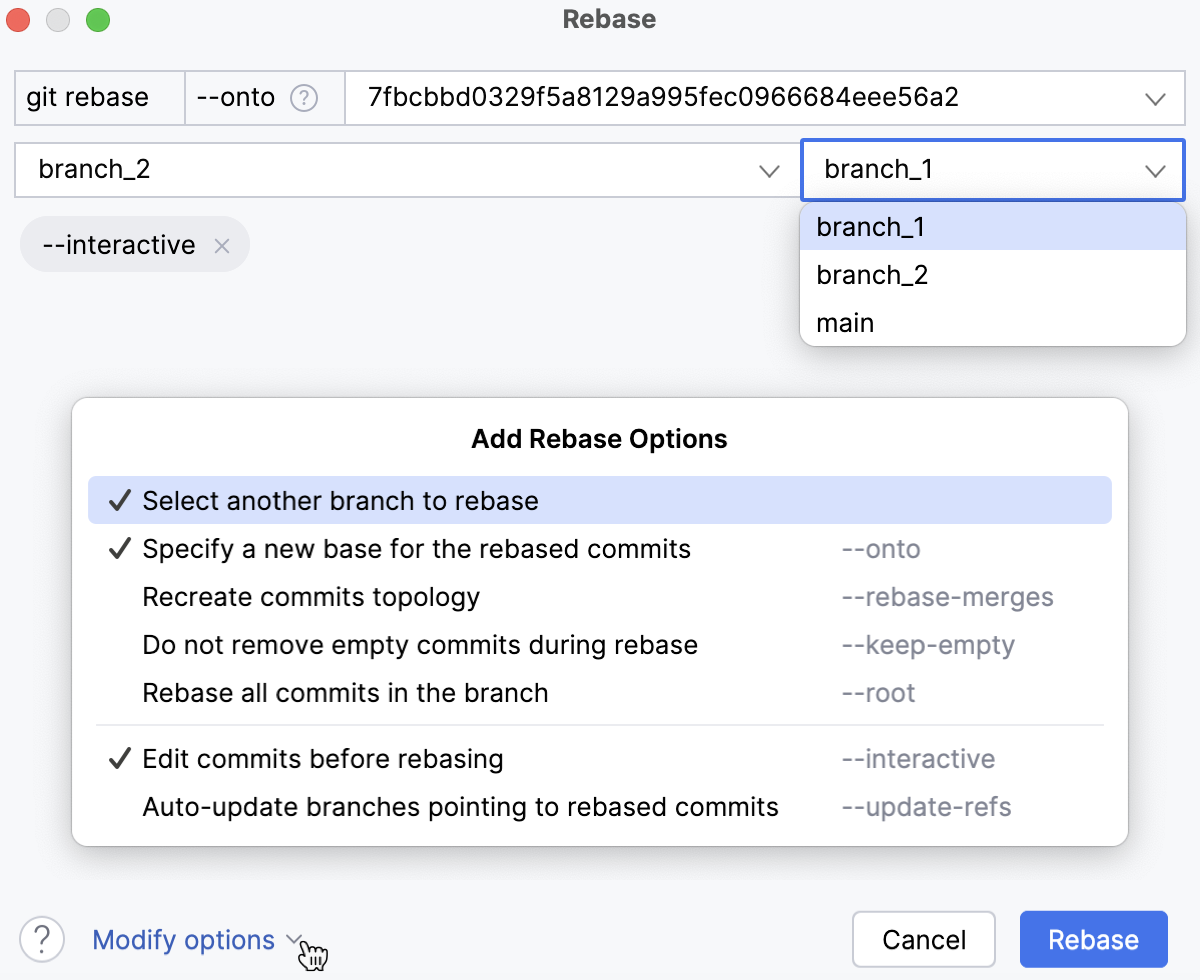
WebStorm will check out this branch before starting the rebase operation.
Depending on your particular case, choose other options from the Modify options list:
--rebase-merges: preserve the branching structure within the commits that are to be rebased.Note that any resolved merge conflicts or manual amendments in these merge commits will have to be resolved or reapplied manually.
--keep-empty: keep empty commits, which are commits that do not change anything from their parent.--root: rebase all commits reachable in the branch.--update-refs: automatically force-update any branches that point to commits that are being rebased.--autosquash: automatically squash commits marked for fixup or squash.
Click Rebase.
The Interactive Rebase dialog will be displayed containing the list of all commits in the current branch that were made after the selected commit.

You can perform the following changes to the branch history:
Change the order in which commits should be applied: use the
and
buttons to move commits up and down the list.
Pick a commit: this is the default state for all commits. If you need to undo an action you've already taken on a commit, click Pick
so that this commit is applied as is.
Edit: click Stop to Edit
so that when you start the rebase, you stop at this commit to be able to edit it.

When rebase is stopped at a commit, a notification pops up in the bottom-right corner of the WebStorm window letting you continue or abort the rebase:

You can modify this commit using the context actions (such as Revert, Undo, Amend, and so on before continuing the rebase. If you do not perform any actions, this commit will be applied as is.
If you've closed the notification, from the main menu choose Git | Continue rebase to resume it.
Reword the commit message: click Reword or double-click a commit and edit the text in the mini-editor that opens.
Combine two commits into one: select the commit you want to meld into the previous one and click Squash or the arrow next to the Squash button and then Fixup.
If you click Squash, by default the messages from the two commits will be combined, so if you do not modify the resulting commit message, this action will be reflected in the branch history.
If you click Fixup, the commit message of the fixup commit will be discarded, so this change will be invisible in the branch history.
In both cases, you will be able to edit the commit message in the mini editor that opens when you apply one of these actions.
Ignore a commit: click Drop so that the changes from the selected commit are not applied.
Undo all changes: click Reset to discard all actions you've applied to the commits.
As a result, the Rebasing Commits dialog shows a graph illustrating all actions you've applied to commits in your branch so that you can review them before starting the rebase:

Click Start Rebasing.
Cherry-pick separate commits
Sometimes you only need to apply a single commit to a different branch instead of rebasing or merging an entire branch. This may be useful, for example, if you are working in a feature branch and want to integrate a hotfix from main that was committed after the two branches have diverged. Or you may want to backport a fix to a previous release branch. You can do so by using the Cherry-pick action.
The status of a cherry-pick operation is displayed in the status bar. You can always abort an ongoing cherry-pick by selecting Abort Cherry-Pick in the Git Branches popup.
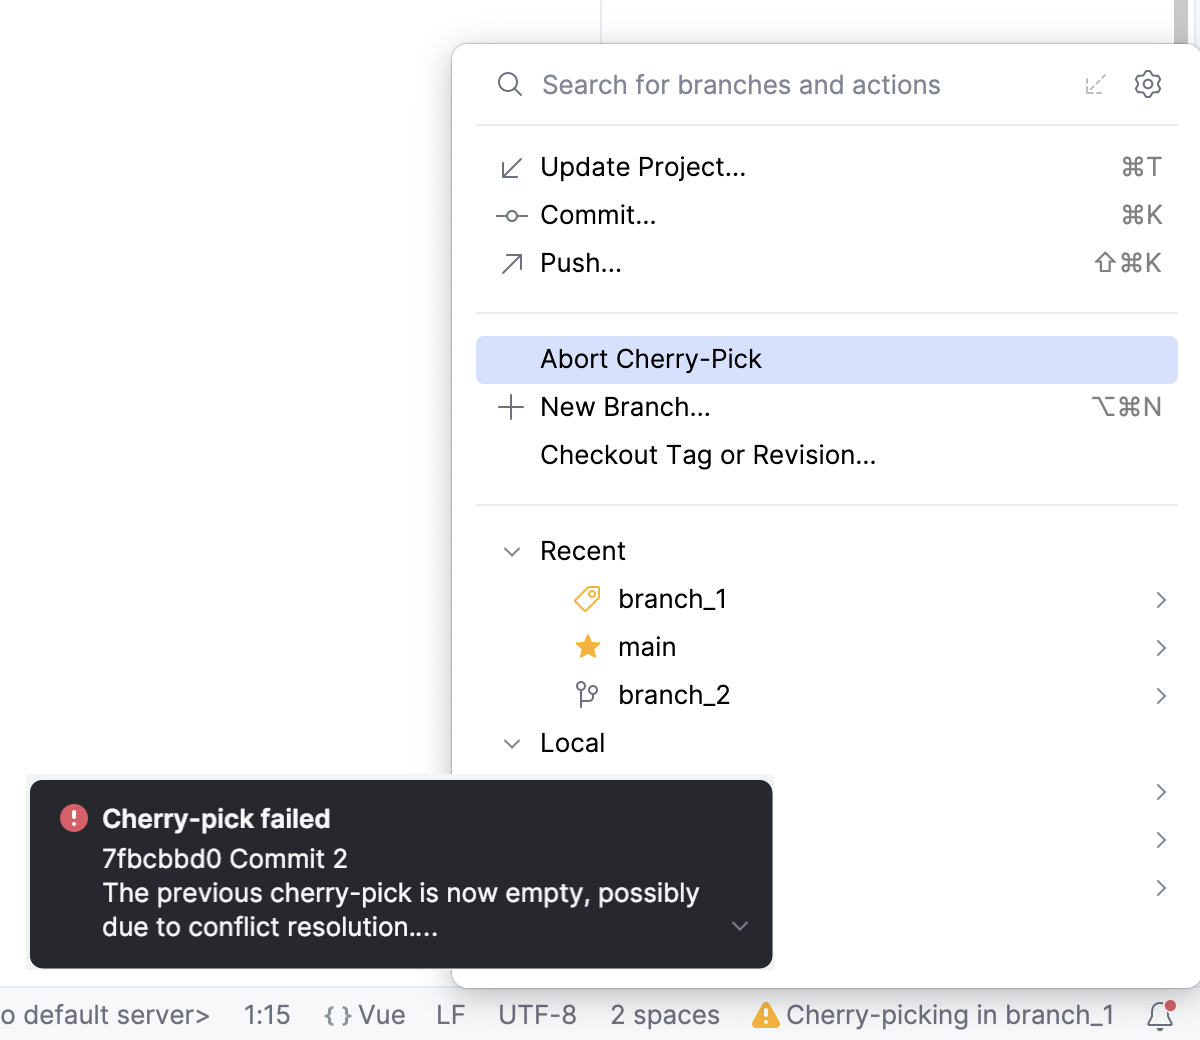
Apply a commit to another branch
In the Branches popup (main menu ), select the target branch that you want to integrate the changes to and choose Checkout from the popup menu to switch to that branch.
Open the Git tool window Alt+9 and switch to the Log tab.
Locate the commit containing the changes you want to cherry-pick.
You can filter commits by branch, user or date. You can also click
on the toolbar and select Highlight | Non-Picked Commits option to grey out the commits that have already been applied to the current branch. If you know the commit hash, or are looking for a tagged commit, you can also use the Go to Hash / Branch / Tag action (press Ctrl+F in the Log tab of the Git tool window Alt+9, or click
on the toolbar).
Select the required commit. Use the information in the Commit Details area to make sure these are the changes you want to transfer to another branch.
Click Cherry-pick
on the toolbar. WebStorm will apply and commit changes to the target branch.
If the cherry-pick failed with conflicts, the selected changes will appear in the Changes area that you can see in the Commit tool window Alt+0. You can review these changes and commit them later if necessary.
If you want WebStorm to create changelists automatically in case of cherry-pick fail, switch on the corresponding setting in .
Push the changes to the target branch.
The following video will help you see how cherry-pick works:
Apply separate changes
Imagine you've made some changes to a file that you want to apply to a different branch, but these changes were committed together with other modified files. WebStorm lets you apply separate changes to a changelist without committing them right away instead of cherry-picking an entire commit.
In the Branches popup (main menu ), select the target branch that you want to integrate the changes to and choose Checkout from the popup menu to switch to that branch.
Open the Git tool window Alt+9 and switch to the Log tab.
Locate the commit that contains the changes that you want to apply.
You can filter commits by branch, user or date. You can also click
on the toolbar and select Highlight | Non-Picked Commits option to grey out the commits that have already been applied to the current branch. If you know the commit hash, or are looking for a tagged commit, you can also use the Go to Hash / Branch / Tag action (press Ctrl+F in the Log tab of the Git tool window Alt+9, or click
on the toolbar).
In the Commit details pane on the right, select the files containing the changes you want to apply to the target branch and select Cherry-Pick Selected Changes from the context menu.
In the dialog that opens, select an existing changelist or enter the name for a new changelist and click OK.
Commit the changes and then push them to the target branch.
Apply separate files
In addition to applying separate changes to a single file, you can copy an entire file's contents to a different branch. This may be useful, for example, if the file you want to apply doesn't exist in the target branch, or if changes to it were made within several commits.
Switch to the branch to which the changes will be applied.
In the Branches popup (main menu ) or in the Branches pane of the Git tool window, select the branch that contains the file you want to apply and choose Show Diff with Working Tree from the context menu.
The Changes tool window that opens shows a list of all files that are different in the selected branch compared with the branch that is currently checked out:
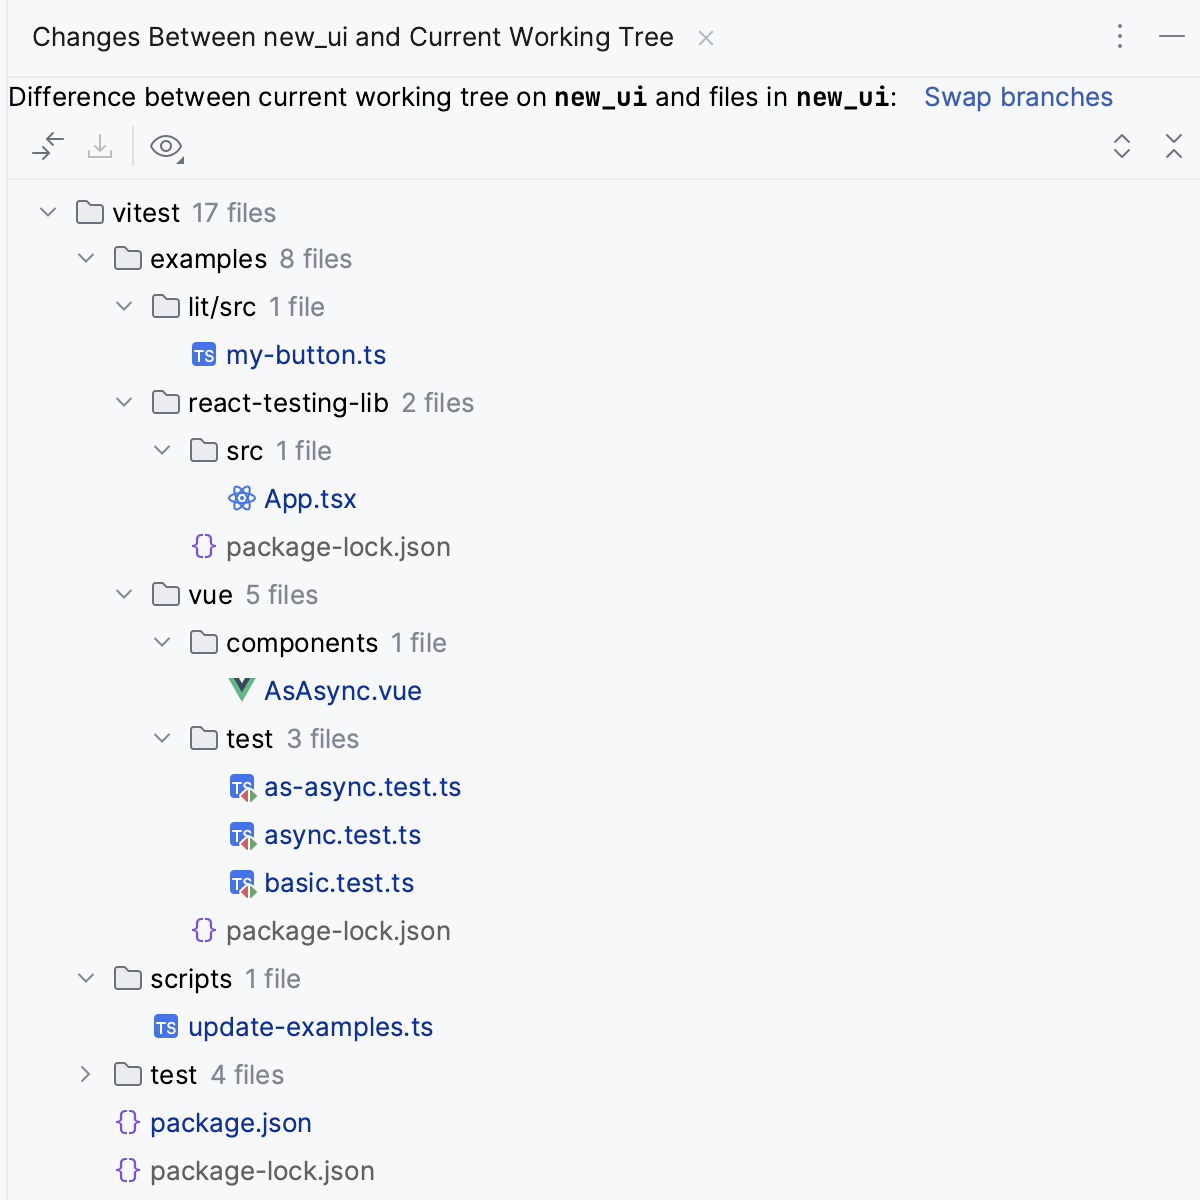
Files that exist in the selected branch and are missing in the current branch are marked with gray.
Files that exist in the current branch but are missing in the selected branch are marked with green.
Files that contain differences between the selected and the current branch are marked with blue.
You can click the Swap Branches link to change which branch is considered as a base against which you are comparing the other branch.
Select the file that you want to apply to the current branch, and choose Get from Branch from the context menu or click
on the toolbar.
Commit and push the changes. WebStorm will copy the entire contents of the file to the current branch.