Kafka
The Kafka plugin lets you monitor your Kafka event streaming processes, create consumers, producers, and topics. It also lets you connect to Schema Registry, create and update schemas.
Install the Kafka plugin
This functionality relies on the Kafka plugin, which you need to install and enable.
Press Ctrl+Alt+S to open the IDE settings and then select .
Open the Marketplace tab, find the Kafka plugin, and click Install (restart the IDE if prompted).
With the Kafka plugin, you can:
Connect to:
If the Kafka plugin is installed and enabled, you can use the Kafka tool window () to connect to Kafka and work with it. Alternatively, if the Remote File Systems or Zeppelin plugin is installed and enabled, you can also access Kafka connections using the Big Data Tools tool window ().
Connect to Kafka
Connect to Kafka using cloud providers
Connect to Confluent cluster
Open the Kafka tool window: .
In the Name field, enter the name of the connection to distinguish it between other connections.
In the Configuration source list, select Cloud, and then, in the Provider list, select Confluent.
Go to https://confluent.cloud/home. On the right side of the page, click the settings menu, select Environments, and select your cluster, and then select .
In the Copy the configuration snippet for your clients block, provide Kafka API keys and click Copy.
Go back to your IDE and paste the copied properties into the Configuration field.
Once you fill in the settings, click Test connection to ensure that all configuration parameters are correct. Then click OK.
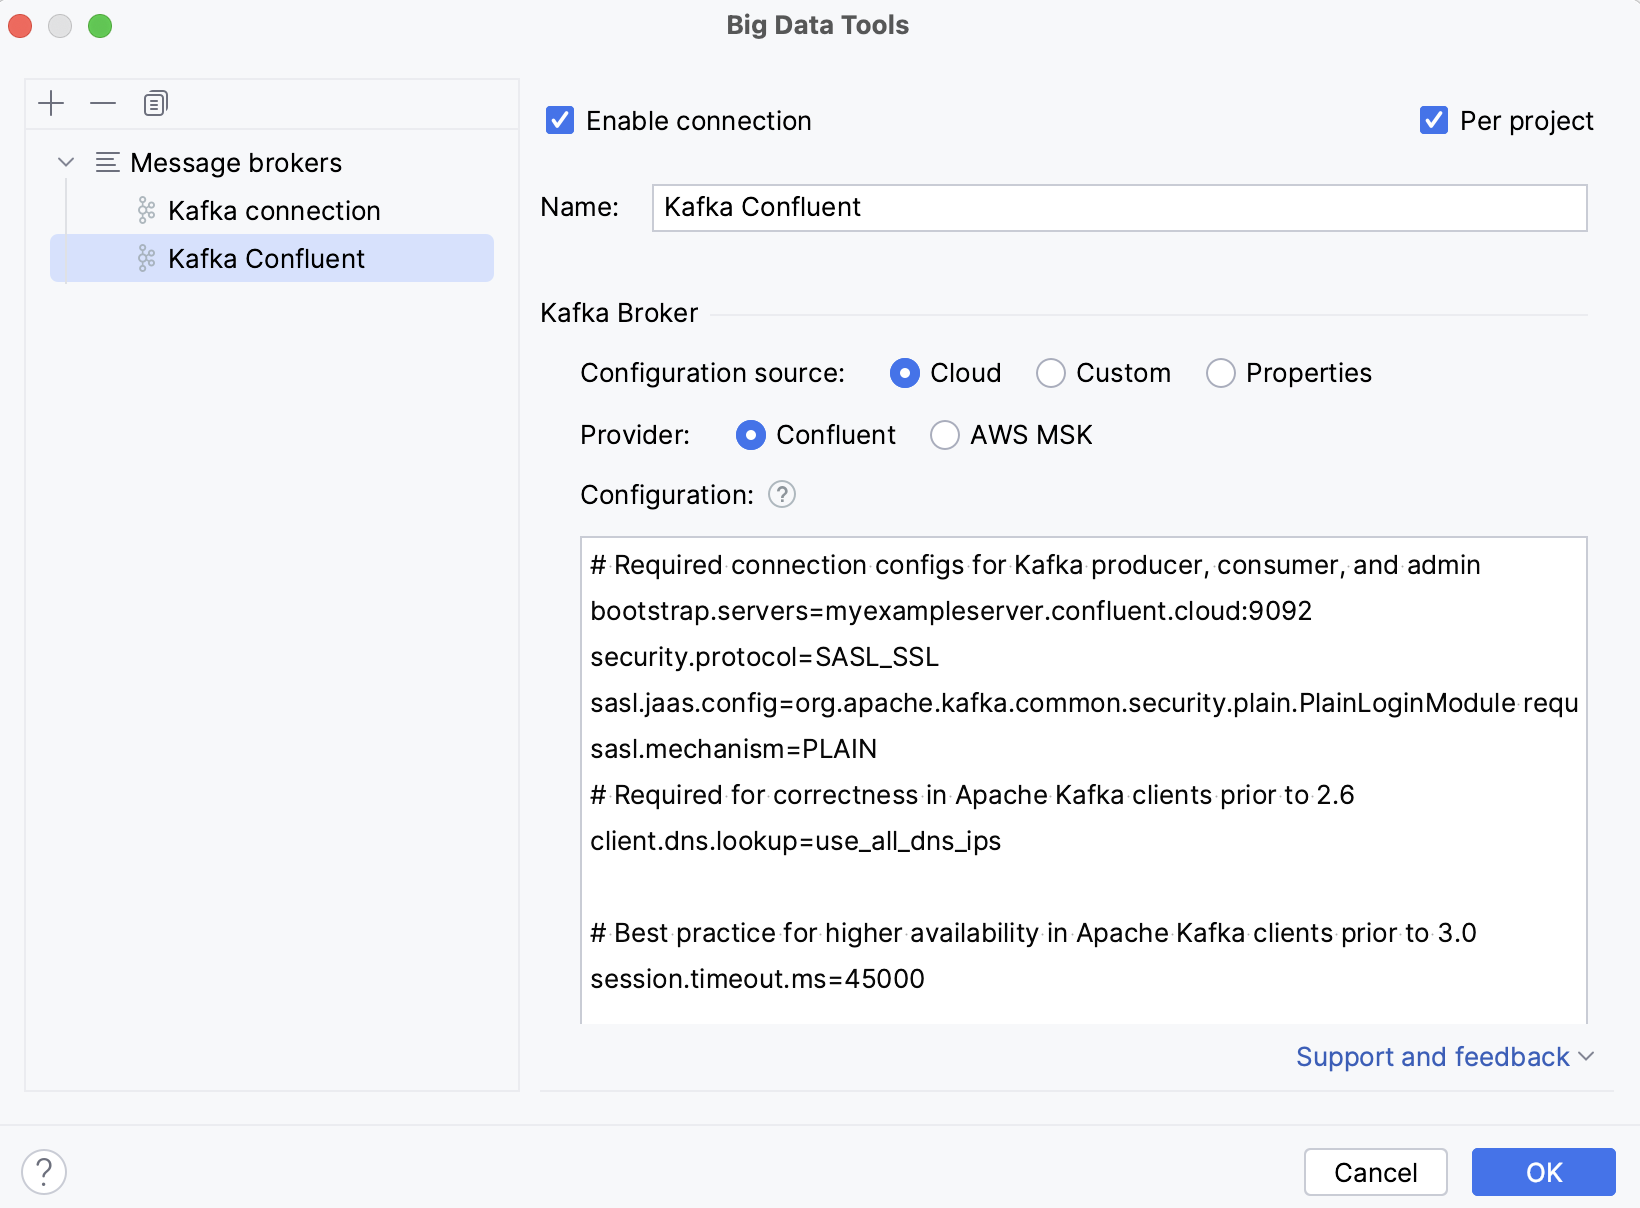
Optionally, you can set up:
Enable connection: deselect if you want to disable this connection. By default, the newly created connections are enabled.
Per project: select to enable these connection settings only for the current project. Deselect it if you want this connection to be visible in other projects.
Connect to AWS MSK cluster
Open the Kafka tool window: .
In the Name field, enter the name of the connection to distinguish it between other connections.
In the Configuration source list, select Cloud, and then, in the Provider list, select AWS MSK.
In the Bootstrap servers field, enter the URL of the Kafka broker or a comma-separated list of URLs.
In the AWS Authentication list, select the authentication method.
Default credential providers chain: use the credentials from the default provider chain. For more information about the chain, refer to Using the Default Credential Provider Chain.
Profile from credentials file: select a profile from your file.
Explicit access key and secret key: enter your credentials manually.
Optionally, you can connect to Schema Registry.
If you want to use an SSH tunnel while connecting to Kafka, select Enable tunneling and in the SSH configuration list, select an SSH configuration or create a new one.
Once you fill in the settings, click Test connection to ensure that all configuration parameters are correct. Then click OK.
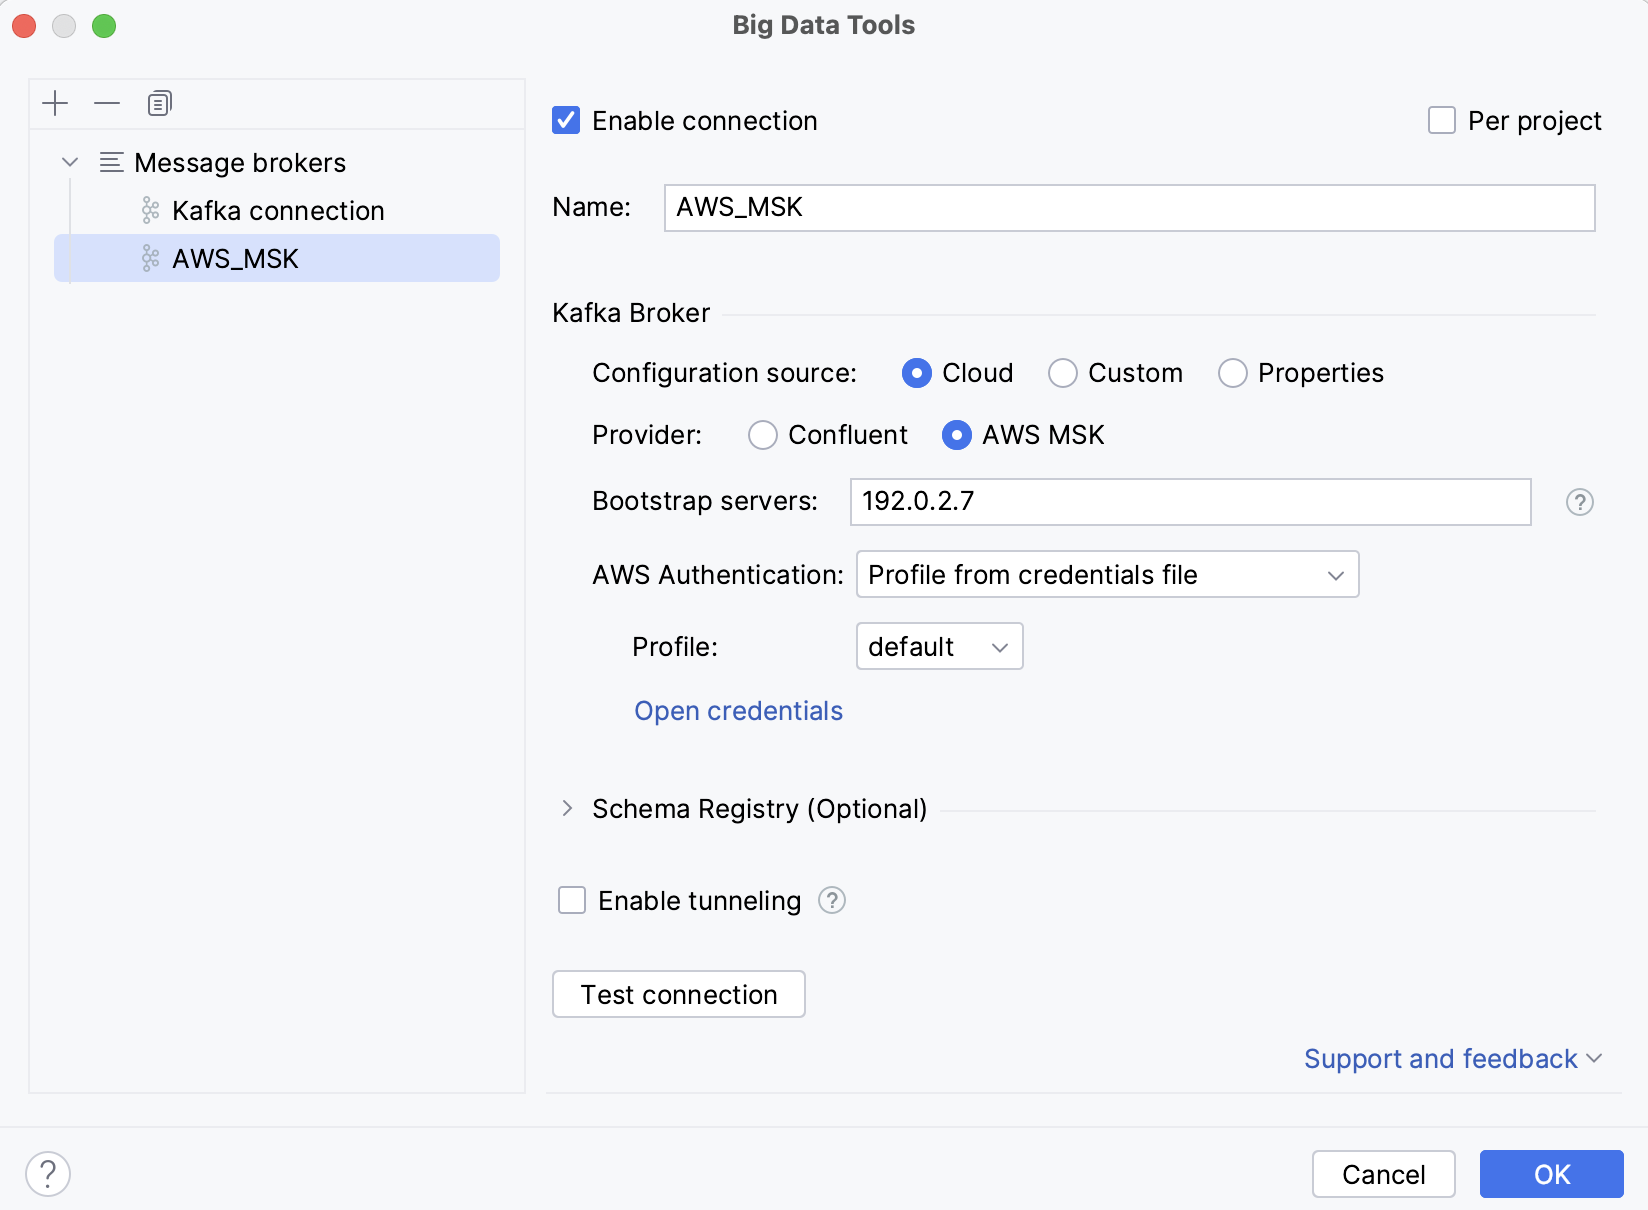
Optionally, you can set up:
Enable connection: deselect if you want to disable this connection. By default, the newly created connections are enabled.
Per project: select to enable these connection settings only for the current project. Deselect it if you want this connection to be visible in other projects.
Connect to custom Kafka server
Open the Kafka tool window: .
In the Name field, enter the name of the connection to distinguish it between other connections.
In the Configuration source list, select Custom.
In the Bootstrap servers field, enter the URL of the Kafka broker or a comma-separated list of URLs.
Under Authentication, select an authentication method:
None: connect without authentication.
SASL: select an SASL mechanism (Plain, SCRAM-SHA-256, SCRAM-SHA-512, or Kerberos) and provide your username and password.
SSL
Select Validate server host name if you want to verify that the broker host name matches the host name in the broker certificate. Clearing the checkbox is equivalent to adding the
ssl.endpoint.identification.algorithm=property.In the Truststore location, provide a path to the SSL truststore location (
ssl.truststore.locationproperty).In the Truststore password, provide a path to the SSL truststore password (
ssl.truststore.passwordproperty).Select Use Keystore client authentication and provide values for Keystore location (
ssl.keystore.location), Keystore password (ssl.keystore.password), and Key password (ssl.key.password).
AWS IAM: use AWS IAM for Amazon MSK. In the AWS Authentication list, select one of the following:
Default credential providers chain: use the credentials from the default provider chain. For more information about the chain, refer to Using the Default Credential Provider Chain.
Profile from credentials file: select a profile from your file.
Explicit access key and secret key: enter your credentials manually.
Optionally, you can connect to Schema Registry.
If you want to use an SSH tunnel while connecting to Kafka, select Enable tunneling and in the SSH configuration list, select an SSH configuration or create a new one.
Once you fill in the settings, click Test connection to ensure that all configuration parameters are correct. Then click OK.
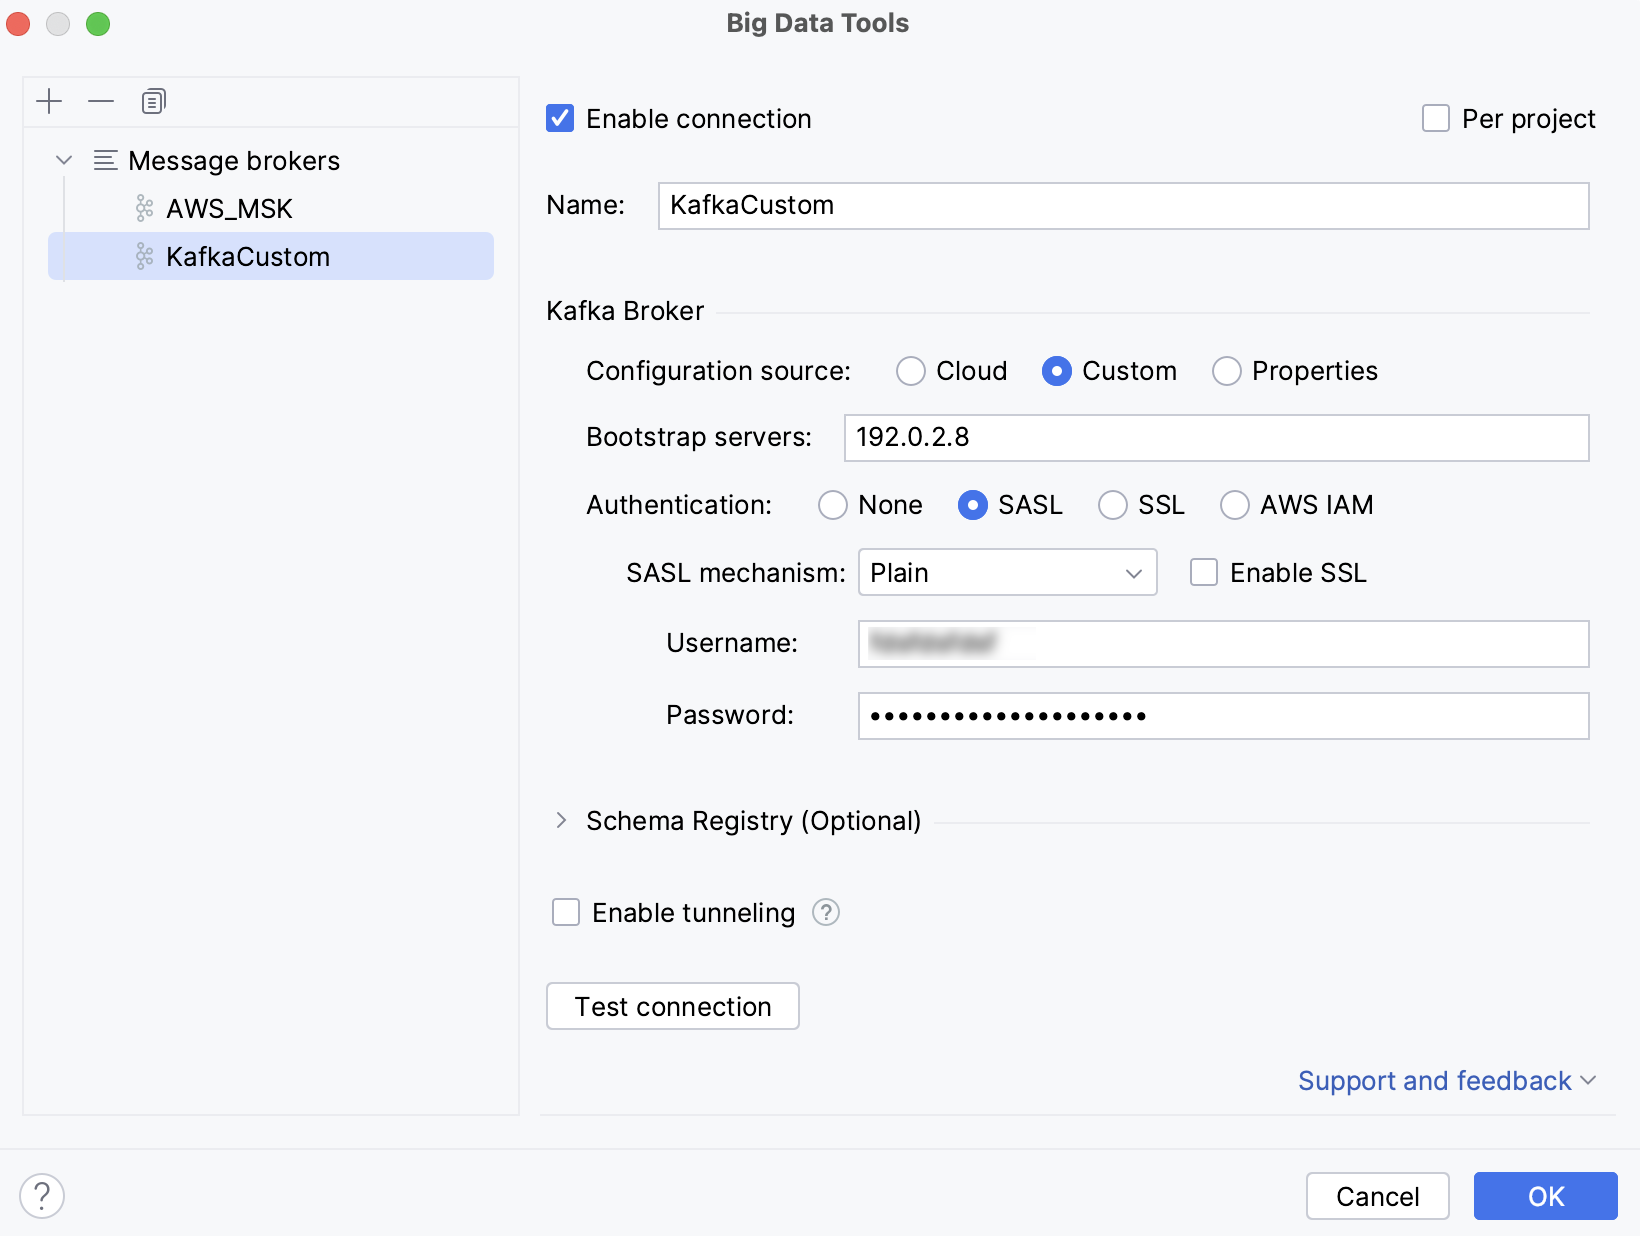
Optionally, you can set up:
Enable connection: deselect if you want to disable this connection. By default, the newly created connections are enabled.
Per project: select to enable these connection settings only for the current project. Deselect it if you want this connection to be visible in other projects.
Connect to Kafka using properties
Open the Kafka tool window: .
In the Name field, enter the name of the connection to distinguish it between other connections.
In the Configuration source list, select Properties.
In the Bootstrap servers field, enter the URL of the Kafka broker or a comma-separated list of URLs.
Select the way to provide Kafka Broker configuration properties:
Implicit: paste provided configuration properties. Or you can enter them manually using code completion and quick documentation that IntelliJ IDEA provides.
From File: select the properties file.
Optionally, you can connect to Schema Registry.
If you want to use an SSH tunnel while connecting to Kafka, select Enable tunneling and in the SSH configuration list, select an SSH configuration or create a new one.
Once you fill in the settings, click Test connection to ensure that all configuration parameters are correct. Then click OK.
Optionally, you can set up:
Enable connection: deselect if you want to disable this connection. By default, the newly created connections are enabled.
Per project: select to enable these connection settings only for the current project. Deselect it if you want this connection to be visible in other projects.
Once you have established a connection to the Kafka server, a new tab with this connection appears in the Kafka tool window. You can use it to produce and consume data, create and delete topics. If you are connected to a Schema Registry, you can also view, create, and update schemas.
Click in any tab of the Kafka tool window to rename, delete, disable, or refresh the connection, or to modify its settings.

All the cluster topics are displayed in the Topics section. You can click to show only favorite topics or
to show or hide internal topics. Click any topic to get more details on it, such as info on partitions, configuration, and schema.
Create a topic
Open the Kafka tool window: .
Select Topics and click
(or press Alt+Insert).
Name the new topic, specify the number of partitions and replication factor, and click OK.
Delete records from a topic
Open the Kafka tool window: .
Under Topics, right-click a topic and select Clear Topic (or click
to the left of it). Click OK to confirm deletion.
Produce and consume data
Produce data
Open the Kafka tool window: .
Select a Kafka connection and click
(Create Producer).
This will open a producer in a new editor tab.
In the Topic list, select a topic to write messages to.
Under Key and Value, select the message key and value. Use
to generate a random value based on the selected type.
If you are connected to a Schema Registry, you can select Schema Registry to check the sent data against a selected schema.
Under Headers, provide any custom headers. If you have them in JSON or CSV format, you can paste them into this section.
Under Flow, you can control the record flow:
In Records at a time, enter a number if you want to send multiple records simultaneously.
Select Generate random keys and Generate random values if you want the record data to be randomly generated.
Set the Interval in milliseconds between sending records.
Provide Stop Conditions if you want the producer to stop sending messages when either a specified number of records is reached or a specified amount of time has elapsed.
Under Options, provide additional options:
Partition: specify a topic partition, to which the record must be sent. If not specified, the default logic is used: The producer takes the hash of the key modulo the number of partitions.
Compression: select the compression type for data generated by the producer: None, Gzip, Snappy, Lz4, or Zstd.
Idempotence: select if you want to ensure that exactly one copy of each message is written in the stream.
Acks: select Leader if you want the leader to write the record to its local log and respond without awaiting full acknowledgement from all followers. Select All for the leader to wait for the full set of in-sync replicas to acknowledge the record. Keep None for the producer in order not to wait for any acknowledgment from the server.
Click Produce.
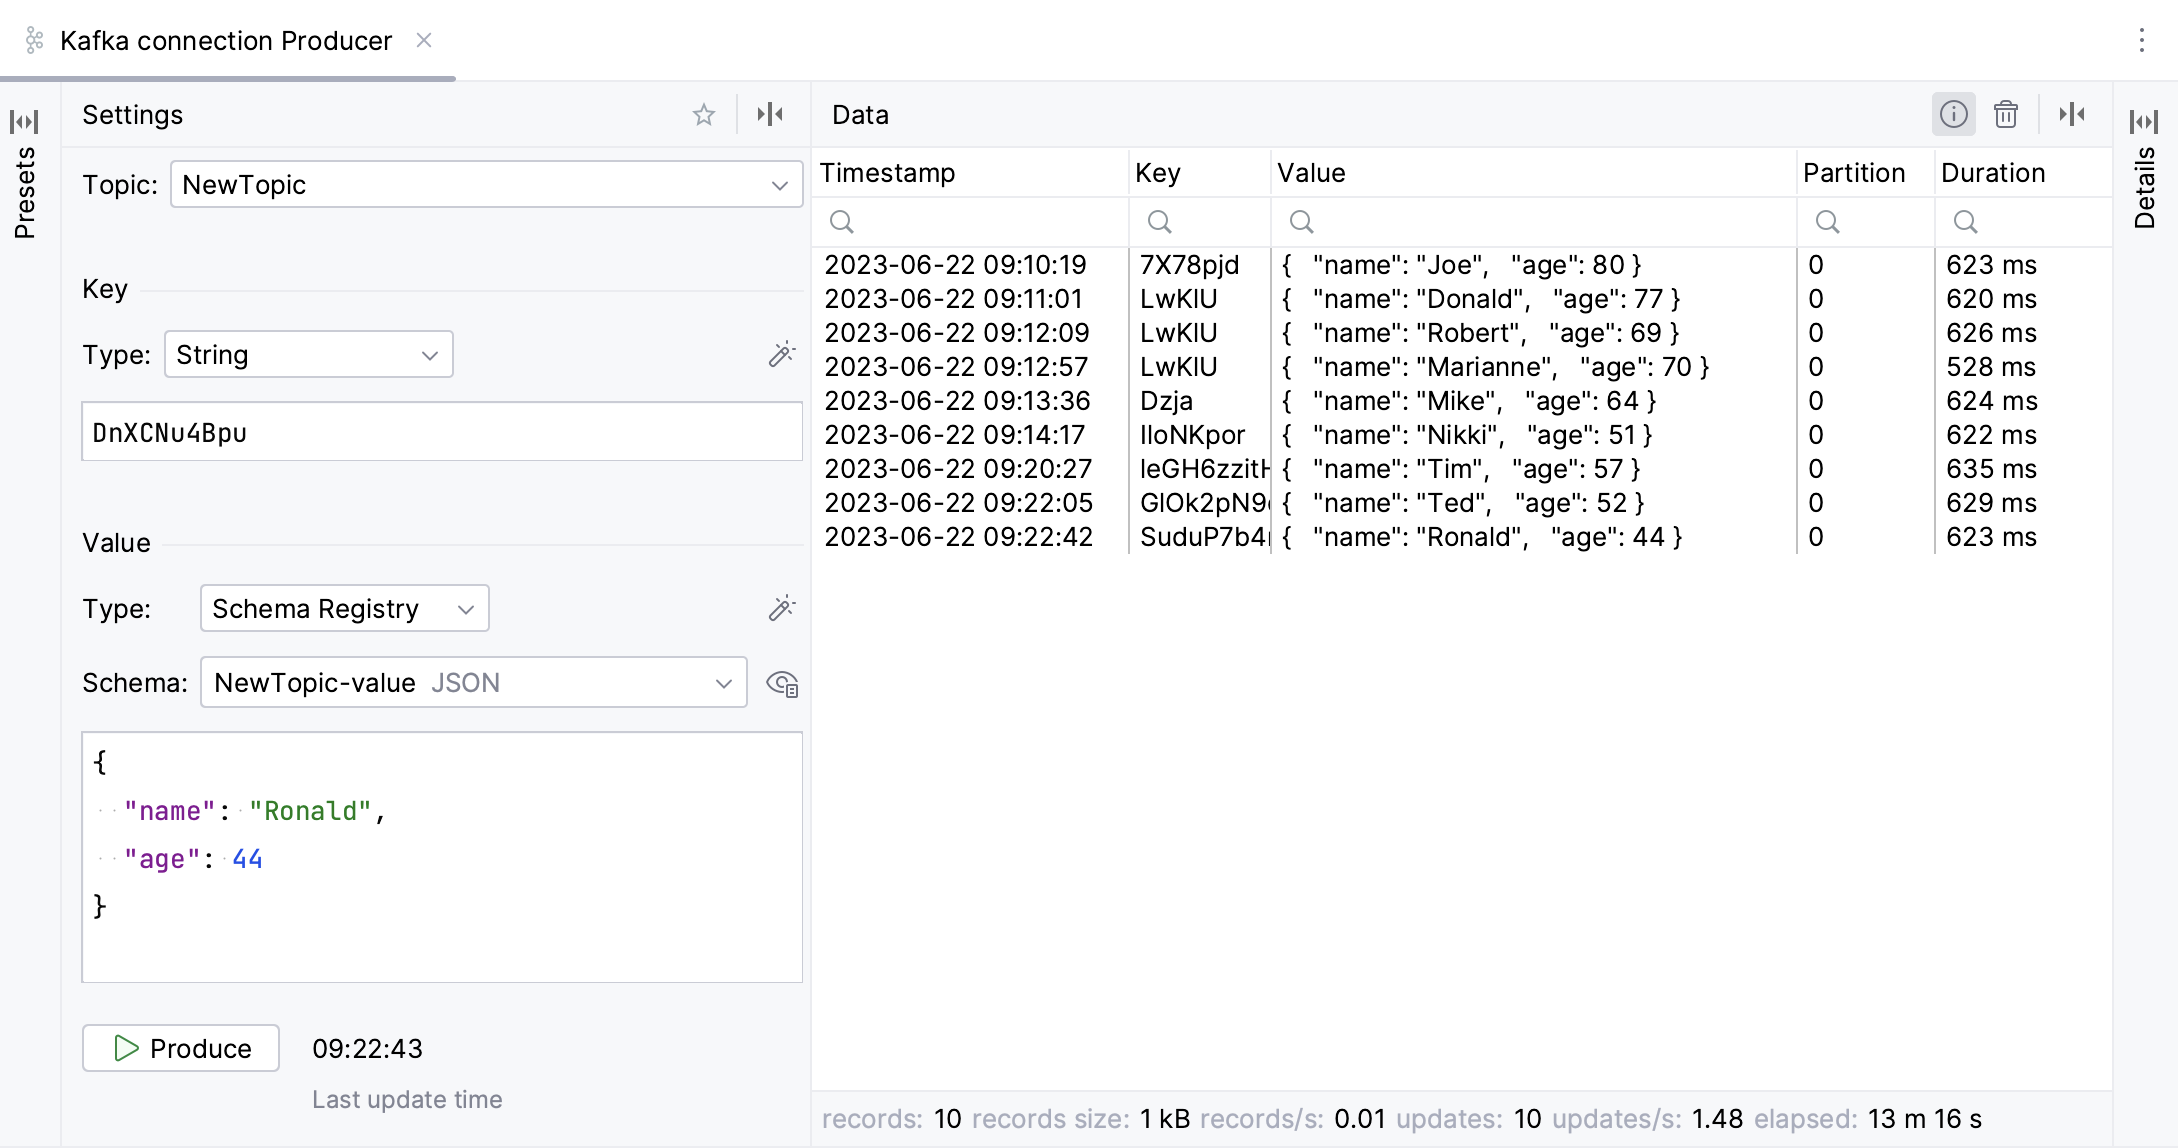
You can then click any record in the Data tab to show its details. You can also click to enable statistics.
Consume data
Open the Kafka tool window: .
Select a Kafka connection and click
(Create Consumer).
This will open a consumer in a new editor tab.
In the Topic list, select a topic to which you want to subscribe.
Under Key and Value, select the data types for the keys and values of records that you are going to consume.
Use Range and Filters to narrow down the data for consumption:
In the Start from list, select a period or offset from which you want to consume data. Select From the beginning to get all records from the topic.
In the Limit list, select when to stop receiving data, for example, when a certain number of records is reached in the topic.
Use Filter to filter records by substring in their keys, values, or headers.
Under Partitions enter a partition ID or a comma-separated list of IDs to get records from specific partitions only.
Click Start Consuming.
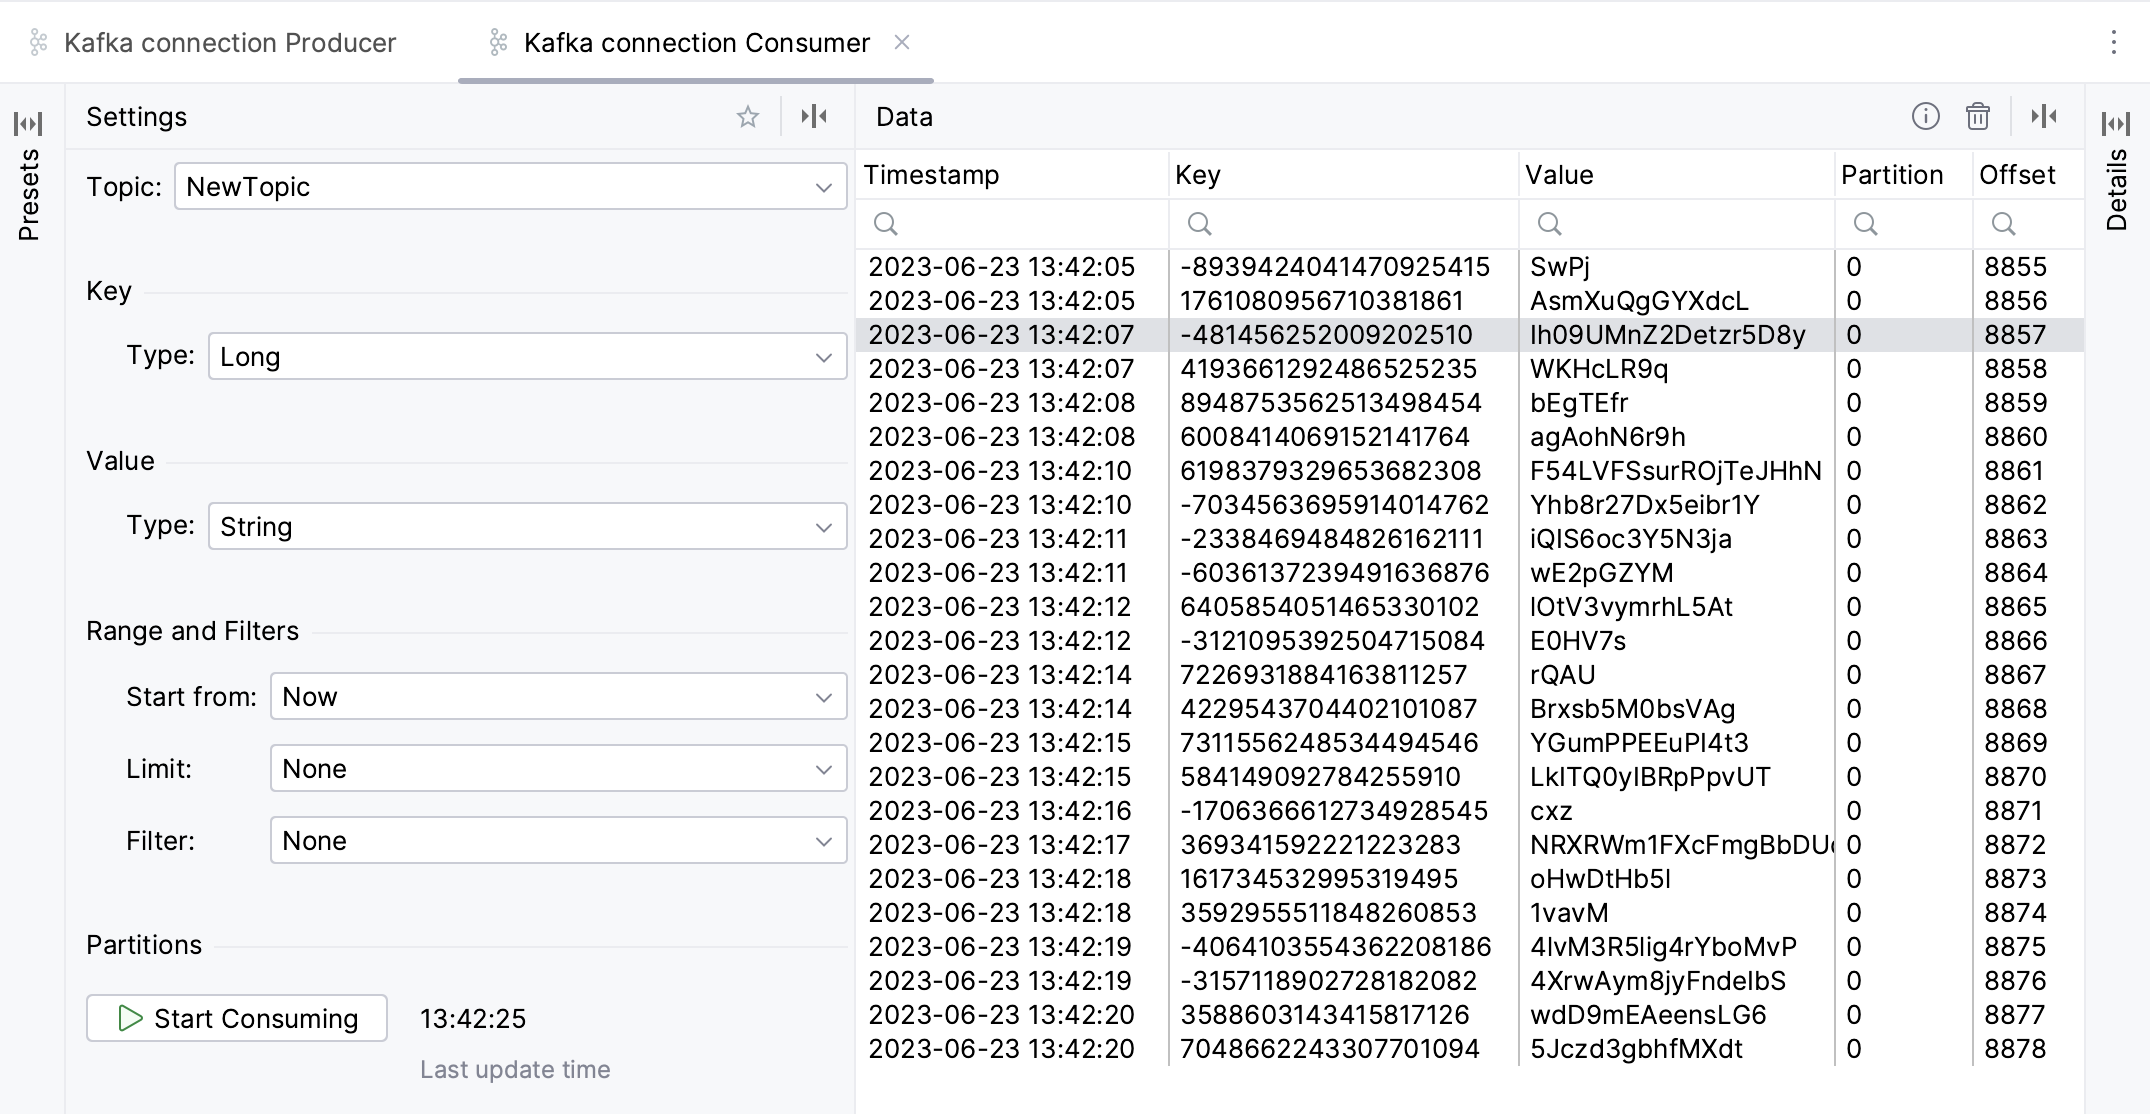
You can then click any record in the Data tab to show its details. You can also click to enable statistics.
Save a producer or consumer preset
If you often produce or consume data with the same keys, values, headers, or other parameters, you can save them as a preset. You can then reuse presets to quickly create a producer or a consumer.
In the Kafka tool window, click
(Create Producer) or
(Create Consumer).
Specify the needed parameters and, on top of the producer or consumer creation form, click
(Save Preset).
The parameters are saved as a preset, which is available in the Presets tab. Click a preset to apply it.
Work with Schema Registry
Producers and consumers can use schemas to validate and ensure consistency of their record keys and values. The Kafka plugin integrates with Schema Registry and supports Avro, Protobuf, and JSON schemas. It enables you to:
Connect to a Schema Registry
Create, update, delete, and clone schemas
Preview schemas in raw format or tree view
Compare schema versions
Delete schema versions
Connect to Schema Registry
Create connection to a Kafka Broker using cloud providers, custom server, or properties.
If you use Confluent, you can paste both Broker and Schema Registry properties into the Configuration field.
Otherwise, expand the Schema Registry section and select a provider: Confluent or Glue.
URL: enter the Schema Registry URL.
Configuration source: select the way to provide connection parameters:
Custom: select the authentication method and provide credentials.
If you want to use SSL settings different from those of the Kafka Broker, clear the Use broker SSL settings checkbox and provide the path for the truststore.
Properties: paste provided configuration properties. Or you can enter properties manually using code completion and quick documentation that IntelliJ IDEA provides.
Region: select the Schema Registry region.
AWS Authentication: select the authentication method:
Default credential providers chain: use the credentials from the default provider chain. For more information about the chain, refer to Using the Default Credential Provider Chain.
Profile from credentials file: select a profile from your file.
Explicit access key and secret key: enter your credentials manually.
Registry name: enter the name of a Schema Registry to which you want to connect or click
to select it from the list.
Once you fill in the settings, click Test connection to ensure that all configuration parameters are correct. Then click OK.
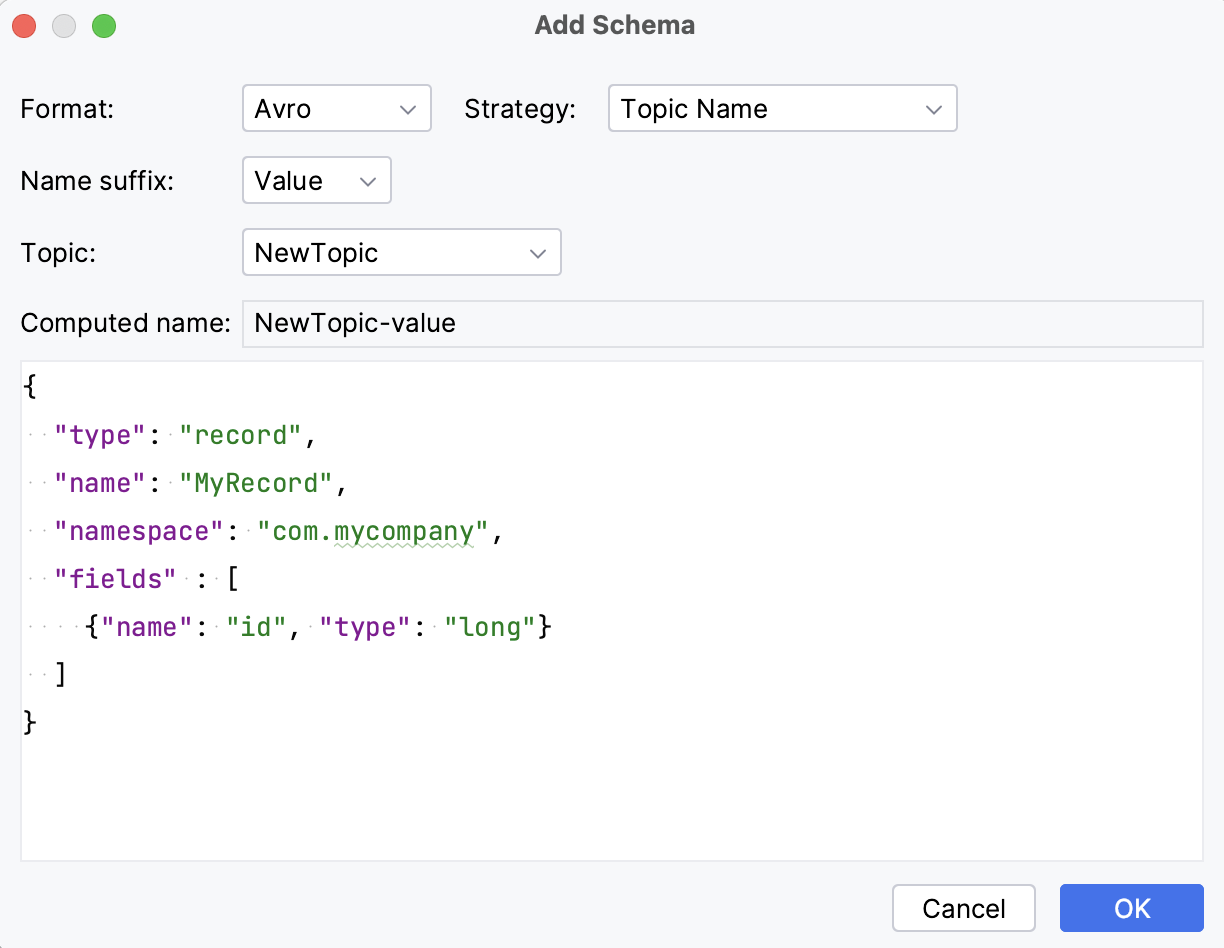
Create schema
Open the Kafka tool window: .
Select Schema Registry and click
(or press Alt+Insert).
In the Format list, select the schema format: Avro, Protobuf, or JSON.
In the Strategy list, select the naming strategy and, depending on the selected strategy, set up the name suffix or select a topic. Alternatively, select Custom name and enter any name.
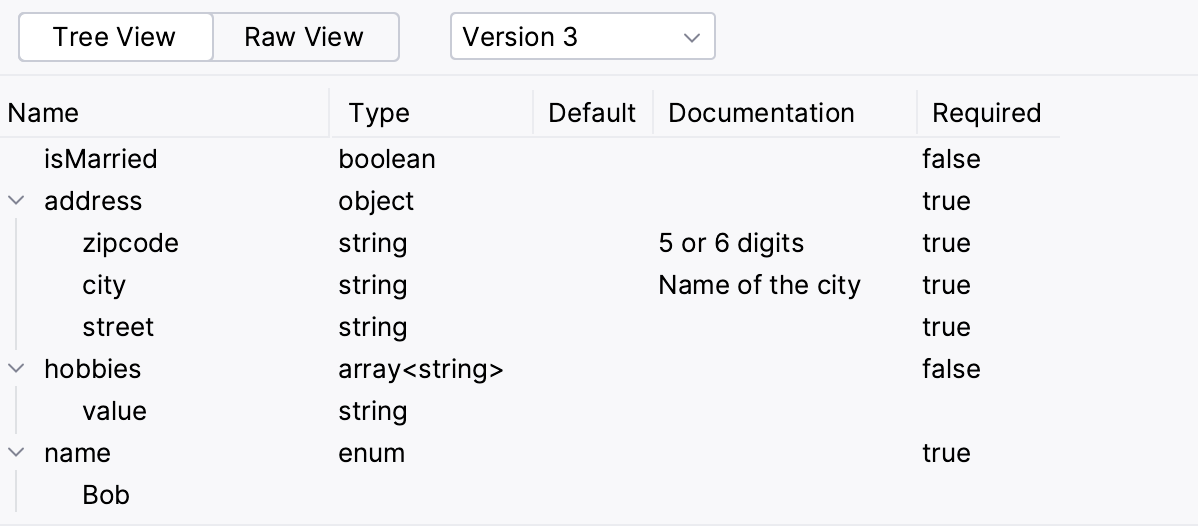
You can preview schemas in a tree and raw view.
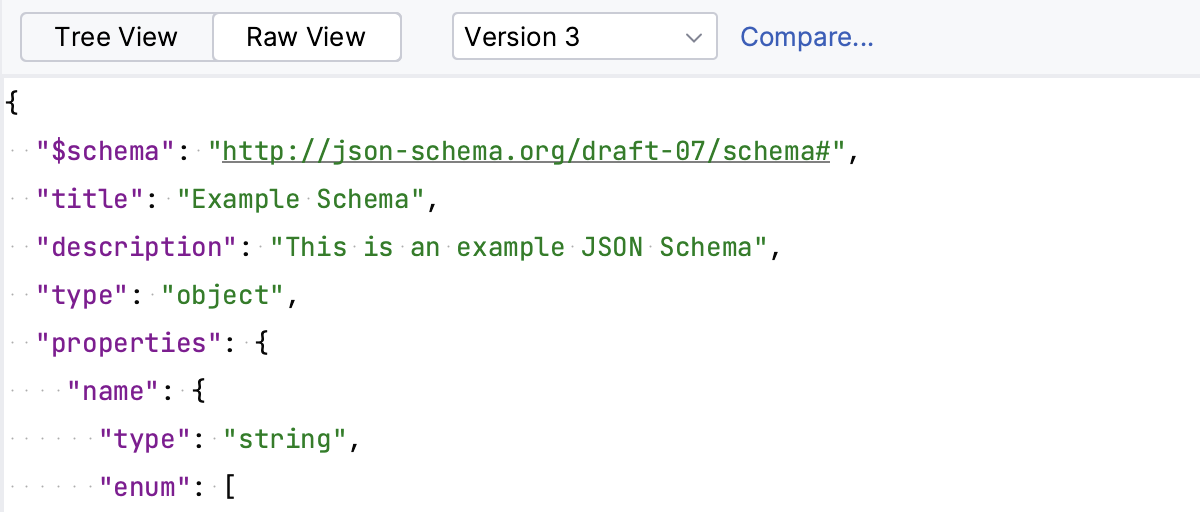
Compare schema versions
When connected to a Schema Registry, select a schema under Schema Registry.
Switch to Raw View and click Compare. The button is available if a schema has more than one version.

Delete a schema version
If a schema has more than one version, you can delete a particular version. Schema Registry supports two types of deletion: soft (when the schema metadata and ID are not removed from the registry after the version deletion) and hard (which removes all metadata, including schema IDs). The ability to choose depends on whether you use Confluent or AWS Glue Schema Registry:
In Confluent Schema Registry, soft delete is used by default. You can choose to use a hard delete by selecting the Permanent deletion checkbox.
AWS Glue Schema Registry always uses a hard delete.
Under Schema Registry, select a schema.
To the right of it, click
and select Delete Version.