Security
This section covers the following security-related procedures and advisories:
JetBrains Trust Center
Our Trust Center provides comprehensive information on:
our infrastructure security
organizational security policies and data privacy procedures
non-public documents: SOC2 report, penetration testing reports, etc.
answers to frequently asked questions.
CVE assessment and response
We perform an automated scanning of the OCI images we ship to the customers on a regular basis together with an impact assessment of the results of such scans.
We consider Critical CVEs as a ground to release a new minor version of Datalore, as long as our assessment identifies that the attack vector of the CVE in question is applicable to any of the user-interactable parts of Datalore.
However, not all the vulnerabilities provide an attacker with a vector to compromise Datalore components; for example, the command line argument parser of the CLI tool shipped with Datalore notebook agent might be vulnerable — but this does not affect the Datalore agent itself directly. Moreover, this tool can be easily uninstalled or upgraded by modifying the baseline image.
Nevertheless, due to the gap in the Datalore's release cycle, there's a chance that you might be able to detect the CVE which has not been addressed yet in the current stable release of Datalore. That said, we still address less-impactful vulnerabilities, but within our planned release cycle.
If you believe that you have identified a critical vulnerability, that might impact your operations - please, contact our Support.
Permissions
Runtime
Datalore notebook agent relies on two things which require elevated access to the runtime: CRI-U and FUSE mounts within the containers. Both of these things require at least SYS_ADMIN capability granted to the runtime, otherwise Reactive mode and attached files won't work properly.
For the same reason, Datalore operational capacity is limited on environments with limited permission scope, like AWS Fargate.
We are looking into ways of reducing the scope of the permissions required. If Datalore is planned to be operated within the communal infrastructure, it's advised to provision a dedicated set of host machines specifically for Datalore compute agents.
Database
Make sure the Postgres' user for provisioning Datalore has CREATE privileges. This ensures proper execution of ALTER TABLE/COLUMN commands derived from Datalore SQL migrations. EXECUTE privilege is also required.
Sensitive data flow within Datalore
By its nature, Datalore can be in possession of sensitive data if it is instructed to connect to such a data source (database or object storage).
However, only three Datalore components can technically process such data: notebook agents, SQL session runtimes, and notebook outputs. For a more detailed explanation, continue reading this block.
The following diagrams describe four different data flows where external sensitive data (like database contents or private keys) are involved.
SQL cell execution data flow
As one of the core concepts in Datalore, the notebook can interact with a remote data source if instructed by the user. For example, a Datalore authenticated user modifies the source code by adding an SQL statement within an SQL cell connected to a pre-configured database connection.
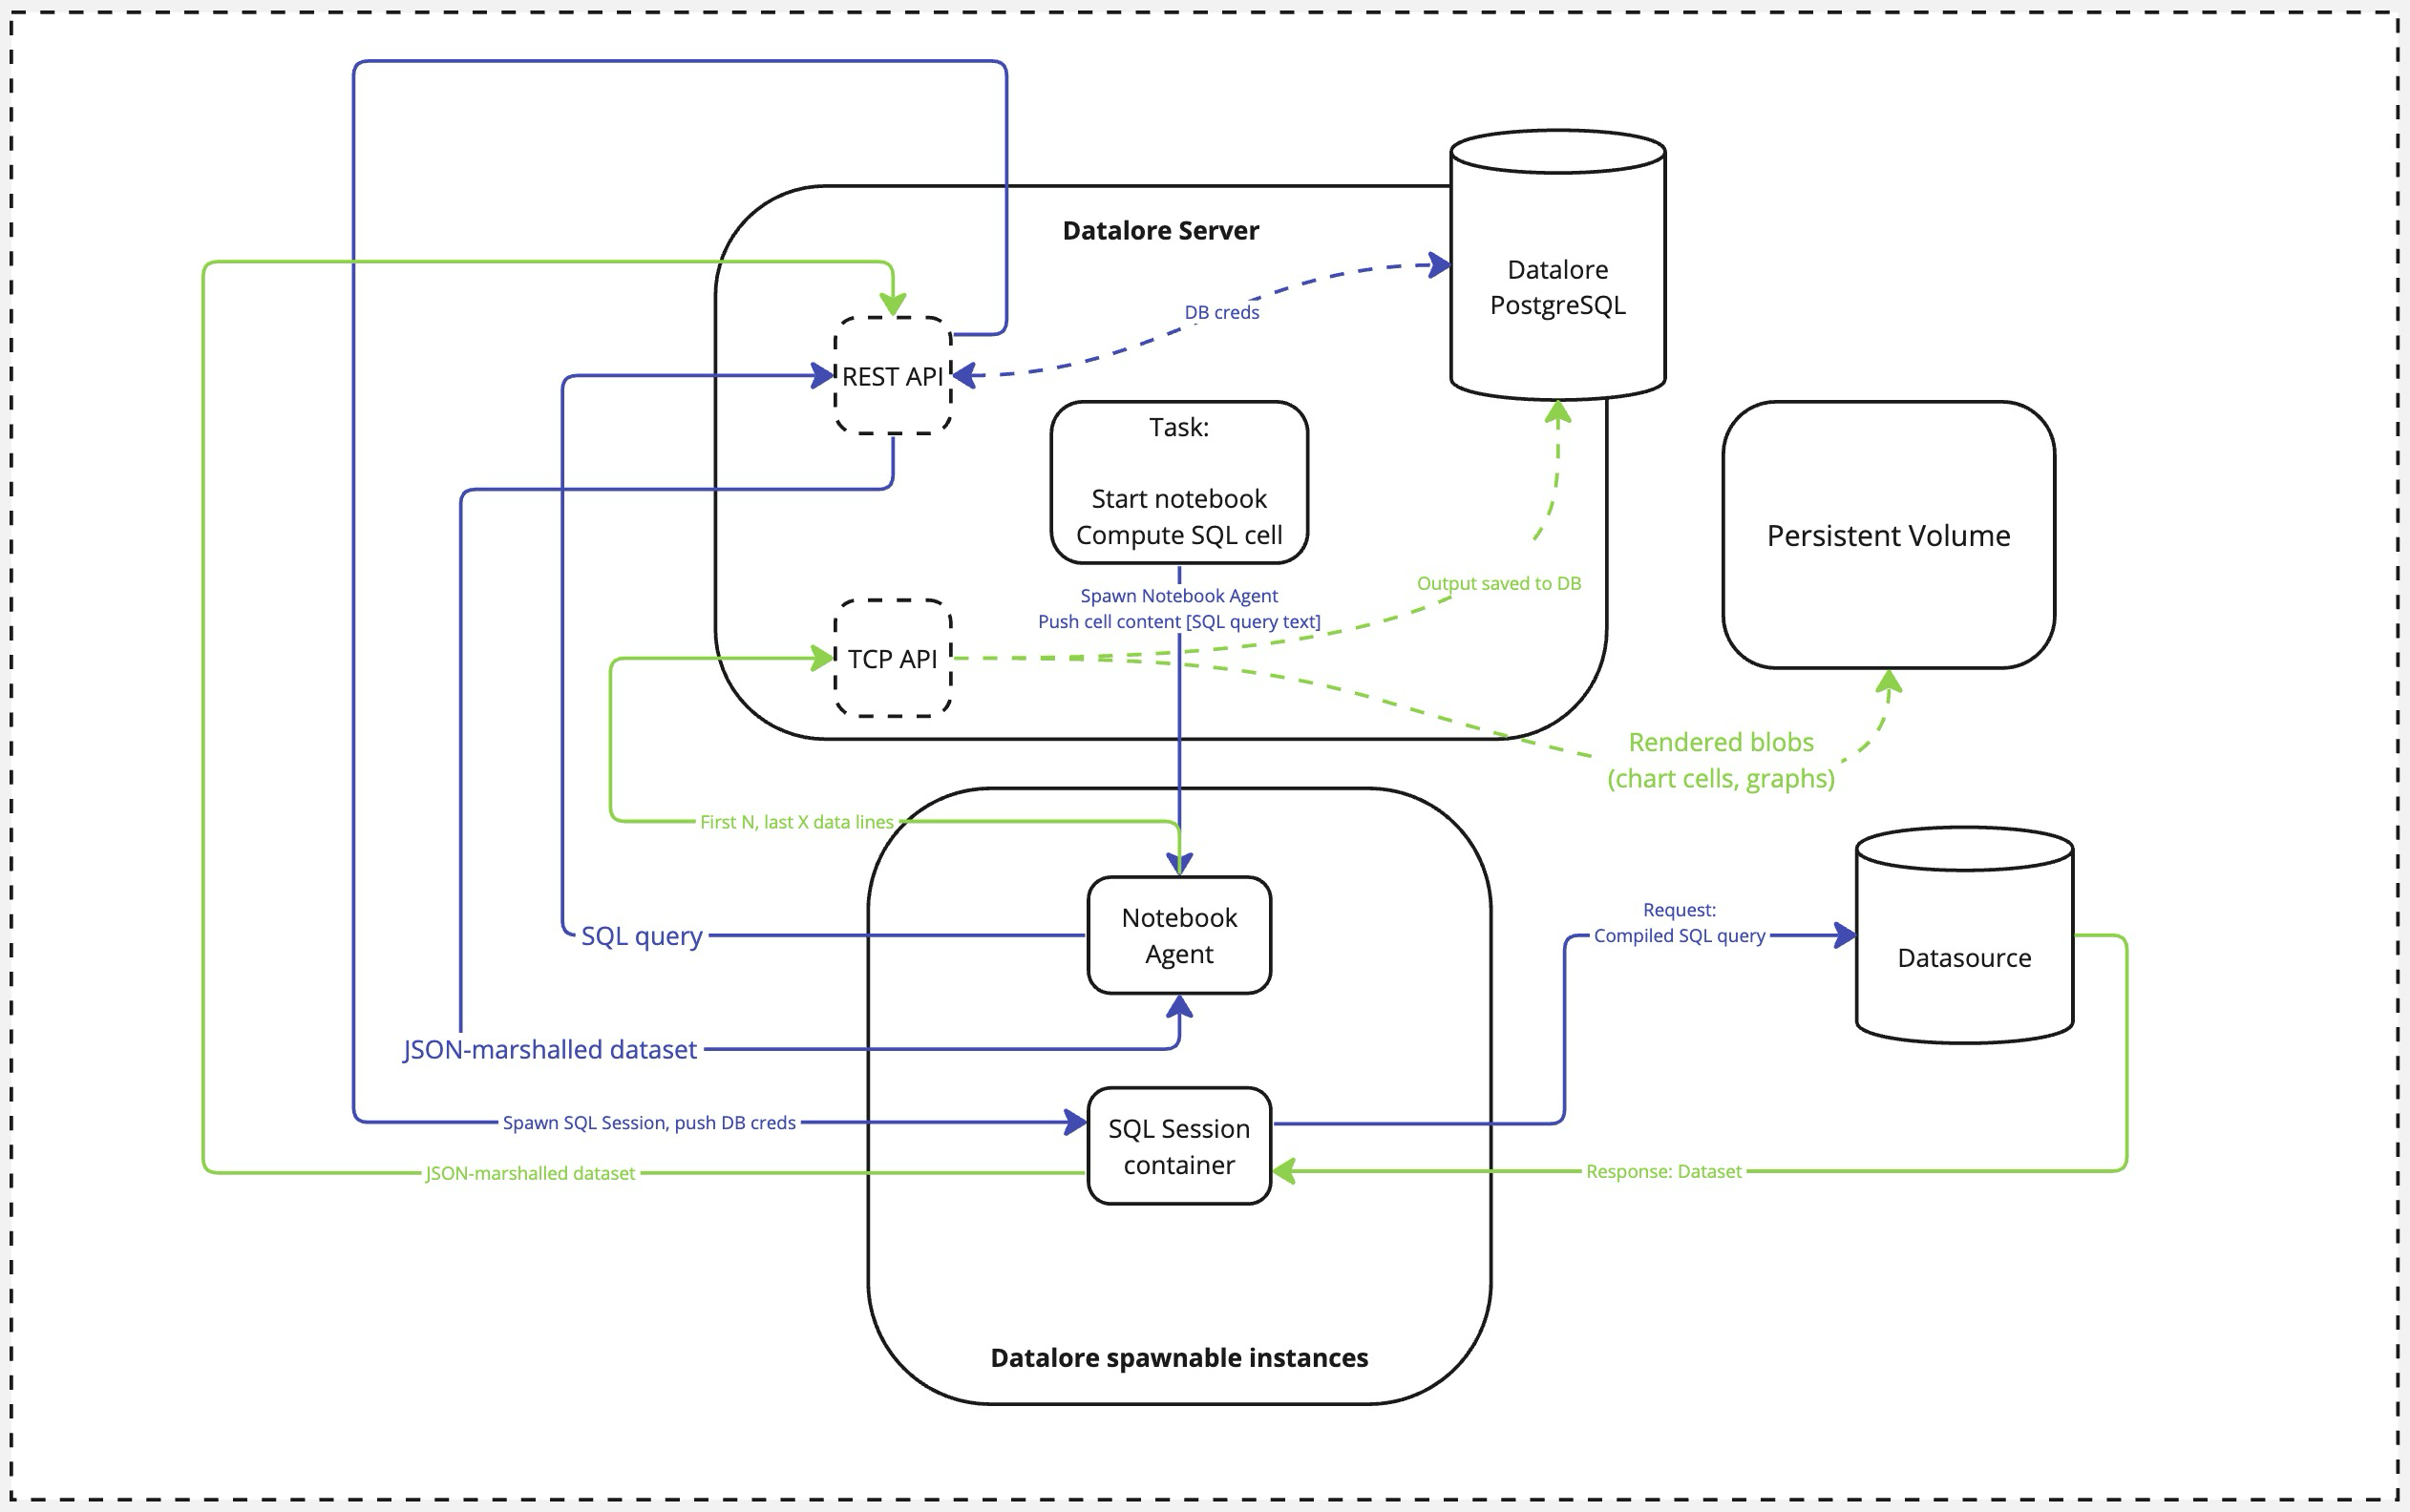
An external actor calls an SQL cell computation event. This is an event triggered by user (or by user intention via Run notebooks using API).
Datalore spawns a new Notebook Agent container.
The Notebook Agent contacts Datalore's REST API, passing over the SQL query string.
Datalore requests the database credentials and spawns an SQL Session container, passing over these credentials and the SQL query.
The SQL Session compiles the query (performing all the variable substitutions according to the selected SQL dialect) and queries the database.
Once the full dataset is fetched, the SQL Session container converts it to JSON and sends back to the Datalore's REST API.
REST API returns the calculated result to the notebook.
During the task teardown, the Notebook Agent caches the first N and the last X values (those are currently non-configurable and set to 100 each) to the database over the Datalore's TCP API. This slice of the dataset is saved to Datalore's PostgreSQL database. Additionally, all the rendered blobs (like generated images or chart cell outputs) are saved to Datalore's persistent storage using the same TCP API.
Database introspection data flow
Apart from explicitly provided and executed SQL queries within the notebook context, Datalore will also perform a database introspection as a background task to improve user experience when using SQL cells.
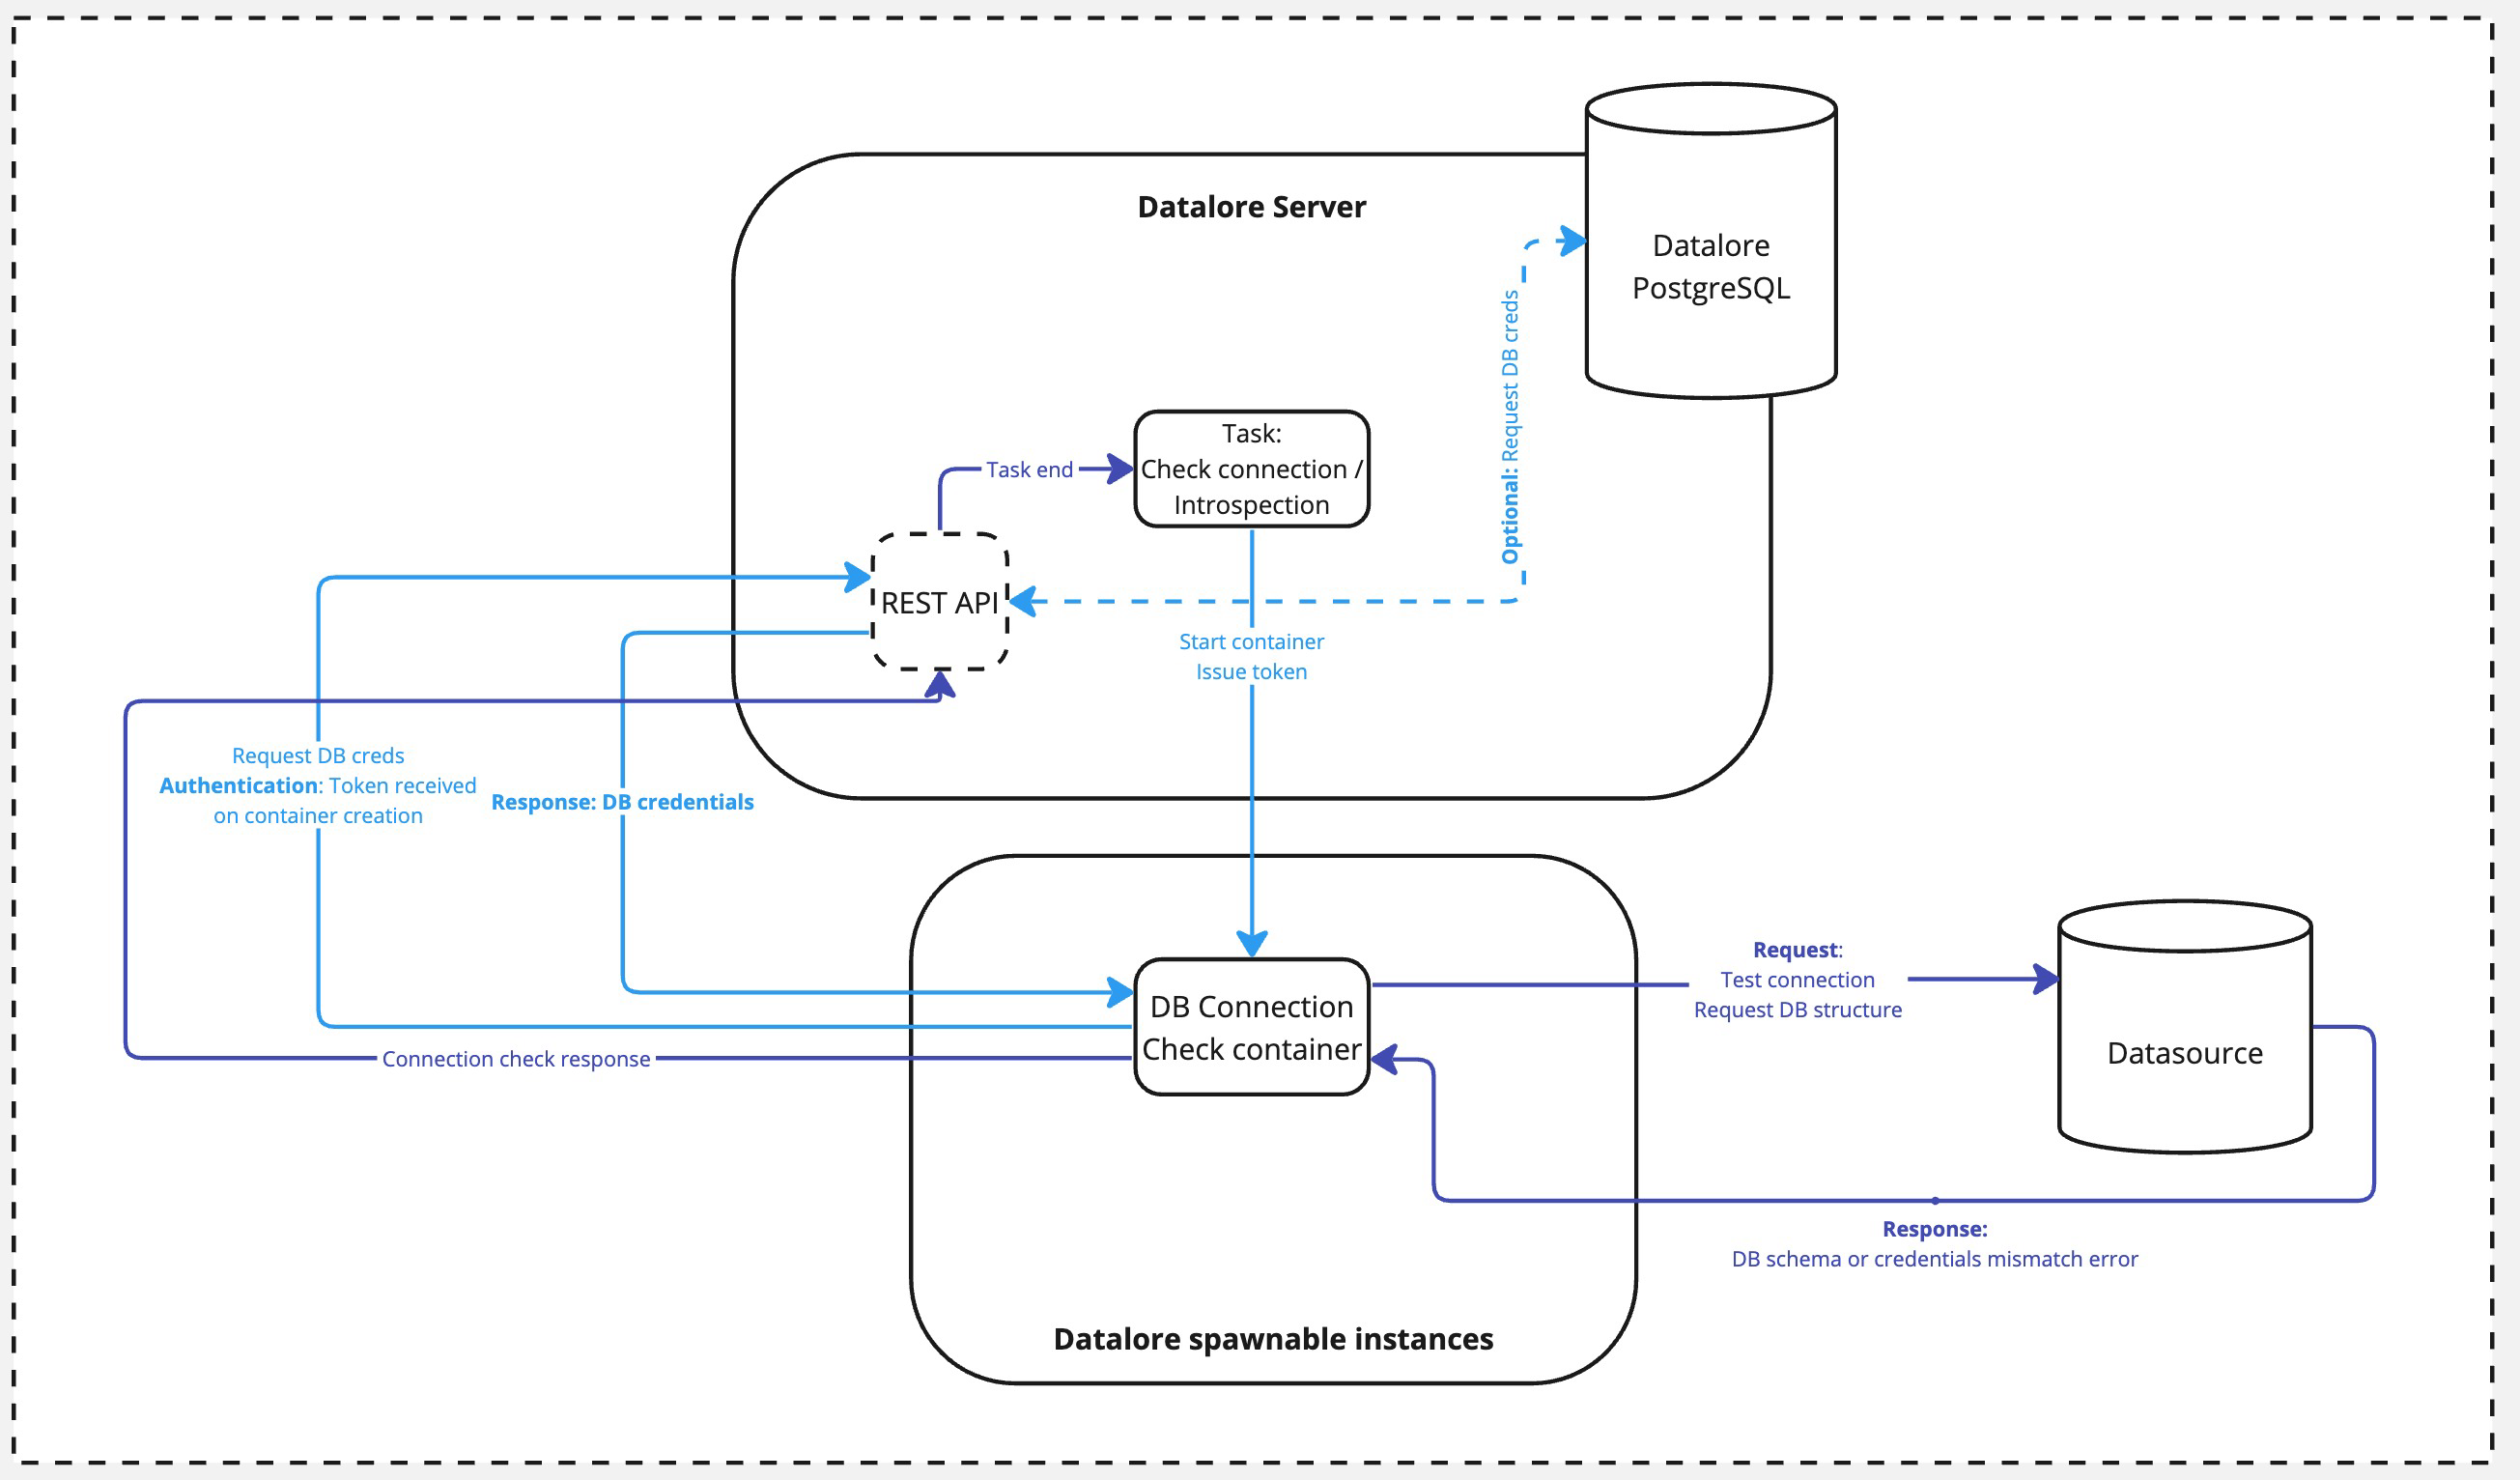
An external actor calls an introspection task. This could be either a UI action by the user or the Datalore server itself as part of routine maintenance or cache update flow.
A DB Connection Check container is spawned. At this step, the Server issues a one-time token for the container.
Once spawned, the container calls Datalore's REST API and authenticates with the token from the previous step. The credentials are either requested from the database (if connected already) or taken from the user input (if triggered by a UI action and there is no connection established yet).
The credentials are passed over to the Connection Check container, and it performs the database connection with the received credentials.
The response is passed back to the Datalore's REST API. Once completed, the Connection Check container is shut down.
Git repo fetching data flow
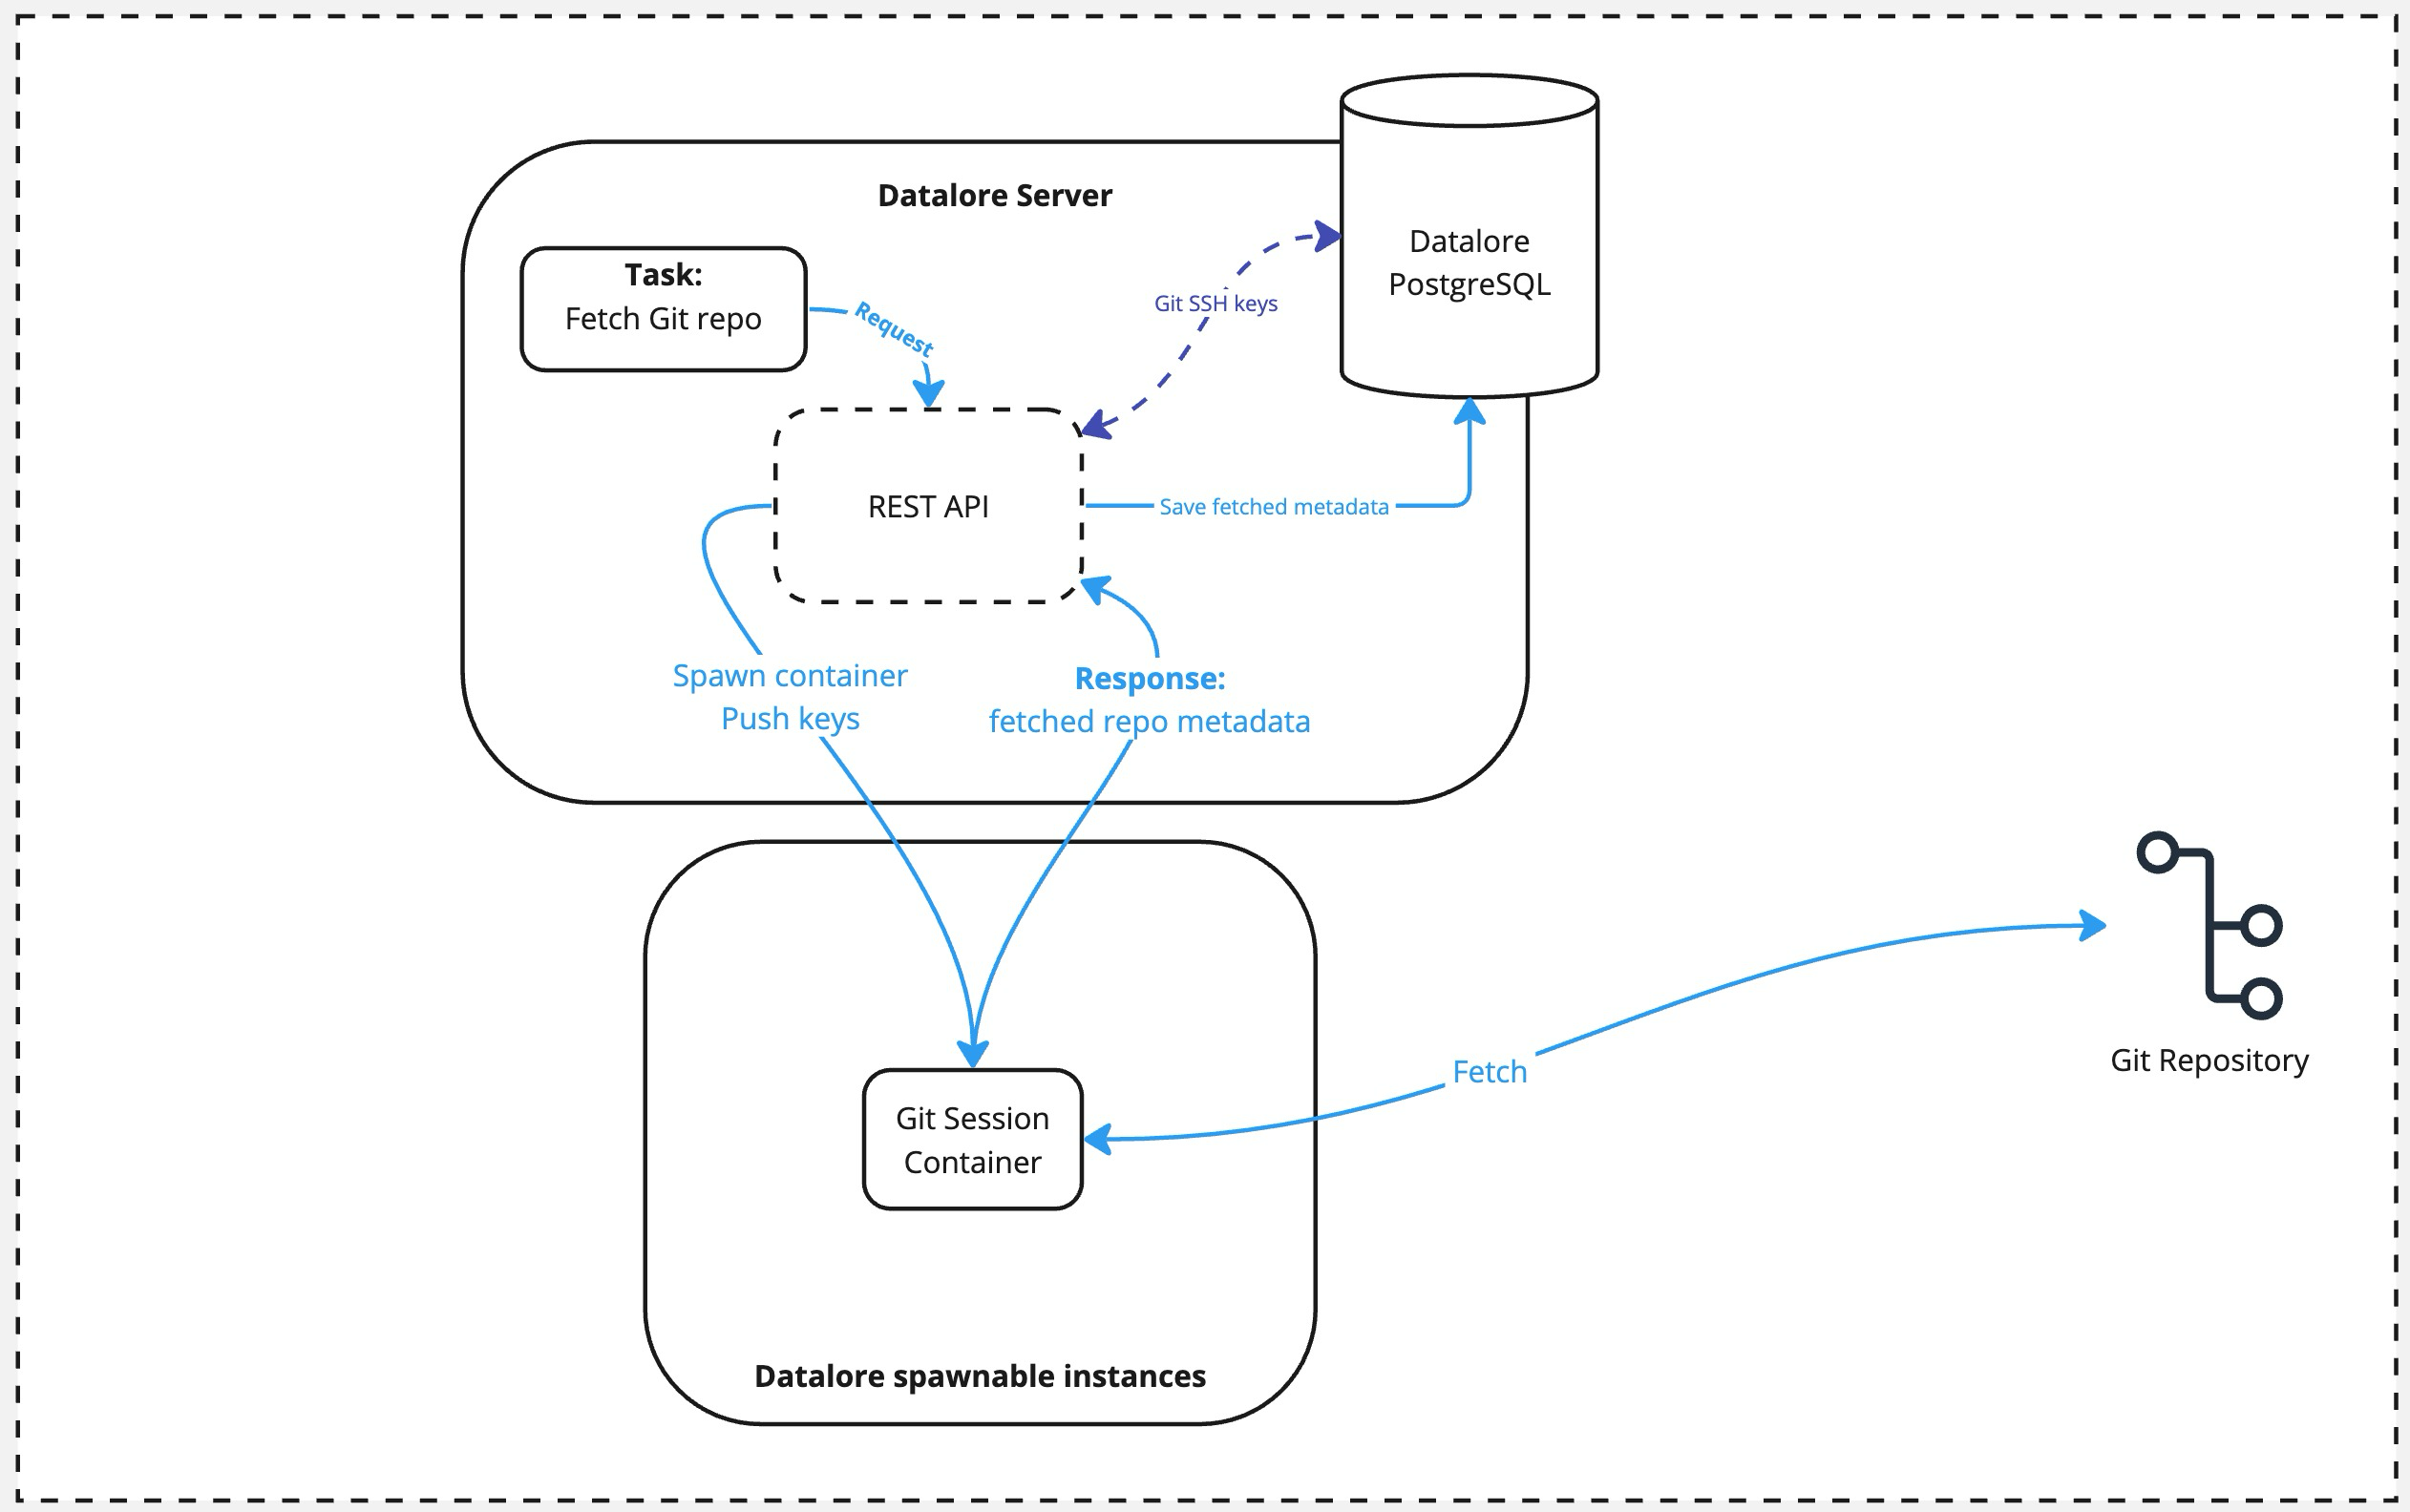
An external actor calls the Git fetch task via the REST API.
Datalore spawns the Git Session container, pushing the private key used for authentication to this container.
Once container is spawned, it does the
git fetchquery against the repo provided and returns the result to the Datalore's API. The container is terminated afterward.As a final step, the fetched metadata is saved to the Datalore's database.
Git repo pulling data flow
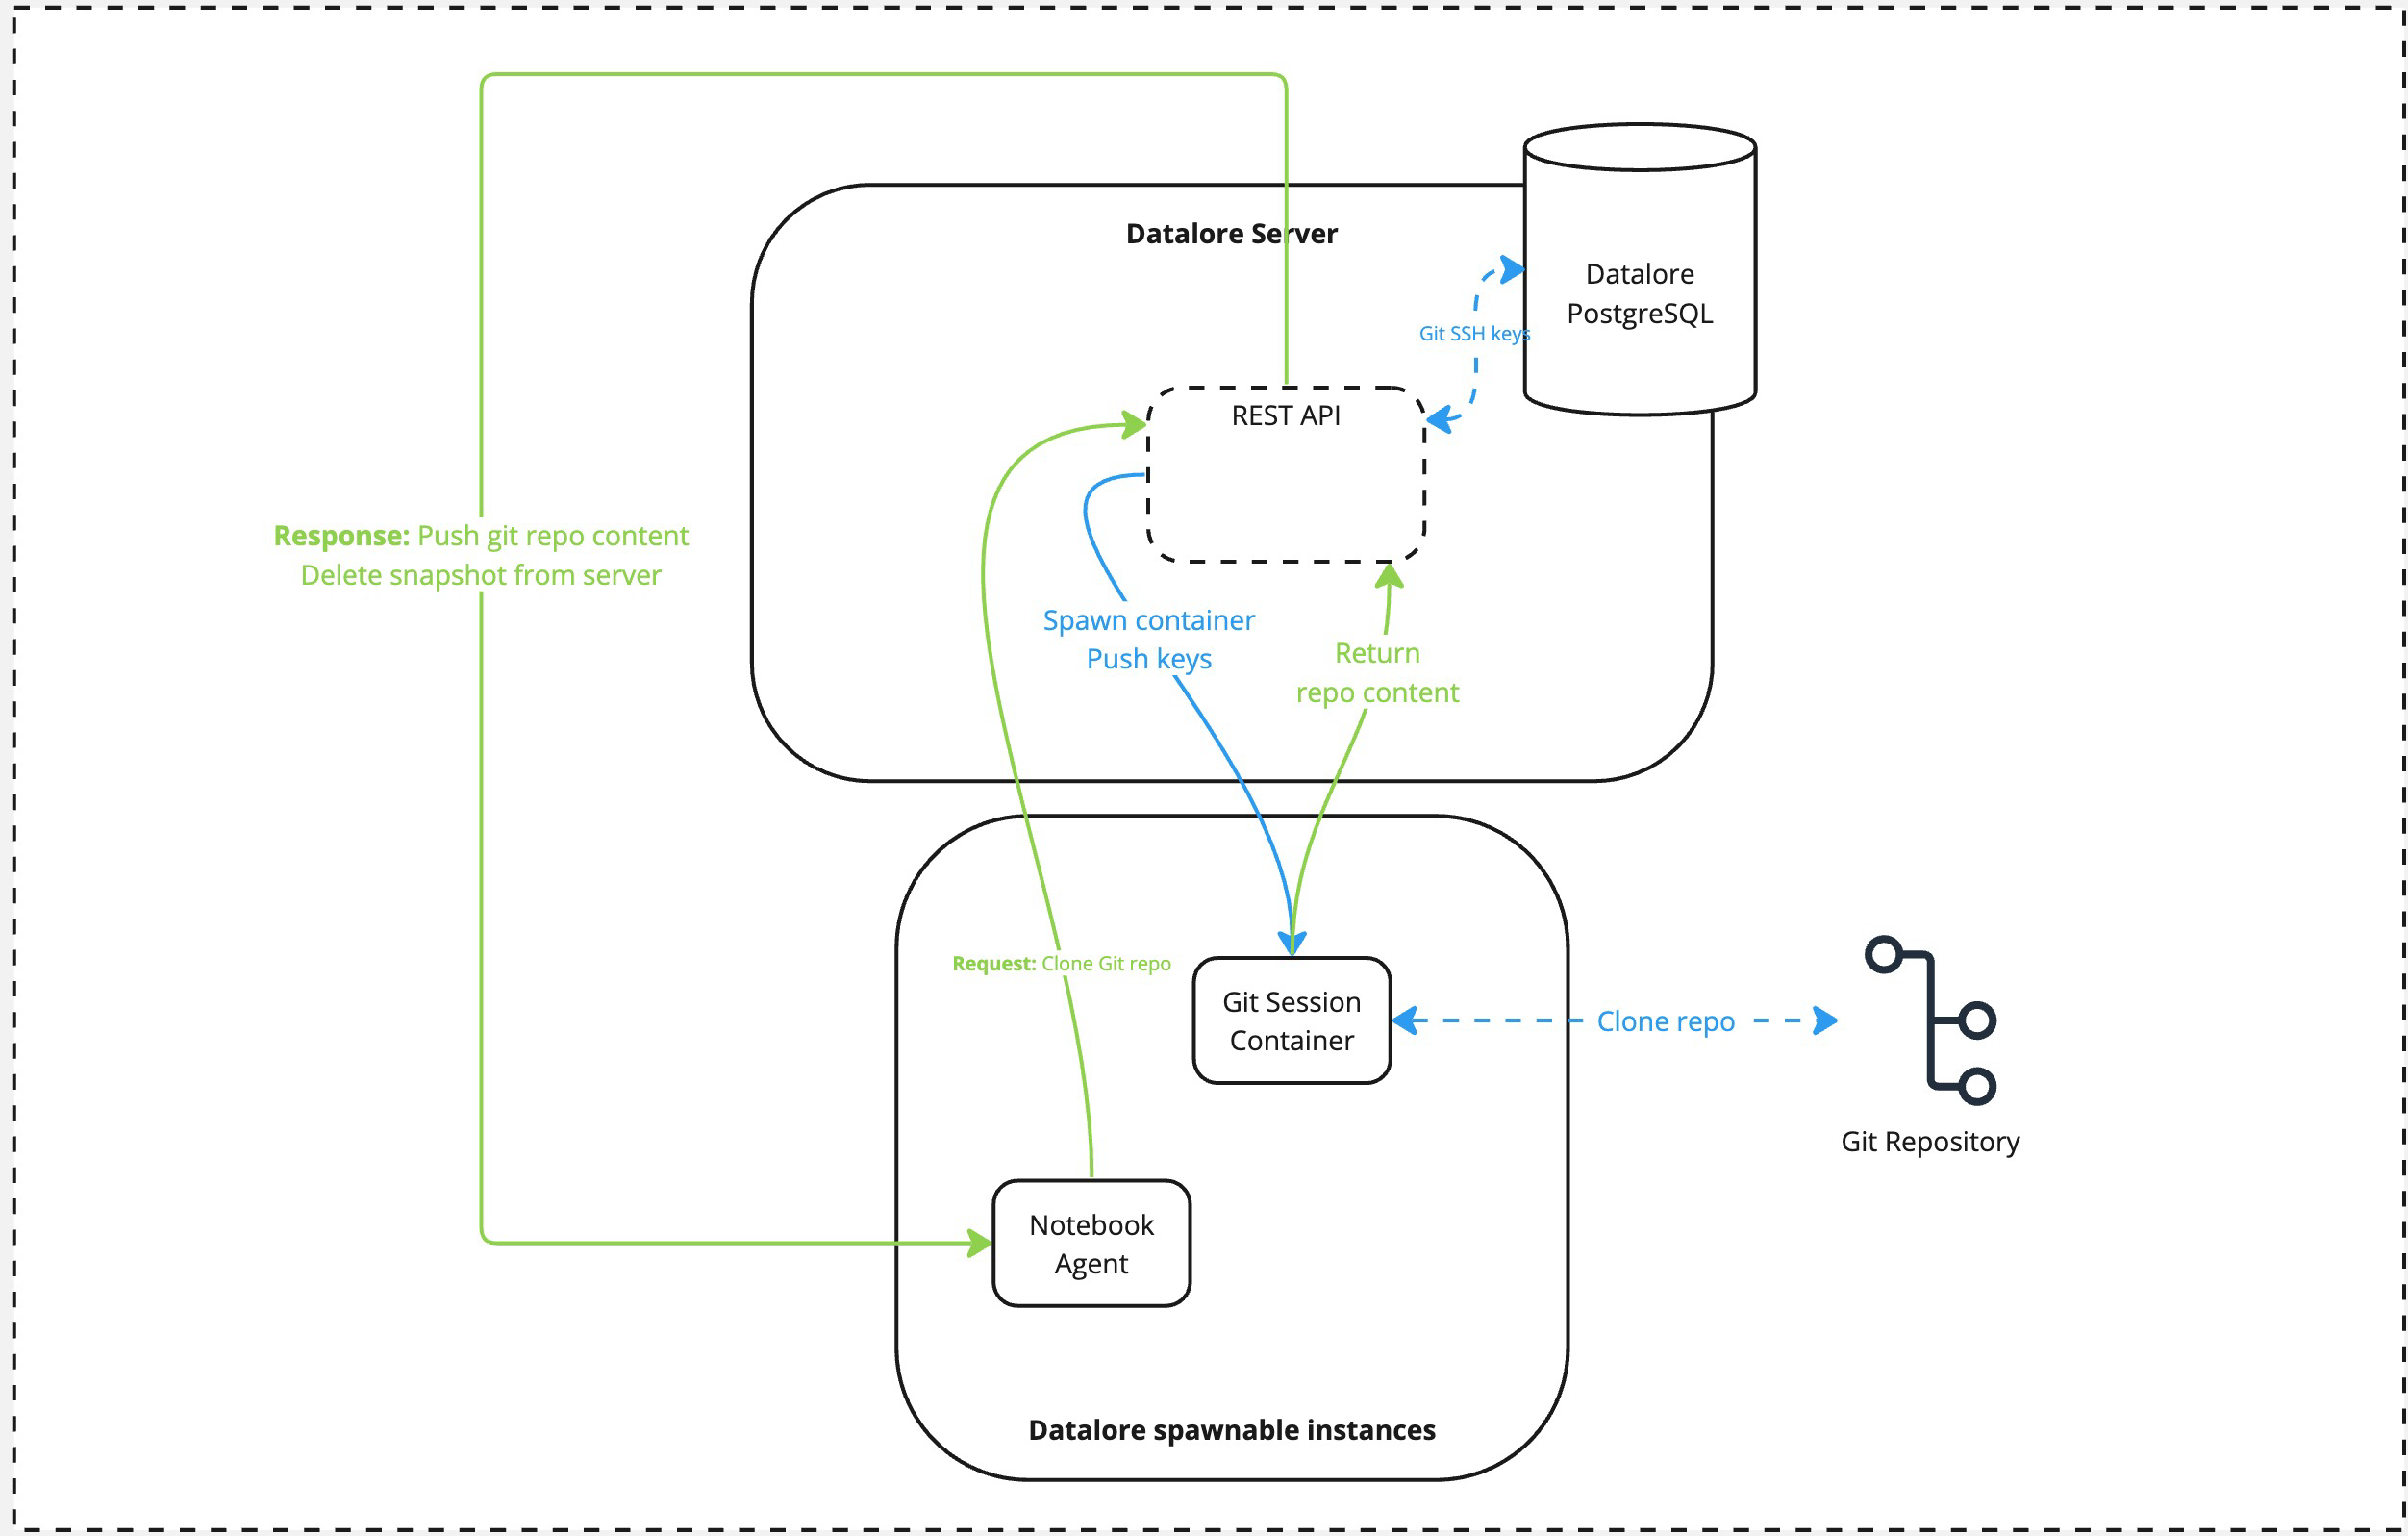
An external actor calls the Git pull task via the notebook agent. The notebook agent calls the Datalore's REST API.
Datalore spawns the Git Session container, pushing the private key used for authentication to this container.
Once container is spawned, it does the
git pullquery against the repo provided and returns the tarball with the pulled repo contents to the Datalore's API. The container is terminated afterward.At this step, Datalore pushes back the tarball to the notebook agent. The tarball is deleted from the server once the operation is complete.
Configure TLS certificates for Datalore
Datalore does not provide any TLS-related options to its end users. Instead, it relies on third-party load balancers (or reverse proxies) to perform such a termination. As a consequence, the Datalore app itself is not normally expected to be user-faced directly without some intermediary proxy deployed next to Datalore.
This procedure describes creating another container with Nginx that will work as a reverse proxy with SSL termination.
Edit the docker-compose.yaml file as shown in the example below.
services: datalore: image: jetbrains/datalore-server:2024.5 expose: [ "8080", "8081", "5050", "4060" ] networks: - datalore-agents-network - datalore-backend-network volumes: - "datalore-storage:/opt/data" - "/var/run/docker.sock:/var/run/docker.sock" environment: # change to your domain name DATALORE_PUBLIC_URL: "https://datalore.example.com" # change to your password DB_PASSWORD: "changeme" # The following block is not required if the external database is used. postgresql: image: jetbrains/datalore-postgres:2024.5 expose: [ "5432" ] networks: - datalore-backend-network volumes: - "postgresql-data:/var/lib/postgresql/data" environment: # change to your password POSTGRES_PASSWORD: "changeme" DATABASES_COMMAND_IMAGE: "jetbrains/datalore-database-command:2024.5" nginx: image: nginx:1.26 networks: - datalore-backend-network volumes: # Adjust accordingly, as needed. - nginx-selfsigned.crt:/etc/ssl/certs/nginx-selfsigned.crt - dhparam.pem:/etc/nginx/dhparam.pem - nginx-selfsigned.key:/etc/ssl/private/nginx-selfsigned.key - ssl.conf:/etc/nginx/conf.d/ssl.conf ports: - 80:80 - 443:443 volumes: postgresql-data: { } datalore-storage: { } networks: datalore-agents-network: name: datalore-agents-network datalore-backend-network: name: datalore-backend-networkEdit the nginx ssl.conf file as shown in the example below.
server { listen 443 ssl; server_name datalore.example.com; # change to your cert and key, accordingly ssl_certificate /etc/ssl/certs/nginx-selfsigned.crt; ssl_certificate_key /etc/ssl/private/nginx-selfsigned.key; ssl_protocols TLSv1.3; ssl_prefer_server_ciphers on; # If absent, can be generated with # openssl dhparam -out dhparam.pem 4096 ssl_dhparam /etc/nginx/dhparam.pem; ssl_ciphers EECDH+AESGCM:EDH+AESGCM; ssl_ecdh_curve secp384r1; ssl_session_timeout 10m; ssl_session_cache shared:SSL:10m; ssl_session_tickets off; # Comment the following two lines out # if the self-signed certificate is used. ssl_stapling on; ssl_stapling_verify on; location / { proxy_http_version 1.1; proxy_set_header Upgrade $http_upgrade; proxy_set_header Connection "upgrade"; proxy_set_header X-Forwarded-Proto "https"; proxy_pass http://datalore:8080; } } server { listen 80 default_server; server_name _; return 301 https://$host$request_uri; }
We advise to use either self-acquired certificate and private key (either self-generated or acquired from the trusted certificate authority), or Let's Encrypt as an alternative.
Perform the following steps based on a selected method:
Create a Kubernetes TLS secret, following the official Kubernetes guidance.
Adjust the
datalore.values.yamlfile, as follows, replacingdatalore.example.comwith your actual FQDN you're going to use with Datalore.ingress: enabled: true tls: - secretName: datalore-tls hosts: - datalore.example.com hosts: - host: datalore.example.com paths: - path: / pathType: Prefix annotations: nginx.ingress.kubernetes.io/proxy-body-size: 8m kubernetes.io/ingress.class: nginx
Install CertManager into your Kubernetes cluster.
Create a
letsencrypt.yamlwith the following content, replacing the placeholders as required:apiVersion: cert-manager.io/v1 kind: Issuer metadata: name: letsencrypt-prod spec: acme: server: 'https://acme-v02.api.letsencrypt.org/directory' email: - PLACE YOUR EMAIL HERE privateKeySecretRef: name: letsencrypt-prod solvers: - http01: ingress: ingressClassName: nginxApply the manifest:
kubectl apply -f letsencrypt.yamlCheck the
kubectl get issuer. Eventually, it should become as follows:kubectl get issuer 1 ↵ NAME READY AGE letsencrypt-prod True 14dAdjust the
datalore.values.yamlfile, as follows, replacingdatalore.example.comwith your actual FQDN you're going to use with Datalore.ingress: enabled: true tls: - secretName: datalore-tls hosts: - datalore.example.com hosts: - host: datalore.example.com paths: - path: / pathType: Prefix annotations: nginx.ingress.kubernetes.io/proxy-body-size: 8m kubernetes.io/ingress.class: nginx
Set the
DATALORE_PUBLIC_URLparameter in the samedatalore.values.yamlfile. Use the same value you provided to replace"https://datalore.example.com"in the step above.dataloreEnv: DATALORE_PUBLIC_URL: "https://datalore.example.com"Apply the configuration and restart Datalore.
Check whether the ingress controller registered the changes:
kubectl get ingress. The expected result is adataloreingress with the 443 port exposed.Check whether the certificate is issued:
kubectl get certificates. The expected output is similar to the one below.kubectl get certificates NAME READY SECRET AGE datalore-tls True datalore-tls 8m5s
Use Kubernetes native secrets for storing a database password
Create a Kubernetes secret using the value from the
namekey above as the secret name, and the desired password as the secret value.Modify the
databaseSecretblock in yourdatalore.values.yamlas follows:databaseSecret: create: false name: datalore-db-password key: DATALORE_DB_PASSWORD(if applicable) Remove the
passwordkey with its value from thedatabaseSecretblock.Proceed based on whether this is your fresh deployment or Datalore is already installed.
Proceed with the installation. No further action is required.
Apply the configuration
helm upgrade --install -f datalore.values.yaml datalore datalore/datalore --version 0.2.24
Database password rotation
Datalore requires a permanent connection to a PostgreSQL database to operate properly. Once Datalore is deployed, the database password is saved within the environment so Datalore can re-use it later once restarted.
However, you might want to change this password later due to various compliance or operational reasons.
Locate the
values.yamlfile being used for the deployment.Depending on the method used: either replace the password within the
databaseSecretblock, OR update the secret value if the Kubernetes secret is used instead of the plain-text value.Update the Datalore deployment:
helm upgrade --install -f datalore.values.yaml datalore datalore/datalore --version 0.2.24
Locate the
docker-compose.yamlfile being used for the deployment.Update the
DB_PASSWORDblock inenvironmentblock.
Configure TLS between server and agent
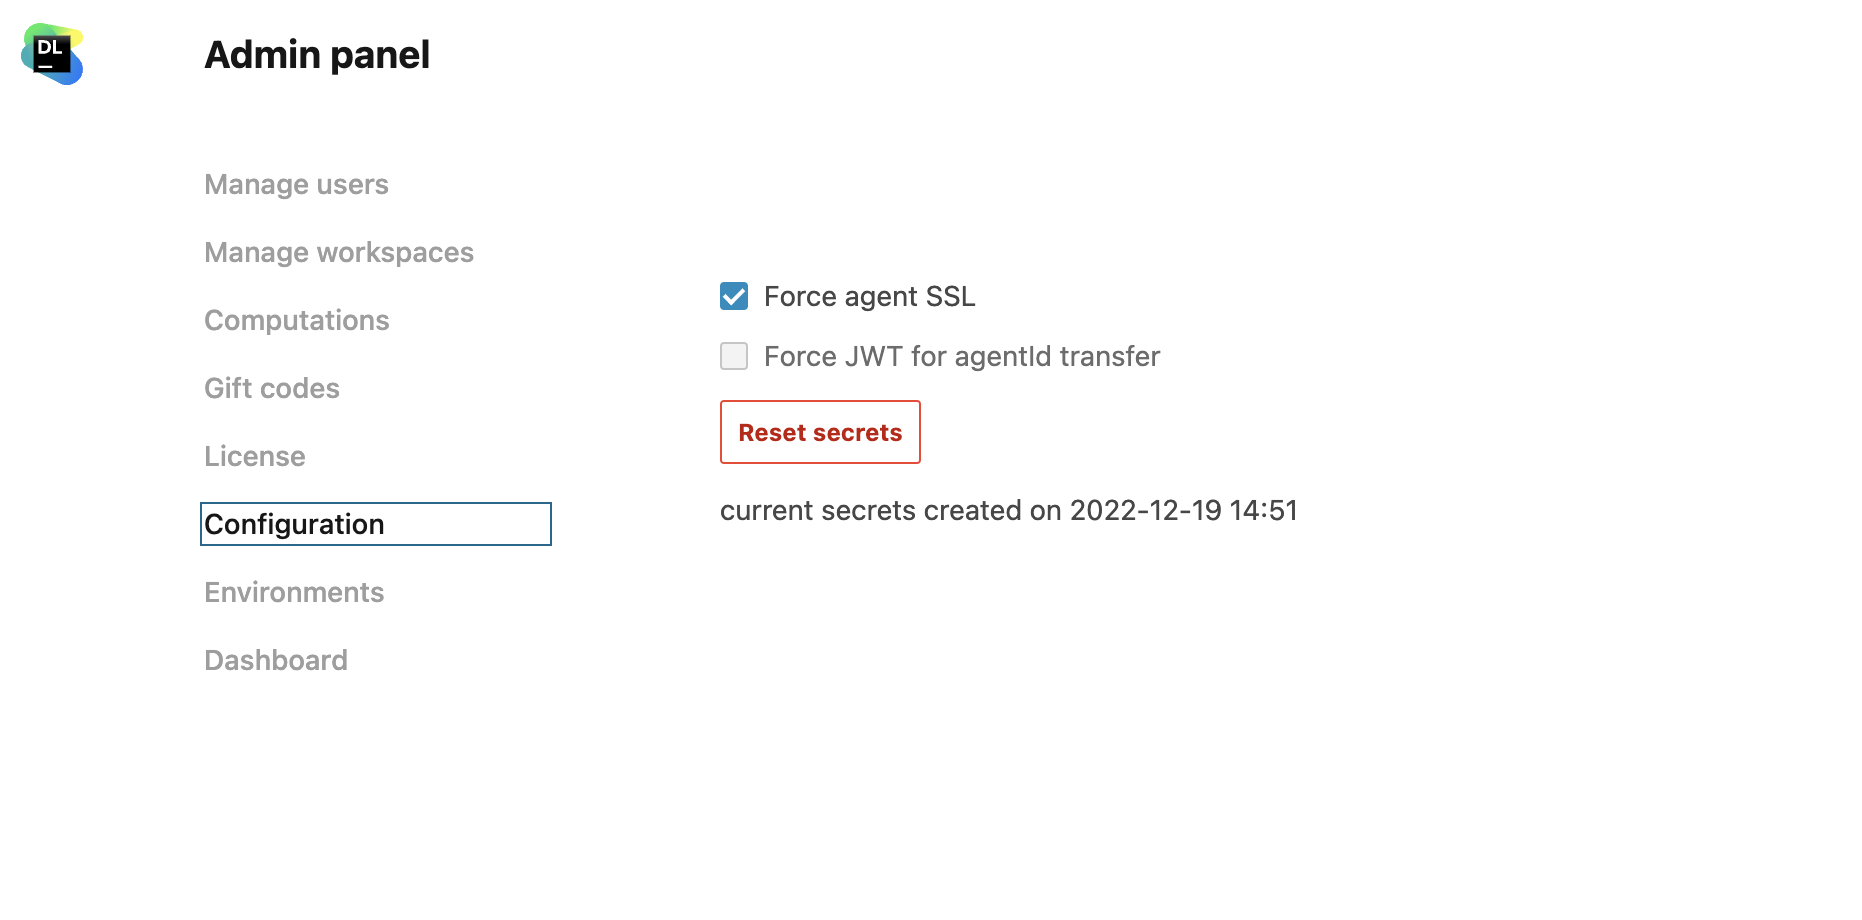
Click the avatar in the upper right corner and select Admin panel from the menu.
From the Admin panel, select Configuration.
Select the Force agent SSL checkbox.
Click the avatar in the upper right corner and select Admin panel from the menu.
From the Admin panel, select Configuration.
Click the Reset secrets button.
