Create a MySQL data source using named pipes
note
You need to create and open a project from the Welcome Screen. Only after that you will see the DataGrip interface and will be able to create connections.
Named pipes provide a way for communication among processes that run on the same machine. By using named pipes, you can send your data without having the performance penalty that involves the network stack.
Just like you have a server that listens to an IP address and port for incoming requests, a server can also set up a named pipe that can listen for requests. In both cases, the client process must know the address or a pipe name to which it should send the request.
The default pipe name for the MySQL server is \\.\pipe\MySQL.
Windows only
DataGrip must be on the host where the server is running (MySQL 8.0 Reference Manual at dev.mysql.com)
To ensure that named pipes are enabled, run the following code:
SHOW GLOBAL VARIABLES LIKE 'named_pipe'.If the
named_pipevariable has theONvalue, skip Step 1.
Run the installation wizard of the MySQL server.
On the Type and Networking dialog, select the Named Pipe checkbox. You can change the pipe name or leave the default value.
Finish all the steps of the installation wizard and start the MySQL server.

Open the my.ini configuration file in a text editor.
Add the
enable-named-pipeparameter to themysqldsection. Consider the following example of themysqldsection:[mysqld] # The next three options are mutually exclusive to SERVER_PORT below. # skip-networking enable-named-pipe # shared-memory # shared-memory-base-name=MYSQL # The Pipe the MySQL Server will use socket=MYSQLSave changes and restart the MySQL server.
In the command line, run
mysql --help. Scroll down to the end of the Options section.
To connect to the database, create a data source that will store your connection details. You can do this using one of the following ways:
In the main menu, go to File | New | Data Source and select MySQL.
In the Database Explorer (View | Tool Windows | Database Explorer) , click the New icon (
) in the toolbar. Navigate to Data Source and select MySQL.

Check if there is a Download missing driver files link at the bottom of the connection settings area. Click this link to download drivers that are required to interact with a database. For a direct download link, refer to the JetBrains JDBC drivers page.
Location for the downloaded JDBC drivers is the DataGrip configuration directory.

You can also use your drivers for the database instead of the provided ones. For more information about connecting to a database with your driver, refer to Add a user driver to an existing connection.
If there is no Download missing driver files link, then you already have the required drivers.
On the Advanced tab, find the
serverTimezoneparameter in the list of options. Double-click the Value cell and type your server timezone (for example,UTC).
Click the General tab.
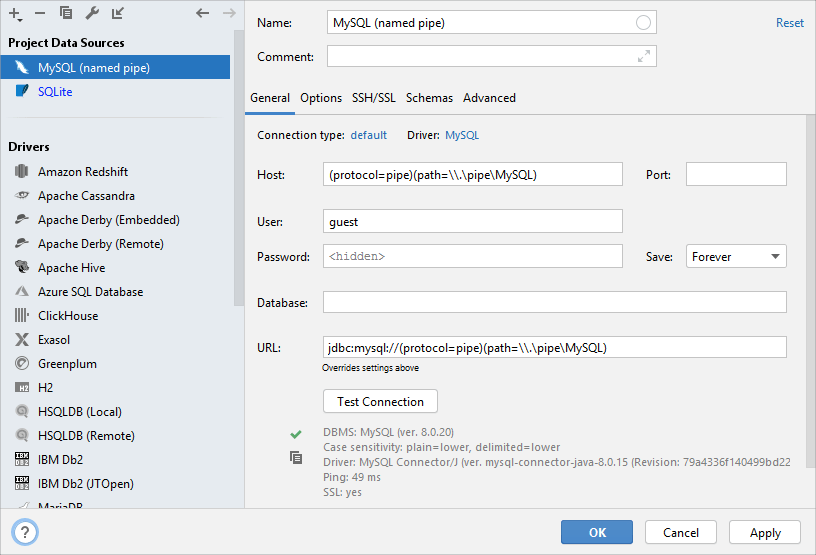
In the Host field, type the following text:
(protocol=pipe)(path=\\.\pipe\MySQL), whereMySQLis the pipe name.Alternatively, in the Connection type list, select Unix Socket and type or select the path to the pipe:
\ .\. \pipe \MySQL Ensure that the connection to the database can be established using the provided details. To do that, click the Test Connection link at the bottom of the connection details area.

In case of any connection issues, refer to the Cannot connect to a database page.
(Optional) By default, only the default schema is introspected and available to work with. If you also want to work with other schemas, in the Schemas tab, select them for the introspection.

Click OK to create the data source.
Find your new data source in Database Explorer () .
For more information about Database Explorer, see the corresponding reference topic.
tip
To see more schemas under your new data source node, click the N of M button and select the ones you need. DataGrip will introspect and show them.

For more information about displaying schemas in Database Explorer, refer to the Show all databases or schemas tutorial.
For more information about working with database objects in DataGrip, refer to Database objects.
To write and run queries, open the default query console by clicking the data source and pressing .
To view and edit data of a database object, open Data editor and viewer by double-clicking the object.
