Server-powered modals with HTMX
Create modal dialogs on the server.
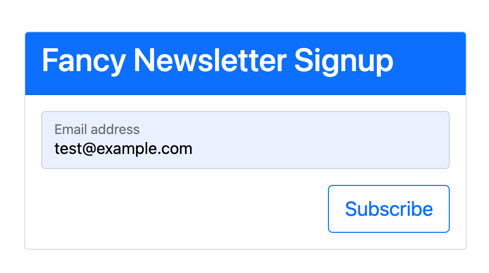
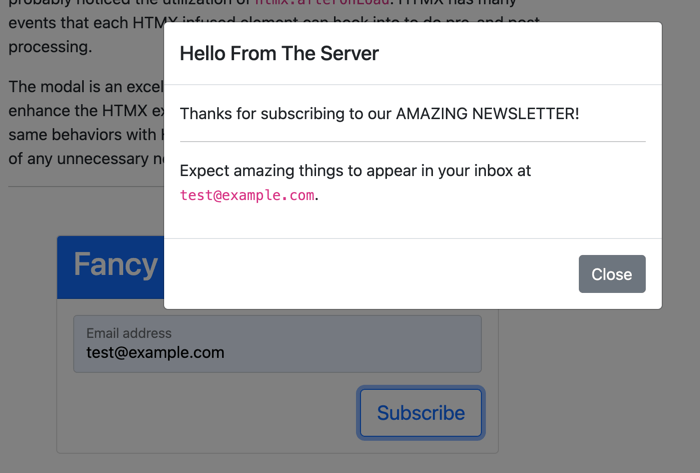
Modals are a powerful way to get a user's attention when you're acknowledging their action. A modal typically contains the most important information represented with a sense of urgency. If you're a modal fan, we'll recreate a typical newsletter signup form with a follow-up modal confirmation to display our user's input, in this case, their email address. In true HTMX fashion, we'll be generating our modal server-side.
Note, this sample requires a bit of JavaScript compared to our previous work, but it's an excellent introduction to the events made available by HTMX. Events give us opportunities to execute JavaScript before, during, or after an HTMX request. In this case, we'll be easing our modal into view with some optional JavaScript. You could forgo the JavaScript for an immediate modal experience.
This time, unlike our previous samples where we added HTMX attributes to individual elements, we'll be leveling up an HTML form with several inputs. By design, any input within an HTMX form will be included as a parameter on the subsequent HTTP request.

So first, let's take a look at the HTML that will trigger our modal. In our newsletter form, the subscribe button will submit all of our user's information.
<div class="card m-5">
    <div class="card-header bg-primary text-white">
        <h2>Fancy Newsletter Signup</h2>
    </div>
    <div class="card-body">
        <form
            id="newsletter"
            hx-post="@Url.Page("06_Modal", "Modal")"
            hx-target="#modals-here"
            hx-trigger="submit">

            <div class="form-floating mb-3">
                <input type="email"
                       name="email"
                       required class="form-control" id="email" placeholder="name@example.com">
                <label for="email">Email address</label>
            </div>
            <button type="submit" class="btn btn-outline-primary btn-lg float-end">
                Subscribe
            </button>
        </form>
        <div id="modals-here"></div>
    </div>
</div>
When the user submits the form, we'll receive an HTML response powered by the following Razor partial.
@model Exercises.Pages.NewsletterSignup @{
ArgumentNullException.ThrowIfNull(Model); }

<div
	id="modal-backdrop"
	class="modal-backdrop fade"
	style="display:block;"
></div>
<div id="modal" class="modal fade" tabindex="-1" style="display:block;">
	<div class="modal-dialog modal-dialog-centered">
		<div class="modal-content">
			<div class="modal-header">
				<h5 class="modal-title">Hello From The Server</h5>
			</div>
			<div class="modal-body">
				<p>Thanks for subscribing to our AMAZING NEWSLETTER!</p>
				<hr />
				<p>
					Expect amazing things to appear in your inbox at
					<code>@Model.Email</code>.
				</p>
			</div>
			<div class="modal-footer">
				<button type="button" class="btn btn-secondary" onclick="closeModal()">
					Close
				</button>
			</div>
		</div>
	</div>
</div>
Bootstrap modals are invisible by default, only being viewable when decorated with the show class. In this case, we exclude the CSS classes to ease them into the client's screen after the HTML is loaded. So let's look at that JavaScript now, and a peek at more HTMX event handlers.
let newsletter = document.getElementById("newsletter");
newsletter.addEventListener("htmx:afterOnLoad", () => {
	const backdrop = document.getElementById("modal-backdrop");
	const modal = document.getElementById("modal");

	setTimeout(() => {
		modal.classList.toggle("show");
		backdrop.classList.toggle("show");
	}, 10);
});
A few things to note about this event handler:
- The event handler is added to the newsletter form, which will trigger when the form is submitted.
- The HTML response is placed on the page but is invisible due to the lack of a
showclass. After adding the HTML, we toggle theshowclass after a10mstimeout. The timeout is an arbitrary time meant to give HTMX time to settle the HTML into the DOM. - It's all optional vanilla JavaScript meant to enhance the experience with animation.
When we enter an email address into the signup form, we get a modal that slides into view. Again, a smooth server-side powered experience brought to you by HTMX and a bit of JavaScript.

In the next section, we'll see how to implement server-powered tabs. It's an interesting way to implement the common pattern.
