Getting Started
What is TeamCity Add-in?
If you use TeamCity continuous integration server to build and test your Visual Studio projects, TeamCity Add-in can help you access, execute, and analyze builds and tests on your TeamCity server without leaving Visual Studio.
You can get the most from TeamCity Add-in when working with centralized version control systems (VCS) (like Perforce, Subversion, or Team Foundation Server), where light feature branches are not a part of the workflow. For these VCSs, TeamCity Add-in provides the possibility to run personal builds so that you can test your local changes on your TeamCity server before you commit them to your VCS.
The TeamCity Add-in is a free Visual Studio extension that seamlessly integrates with Visual Studio 2010, 2012, 2013, 2015, 2017, 2019, and 2022 and with other JetBrains .NET tools such as ReSharper and dotCover.
Installation and Start
TeamCity Add-in is distributed as a part of dotUltimate installer, which you can download in several ways:
In your TeamCity web interface, choose My Settings and Tools under your username in the top right corner. Then, in the TeamCity Tools section on the right, click the Visual Studio Add-in download link.
Download any of compatible JetBrains .NET products, e.g. ReSharper or dotCover.
When the download is complete, close all Visual Studio instances, run the installer and follow its instructions to finish the installation.
Note that the installer will suggest that you install other JetBrains tools from the dotUltimate bundle or update the existing ones if necessary. You will be able to choose to install free 30-day trial versions of these products together with TeamCity Add-in or not to install them at all. For more information, refer to dotUltimate installation guide.
After installation, TeamCity Add-in's commands will be available under the menu in Visual Studio.
Connecting to a TeamCity server
To start using TeamCity Add-in, you need to establish a connection between it and your TeamCity server. More specifically, as different solutions can be built on different TeamCity servers, you need to link each solution that you work on with a TeamCity server.
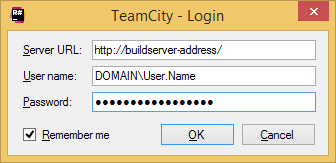
You can either choose in the main menu or right-click the cloud icon ![]() in the right part of the Visual Studio status bar and choose Login. In the dialog that appears, specify the URL of your TeamCity server and your credentials, and then click OK.
in the right part of the Visual Studio status bar and choose Login. In the dialog that appears, specify the URL of your TeamCity server and your credentials, and then click OK.

As soon as the connection established, the cloud icon in the Visual Studio status bar turns green ![]() and you are ready to view your commits and related builds in the My Changes window.
and you are ready to view your commits and related builds in the My Changes window.
Making Necessary Configurations
Enabling VCS support
To enable personal build, remote run, pre-tested commit, as well as to be able to view, commit, and revert your local changes in the Local Changes window, you need to select the VCS you use for your solution in the TeamCity Add-in options (). Supported VCSs include Perforce, Subversion, and Team Foundation Server.
To configure the file system browser to navigate from your changes, external diff viewer and customized pre-tested commit message, use the General tab ().
Perforce
Check the Perforce support box and specify the Perforce client to use — use the client detected via the Path environment variable or specify the path to the client explicitly.
In the Connection Settings section, specify the mandatory Server, User name and Workspace settings and the optional Password and charset. Check the details on the checkout paths in this section. Test your connection settings.
Save your VCS configuration.
Subversion
Check the Subversion support box and specify the Subversion client to use — use the client detected via the Path environment variable or specify the path to the client explicitly.
In the Login Settings section, select one of the options.
Configure the directories where TeamCity Add-in will look for changes: use the automatically detected directories or specify the directories explicitly, including the externals.
Save your VCS configuration.
TFS
Check the TFS support box. The settings will be detected automatically.
Configuring Diff Viewer
To be able to view diffs for local changes in the Local Changes window, you need to configure an external diff tool of your choice in the TeamCity Add-in options ().