Connect to a remote server from JetBrains Rider
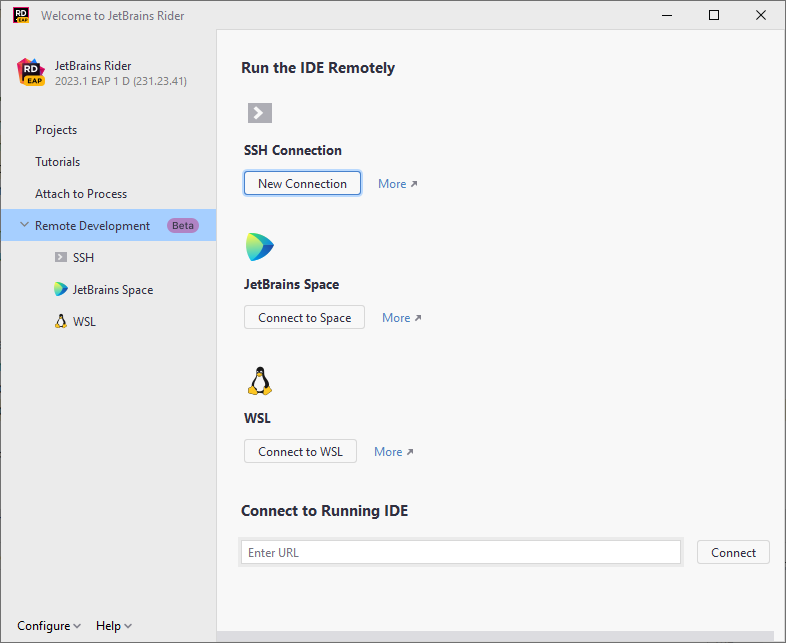
To start remote development session from JetBrains Rider, use the Remote Development option on the welcome screen or choose from the menu.

Connection via SSH
Connect to a remote server and open the remote project
Ensure you have the Remote Development Gateway plugin enabled.
On the JetBrains Rider welcome screen, select Remote Development. Alternatively, go to in the main menu.
Under SSH Connection, click New Connection.
If you have the IDE already running on the remote server, and you have a connection link, you can use the Connect to Running IDE section.
Configure the remote server connection parameters and click Check Connection and Continue to make sure the connection to the remote server is successful.
On the next page of the wizard, in the IDE version field, select the source of the remote IDE that you want to use.
Use one of the following ways to get an IDE installer:
Automatically fetch from JetBrains installers storage - default variant.
Your remote server must have a network connection to JetBrains URLs:
https://code-with-me.jetbrains.com https://download.jetbrains.com https://download-cf.jetbrains.com https://cache-redirector.jetbrains.comFetch from your company's internal storage. In this case, you need to click Other options and select Use download link. It is helpful if remote machines don't have an Internet connection to JetBrains' websites or your organization uses some custom builds.
Upload from your local machine. In this case, click Other options and select Upload installer file. You need to get the IDE
.tar.gzarchive from the JetBrains website by yourself in advance.
Click Download and Start IDE.
JetBrains Rider starts JetBrains Gateway, which downloads the IDE backend, launches, and opens JetBrains Client with your remote project.
For more information about starting to work with a separate JetBrains Gateway installer, refer to JetBrains Gateway.
For more information about adding plugins or SDK, refer to the appropriate Getting Started section.
Connect to a project running on WSL2
You can configure your IDE backend to launch directly in WSL2.
Before you start connecting to WSL, make sure the following prerequisites are met:
You have the Windows 10 or 11 version installed on your machine with the Ubuntu 20.04 version installed under WSL2.
You have WSL2 configured on your Windows machine. For more information, refer to the WSL2 configuration section.
You have at least 200 GB of available space, 8 GB RAM, and 4 CPUs.
You use the latest EAP build of JetBrains Gateway.
You use the latest EAP version of the backend IDE.
Connect to WSL
Ensure you have the Remote Development Gateway plugin enabled.
On the JetBrains Rider welcome screen, select Remote Development.
Under Remote Development, select WSL.
From the options on the right, click New Connection.
On the next page, select the WSL instance and click Next.
On the next page, select the IDE version and the project you want open. Click Start IDE and Connect.
The connection is established, the backend IDE is downloaded, and the project is opened in JetBrains Client.
Connect through Space
You can perform a custom orchestration on your remote server and use, for example, a Docker file, or any other automation that fits with your practices. This could be creating a new virtual image every night, taking the empty environment, and checking out the latest source code, with a fresh clean image ready to use in the morning.
However, if you work in Space, the integration with JetBrains Rider lets you automate all processes in configuring your dev environment that you can use for software development.
Space automates for you the following processes:
Creating a remote virtual machine
Starting a Docker image with appropriate libraries and tools
Downloading and warming up the backend IDE so you can easily open your project and dive into coding right away.
Connect via Space
Launch JetBrains Rider.
On the starting page, select JetBrains Space and click Connect to Space.
Enter your organization URL and click Continue in Browser.
In the browser window that opens, click Accept to grant the required permissions. If you are not yet logged in to the Space web app, you will also be prompted to enter your Space username and password. You will be then redirected back to your JetBrains Rider.
Click New Environment and configure a new dev environment (skip this step if your project already has the needed dev environment):
Select a repository and a branch where you want to create a dev environment.
In the Devfile list, select a devfile (if it exists in your Space project).
In the IDE list, select an IDE to be used in the dev environment.
In the Instance type list, select a type of the virtual machine based on the resources you need and computation credits.
In the Environment name field, enter a name for the environment to distinguish it from other environments.
Click Create Environment to complete the environment creation.
In the list of dev environments, select an environments to which you want to connect.
This will initiate a connection to the remote IDE. Once the connection is successfully established, JetBrains Rider will open JetBrains Client with your Space project where you can work further.