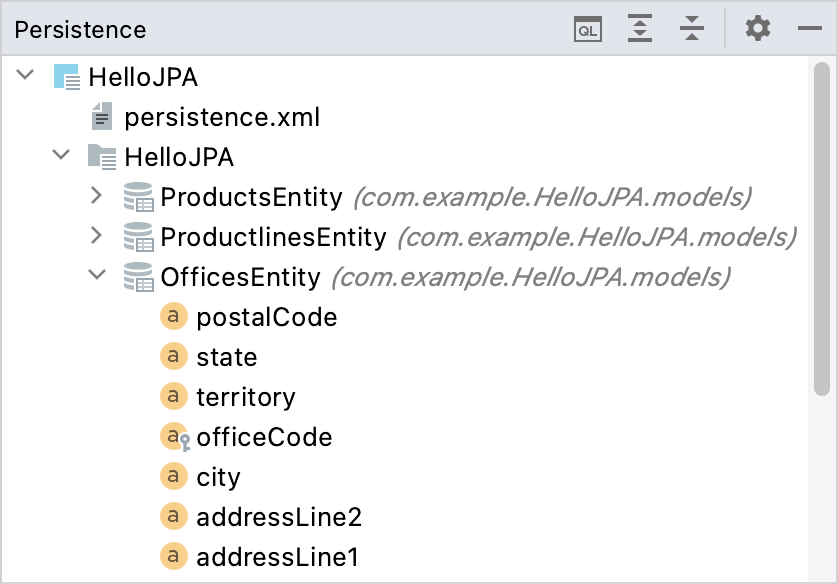
Persistence tool window
If you have at least one module with the JPA facet in your project, you can use the Persistence tool window to view and manage various JPA items: configuration files, persistence units, and managed entities (persistent classes and fields).

Navigate to entity definitions
To navigate from an entity in the Persistence tool window to the corresponding source code definition in the editor, do one of the following:
Double-click a field.
Select a field or class and press F4.
Right-click a field or class and select Jump to Source.
Create new entities
Use the New action in the Persistence tool window to create XML configuration files, persistence units, entity classes and fields with their getters and setters, embeddable objects, mapped superclasses, entity listeners, object-relational mappings, and so on.
Select an item and press Alt+Insert.
Right-click an item and select New.
View entity relationship diagrams (ERD)
Right-click a managed entity and select Entity Relationship Diagram.
Associate persistence units with data sources
Right-click a module, persistence unit, or entity, and select Assign Data Sources.
Select necessary data sources for relevant persistence units and click OK.
With this association, IntelliJ IDEA will validate the source code that references database tables against the corresponding data sources. Also, the JPA console will use proper database connection settings, and you won't need to specify them manually.
Associate persistence units with naming strategies
Right-click a module, persistence unit, or entity, and select Assign Naming Strategies.
Select necessary naming strategies for relevant persistence units and click OK.
Run JPQL queries
Right-click a persistence unit or entity and select Console or click
in the toolbar Ctrl+Shift+F10.
This will open the JPA console where you can write and execute JPQL queries.
Generate persistence mappings
You can generate managed entity classes and object-relational mappings from a database schema represented by a data source, from entity beans in an EJB facet with an associated deployment descriptor file ejb-jar.xml, or from a Hibernate object-relational mapping file .hbm.xml.
Right-click a module or a persistence unit, point to Generate Persistence Mapping and select By Database Schema.
Select the source and output options and click OK.
Import Database Schema dialog options
Choose Data Source | Specify the data source. |
Package | Specify the destination package for your entity classes. |
Entity prefix | Specify one or more characters as a prefix for your entity class names. |
Entity suffix | Specify one or more characters as a suffix for your entity class names. |
Prefer primitive types | Prefer primitive field types to object reference types (for example, prefer |
Show default relationships | Analyze foreign keys in tables and suggest creating corresponding relationships (for example, one-to-one, one-to-many). |
Database Schema Mapping | Select the tables and columns to be mapped. Edit the names of entity classes and their persistent fields (the Map As column). Adjust the field types (the Mapped Type column). |
Add to Persistence Unit | Associate the generated entity classes with the selected persistence unit. Click |
Generate Column Properties | Include column properties, such as |
Generate Single Mapping XML | Store object-relational mappings for all the generated entity classes in one XML file. |
Generate Separate XML per Entity | Create an individual object-relational mapping file for every generated entity class. |
Generate JPA Annotations (Java 5) | Add mapping information to the source code of the generated entity classes as annotations. |
Right-click a module or a persistence unit, point to Generate Persistence Mapping and select By Entity Beans.
Select the source and output options and click OK.
Import Entity Beans dialog options
Choose EJB Facet | Specify the EJB facet with an associated deployment descriptor file ejb-jar.xml. |
Package | Specify the destination package for your entity classes. |
Entity prefix | Specify one or more characters as a prefix for your entity class names. |
Entity suffix | Specify one or more characters as a suffix for your entity class names. |
Prefer primitive types | Prefer primitive field types to object reference types (for example, prefer |
Show default relationships | Analyze foreign keys in tables and suggest creating corresponding relationships (for example, one-to-one, one-to-many). |
Right-click a module or a persistence unit, point to Generate Persistence Mapping and select By Hibernate Mappings.
Select the source and output options and click OK.
Import Hibernate Mappings dialog options
Choose Hibernate XML | Specify the Hibernate object-relational mapping file .hbm.xml. |
Package | Specify the destination package for your entity classes. |
Entity prefix | Specify one or more characters as a prefix for your entity class names. |
Entity suffix | Specify one or more characters as a suffix for your entity class names. |
Add to Persistence Unit | Associate the generated entity classes with the selected persistence unit. Click |
Generate Single Mapping XML | Store object-relational mappings for all the generated entity classes in one XML file. |
Generate Separate XML per Entity | Create an individual object-relational mapping file for every generated entity class. |
Generate JPA Annotations (Java 5) | Add mapping information to the source code of the generated entity classes as annotations. |